Making an Antique-Style Pepper Grinder
Looking for an interesting attention getter for your craft sales, a really cool gift for that special friend, or another way to impress your spouse? Have we got a deal for you!!!
Woodcraft is marketing a set of kits of an Antique-Style Pepper Grinders, in Antique Brass or Antique Copper. The process for both is the same, and total time for completion of the project is less than an hour.
Materials Required:
- Antique Pepper Grinder kit from Woodcraft
- 3x3x6-in wood, your choice of species
- Cone live center
- Drive Center
- 1 1/16-in Forstner Bit
- Jacobs chuck to fit your tail-stock (#2 morse taper) and/or
- 4” or 6"- Forstner bit extension with #2 morse taper
- Sandpaper selection
- Scroll chuck with #1 jaws (1-in od minimum)
- Tool: Spindle roughing gouge, spindle gouge, parting tool, curved scraper
- Finish of your choice (I use 50/50 shellac for seal coat, and Doctors Woodshop Pens Plus for top coat..awesome finish!!!)

Process:
- Locate centers on both ends of your 6-inch blank and mount between centers. Make sure tailstock, banjo and tool rest are locked down in the proper position. Lathe speed should be about 1800 RPM
- Turn the blank to a cylinder of 2 1/4” diameter at the top end..bottom end can be same or a little larger
- Turn a tenon of 3/8” on the bottom, 1 1/2” in diameter. NOTE: if you have another scroll chuck with the #2 jaws, you can make the tenon 2 1/4 "- 2 1/2” in diameter
- Mount the blank to the scroll chuck…verify the centers are lining up by checking with the live center point
- Using the Jacobs chuck or the Forstner bit extension, drill a 1 1/16” hole 4” deep. Clear the shavings out every 1/2 inch or 1-inch
- Remove the drill bit apparatus, reinstall the cone live center in the tailstock, registering into the 1 1/16” hole you have just created
- Shape the outside to what your imagination demands or permits. I find a long gentle cove, about 1/4 or 3/8 inch deep looks and feels good
- The body should be 3 1/2 to 4-inches long…the rest is waste. Remember your hole is 4 ‘ deep
- Sand to your satisfaction
- Apply several seal coats and then at LEAST FIVE COATS of final finish…..make sure you have sanded and finished the top surface
- Measure and mark where you determine the bottom of the hole to be…subtract 1/8 to 1/4 inch (good insurance!!)
- Using the parting tool, and making sure you are at 90-egrees, part through the blank. If you measured well, you run into the hole
- Remount he blank onto the scroll chuck, but now the top is toward the headstock.
- Clean up the bottom surface with the spindle gouge or scraper, sand and finish
- The top mechanism mounts with two screws…a good idea is to drill pilot holes and then screw it down
- You will need to remove and remount the crank…for packaging it is reversed.
So…you have now created a handsome item, usually marketed in craft shows for $35-$65.
Not bad, eh?

Related Posts
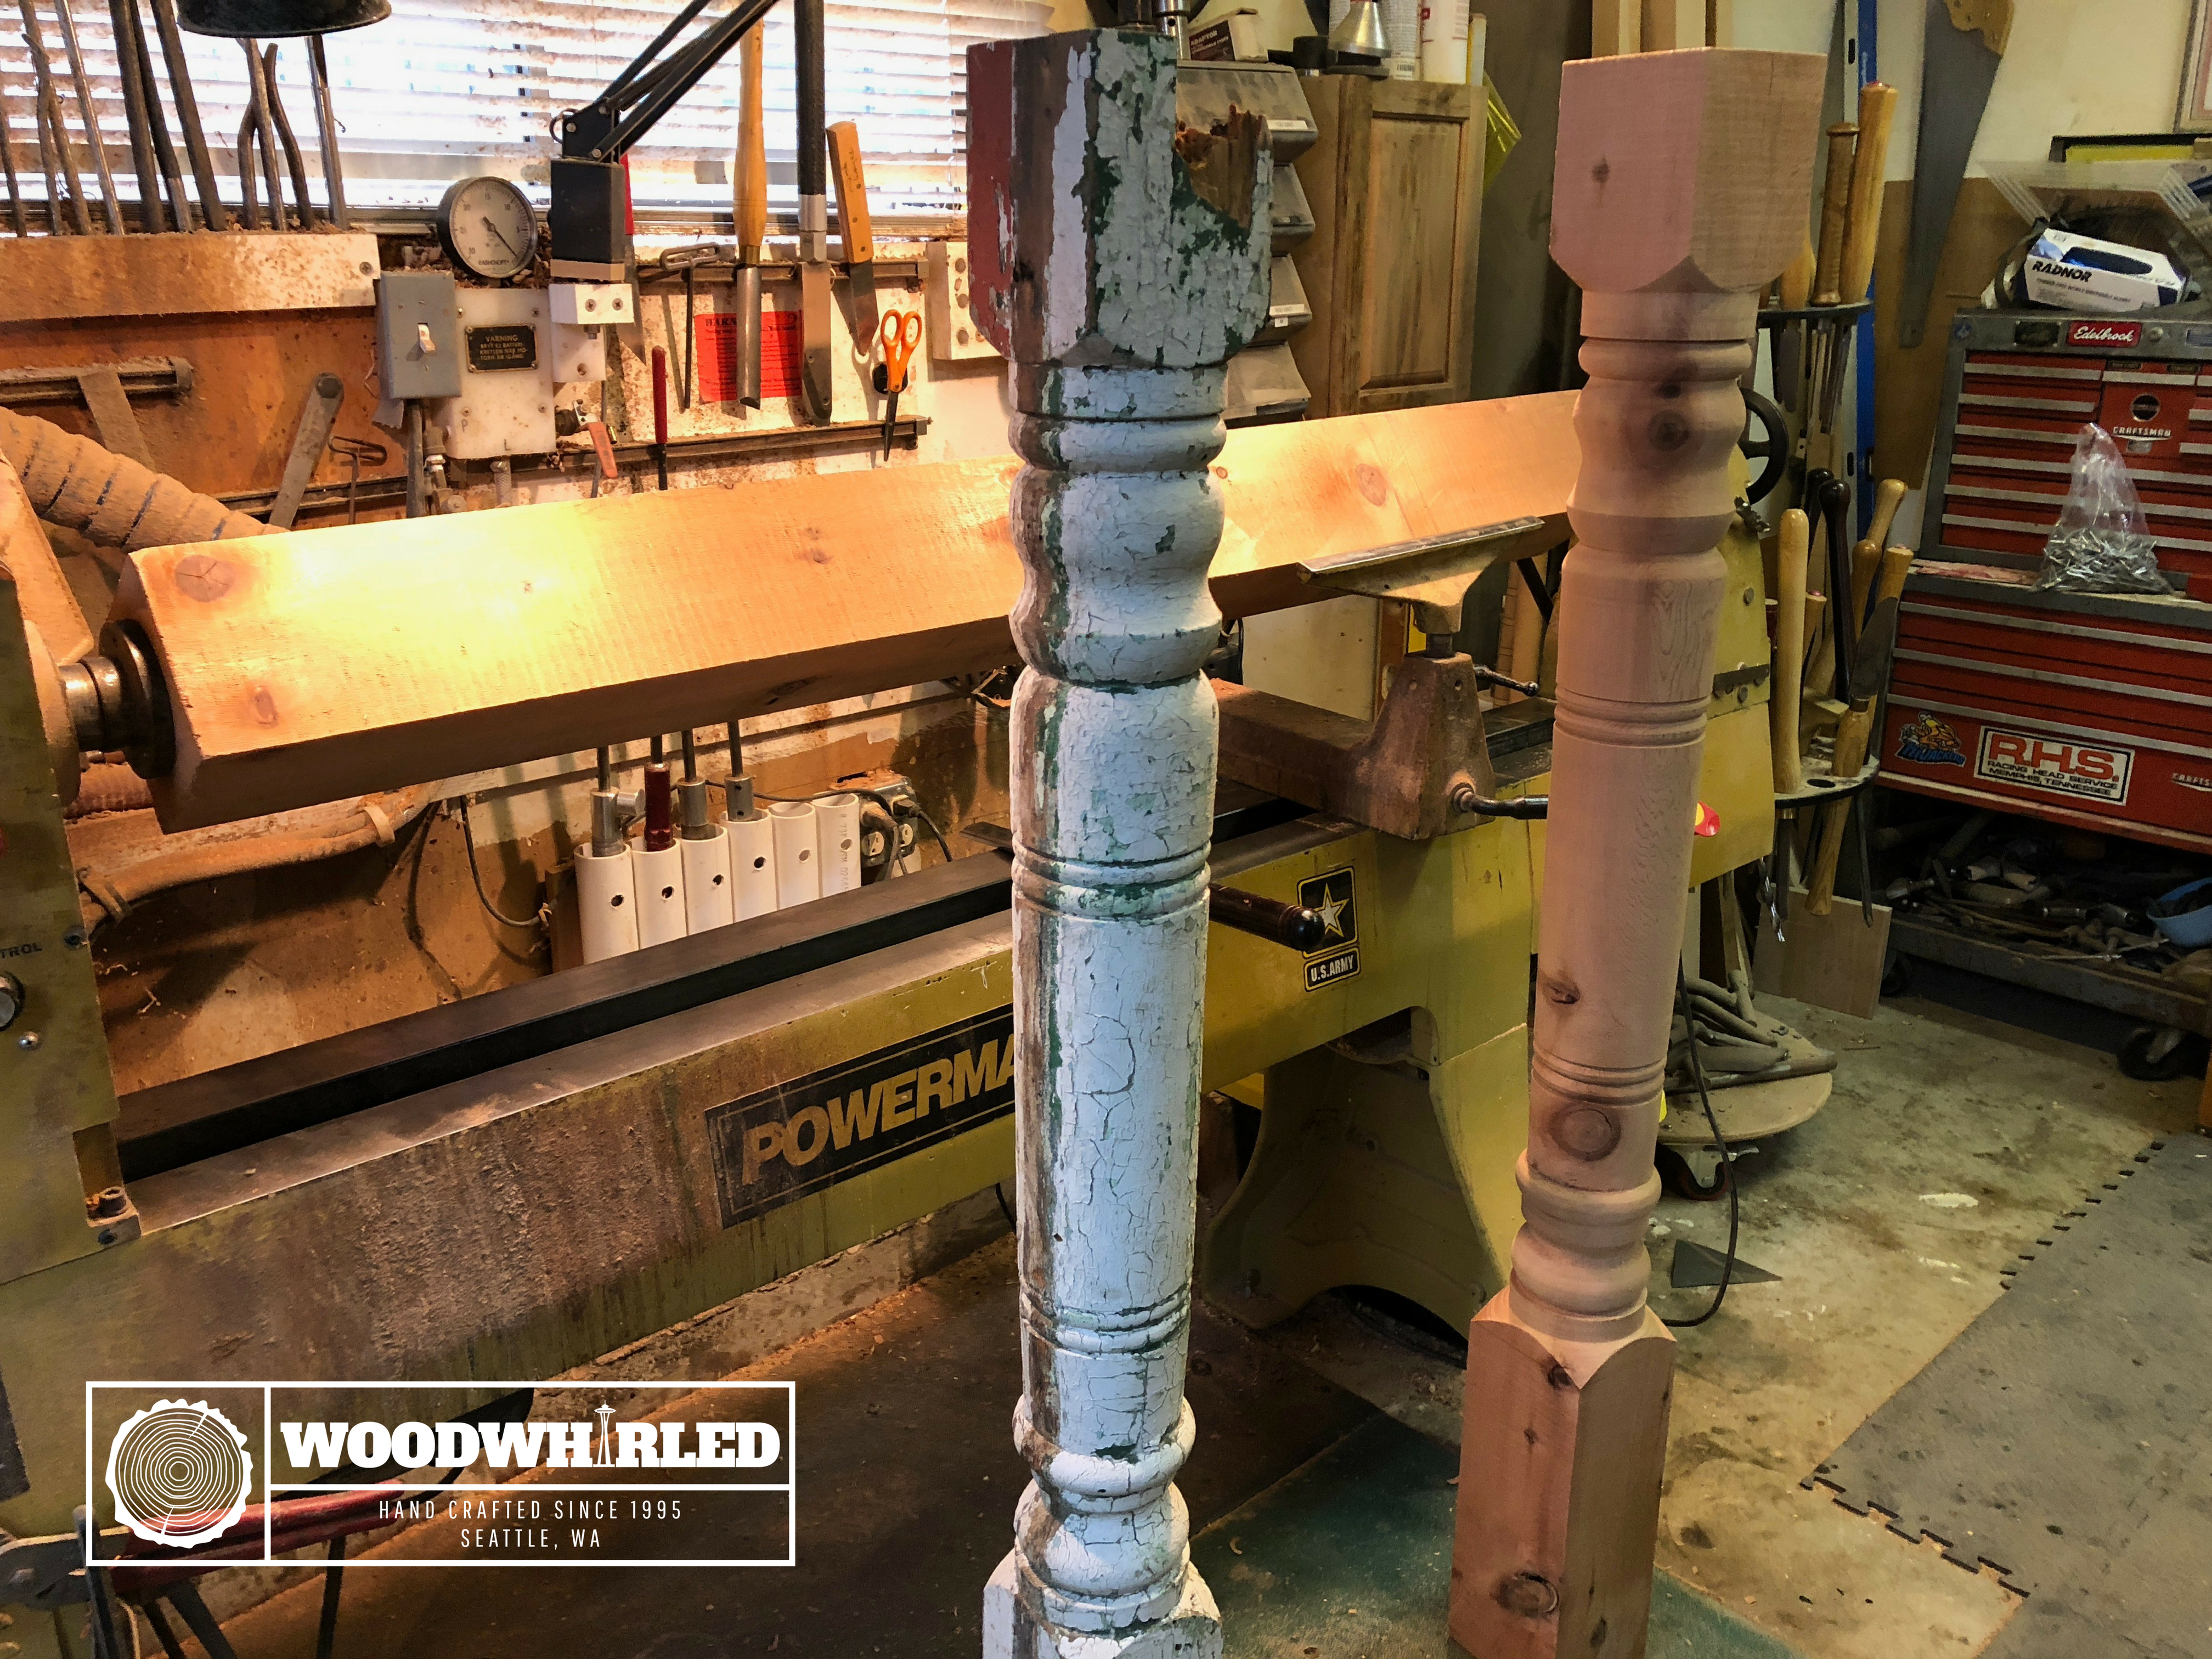
Turning project: Architectural columns
I recently accepted a project to turn 3 columns for a house in Seattle that was more than 100-years old. The surviving ...
Read More
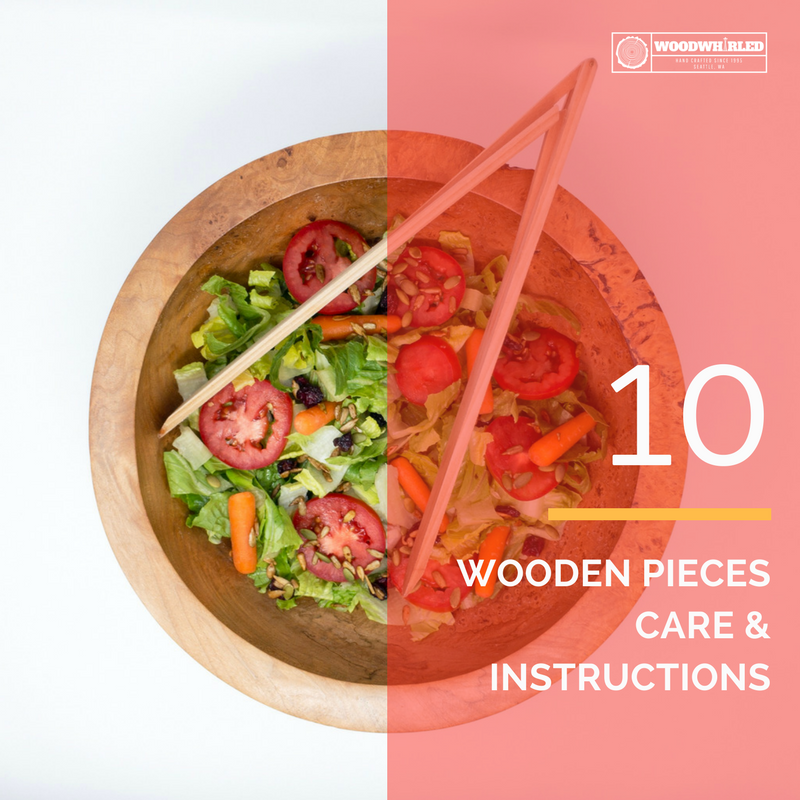
Wooden Pieces, Care & Instructions
Congratulations! You are a proud owner of an original WoodWhirled piece.
Wooden pieces are a nice way to add a little wa...
Read More
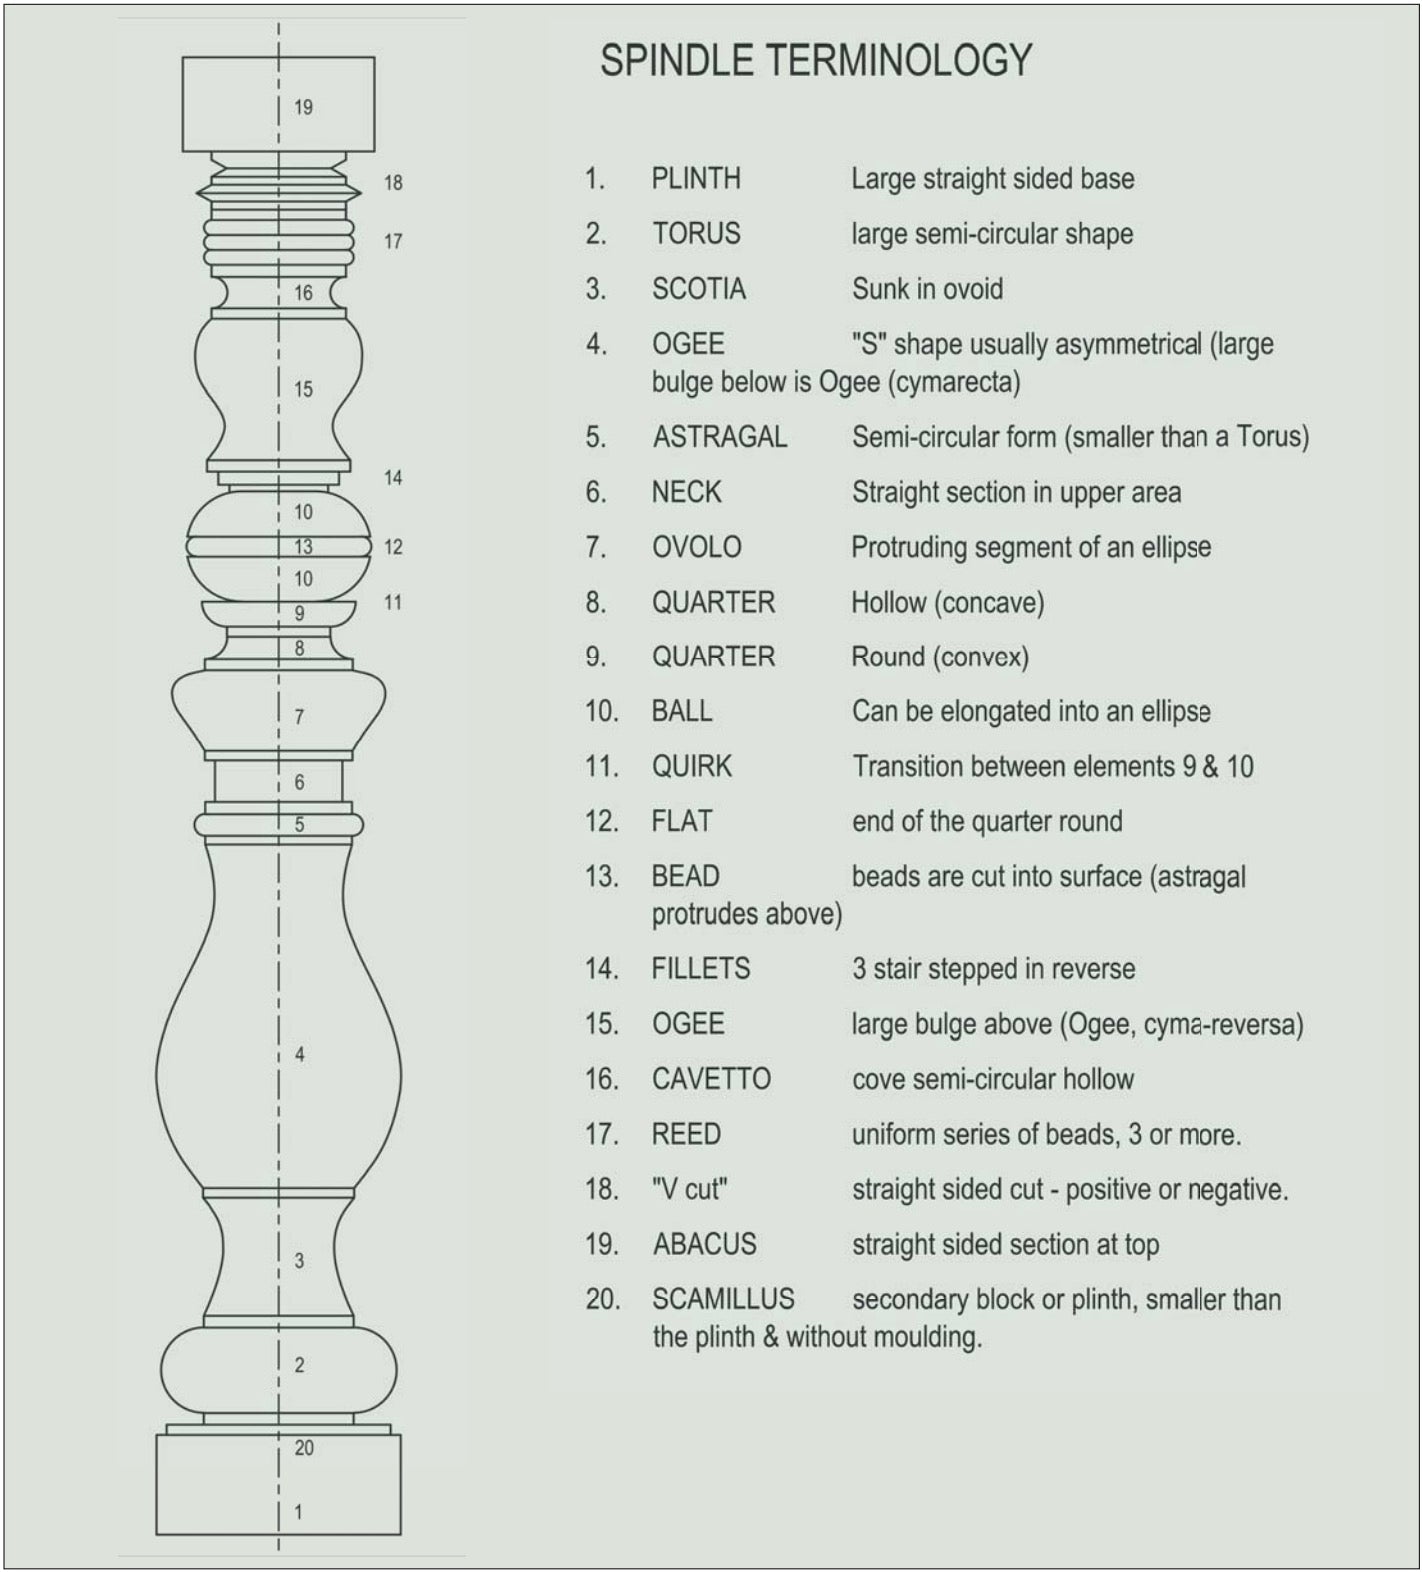
Spindle Nomenclature - Shapes and Individual Features to Create Spindle Work
We have all chucked up a turning square of one kind or another and, with the set of tools common to most, roughed-out, p...
Read More
84 comments
https://opviewer.com/
lstiles135@gmail.com
https://www.google.tn/url?sa=t&url=https://massage2203.blogspot.com/2022/07/5-of-best-back-rub-weapons.html
https://www.google.sn/url?sa=t&url=https://massage2203.blogspot.com/2022/07/5-of-best-back-rub-weapons.html
https://www.google.sk/url?sa=t&url=https://massage2203.blogspot.com/2022/07/5-of-best-back-rub-weapons.html
https://www.google.si/url?sa=t&url=https://massage2203.blogspot.com/2022/07/5-of-best-back-rub-weapons.html
https://www.google.sh/url?sa=t&url=https://massage2203.blogspot.com/2022/07/5-of-best-back-rub-weapons.html
https://www.google.se/url?sa=t&url=https://massage2203.blogspot.com/2022/07/5-of-best-back-rub-weapons.html
https://www.google.rw/url?sa=t&url=https://massage2203.blogspot.com/2022/07/5-of-best-back-rub-weapons.html
https://www.google.ru/url?sa=t&url=https://massage2203.blogspot.com/2022/07/5-of-best-back-rub-weapons.html
https://www.google.rs/url?sa=t&url=https://massage2203.blogspot.com/2022/07/5-of-best-back-rub-weapons.html
https://www.google.ro/url?sa=t&url=https://massage2203.blogspot.com/2022/07/5-of-best-back-rub-weapons.html
https://www.google.pt/url?sa=t&url=https://massage2203.blogspot.com/2022/07/5-of-best-back-rub-weapons.html
https://www.google.ps/url?sa=t&url=https://massage2203.blogspot.com/2022/07/5-of-best-back-rub-weapons.html
https://www.google.pl/url?sa=t&url=https://massage2203.blogspot.com/2022/07/5-of-best-back-rub-weapons.html
https://www.google.no/url?sa=t&url=https://massage2203.blogspot.com/2022/07/5-of-best-back-rub-weapons.html
https://www.google.nl/url?sa=t&url=https://massage2203.blogspot.com/2022/07/5-of-best-back-rub-weapons.html
https://www.google.mw/url?sa=t&url=https://massage2203.blogspot.com/2022/07/5-of-best-back-rub-weapons.html
https://www.google.mv/url?sa=t&url=https://massage2203.blogspot.com/2022/07/5-of-best-back-rub-weapons.html
https://www.google.mu/url?sa=t&url=https://massage2203.blogspot.com/2022/07/5-of-best-back-rub-weapons.html
https://www.google.ms/url?sa=t&url=https://massage2203.blogspot.com/2022/07/5-of-best-back-rub-weapons.html
https://www.google.mn/url?sa=t&url=https://massage2203.blogspot.com/2022/07/5-of-best-back-rub-weapons.html
https://www.google.mk/url?sa=t&url=https://massage2203.blogspot.com/2022/07/5-of-best-back-rub-weapons.html
https://www.google.mg/url?sa=t&url=https://massage2203.blogspot.com/2022/07/5-of-best-back-rub-weapons.html
https://www.google.me/url?sa=t&url=https://massage2203.blogspot.com/2022/07/5-of-best-back-rub-weapons.html
https://www.google.md/url?sa=t&url=https://massage2203.blogspot.com/2022/07/5-of-best-back-rub-weapons.html
https://www.google.lv/url?sa=t&url=https://massage2203.blogspot.com/2022/07/5-of-best-back-rub-weapons.html
https://www.google.lu/url?sa=t&url=https://massage2203.blogspot.com/2022/07/5-of-best-back-rub-weapons.html
https://www.google.lt/url?sa=t&url=https://massage2203.blogspot.com/2022/07/5-of-best-back-rub-weapons.html
https://www.google.lk/url?sa=t&url=https://massage2203.blogspot.com/2022/07/5-of-best-back-rub-weapons.html
https://www.google.li/url?sa=t&url=https://massage2203.blogspot.com/2022/07/5-of-best-back-rub-weapons.html
https://www.google.la/url?sa=t&url=https://massage2203.blogspot.com/2022/07/5-of-best-back-rub-weapons.html
https://www.google.kz/url?sa=t&url=https://massage2203.blogspot.com/2022/07/5-of-best-back-rub-weapons.html
https://www.google.kg/url?sa=t&url=https://massage2203.blogspot.com/2022/07/5-of-best-back-rub-weapons.html
https://www.google.jo/url?sa=t&url=https://massage2203.blogspot.com/2022/07/5-of-best-back-rub-weapons.html
https://www.google.je/url?sa=t&url=https://massage2203.blogspot.com/2022/07/5-of-best-back-rub-weapons.html
https://www.google.it/url?sa=t&url=https://massage2203.blogspot.com/2022/07/5-of-best-back-rub-weapons.html
https://www.google.is/url?sa=t&url=https://massage2203.blogspot.com/2022/07/5-of-best-back-rub-weapons.html
https://www.google.iq/url?sa=t&url=https://massage2203.blogspot.com/2022/07/5-of-best-back-rub-weapons.html
https://www.google.ie/url?sa=t&url=https://massage2203.blogspot.com/2022/07/5-of-best-back-rub-weapons.html
https://www.google.hu/url?sa=t&url=https://massage2203.blogspot.com/2022/07/5-of-best-back-rub-weapons.html
https://www.google.ht/url?sa=t&url=https://massage2203.blogspot.com/2022/07/5-of-best-back-rub-weapons.html
https://www.google.hr/url?sa=t&url=https://massage2203.blogspot.com/2022/07/5-of-best-back-rub-weapons.html
https://www.google.hn/url?sa=t&url=https://massage2203.blogspot.com/2022/07/5-of-best-back-rub-weapons.html
https://www.google.gr/url?sa=t&url=https://massage2203.blogspot.com/2022/07/5-of-best-back-rub-weapons.html
https://www.google.gp/url?sa=t&url=https://massage2203.blogspot.com/2022/07/5-of-best-back-rub-weapons.html
https://www.google.gm/url?sa=t&url=https://massage2203.blogspot.com/2022/07/5-of-best-back-rub-weapons.html
https://www.google.gl/url?sa=t&url=https://massage2203.blogspot.com/2022/07/5-of-best-back-rub-weapons.html
https://www.google.gg/url?sa=t&url=https://massage2203.blogspot.com/2022/07/5-of-best-back-rub-weapons.html
https://www.google.ge/url?sa=t&url=https://massage2203.blogspot.com/2022/07/5-of-best-back-rub-weapons.html
https://www.google.fr/url?sa=t&url=https://massage2203.blogspot.com/2022/07/5-of-best-back-rub-weapons.html
https://www.google.fm/url?sa=t&url=https://massage2203.blogspot.com/2022/07/5-of-best-back-rub-weapons.html
https://www.google.fi/url?sa=t&url=https://massage2203.blogspot.com/2022/07/5-of-best-back-rub-weapons.html
https://www.google.es/url?sa=t&url=https://massage2203.blogspot.com/2022/07/5-of-best-back-rub-weapons.html
https://www.google.ee/url?sa=t&url=https://massage2203.blogspot.com/2022/07/5-of-best-back-rub-weapons.html
https://www.google.dz/url?sa=t&url=https://massage2203.blogspot.com/2022/07/5-of-best-back-rub-weapons.html
https://www.google.dk/url?sa=t&url=https://massage2203.blogspot.com/2022/07/5-of-best-back-rub-weapons.html
https://www.google.dj/url?sa=t&url=https://massage2203.blogspot.com/2022/07/5-of-best-back-rub-weapons.html
https://www.google.de/url?sa=t&url=https://massage2203.blogspot.com/2022/07/5-of-best-back-rub-weapons.html
https://www.google.cz/url?sa=t&url=https://massage2203.blogspot.com/2022/07/5-of-best-back-rub-weapons.html
https://www.google.com/url?sa=t&url=https://massage2203.blogspot.com/2022/07/5-of-best-back-rub-weapons.html
https://www.google.com.vn/url?sa=t&url=https://massage2203.blogspot.com/2022/07/5-of-best-back-rub-weapons.html
https://www.google.com.uy/url?sa=t&url=https://massage2203.blogspot.com/2022/07/5-of-best-back-rub-weapons.html
https://www.google.com.ua/url?sa=t&url=https://massage2203.blogspot.com/2022/07/5-of-best-back-rub-weapons.html
https://www.google.com.tw/url?sa=t&url=https://massage2203.blogspot.com/2022/07/5-of-best-back-rub-weapons.html
https://www.google.com.tr/url?sa=t&url=https://massage2203.blogspot.com/2022/07/5-of-best-back-rub-weapons.html
https://www.google.com.sv/url?sa=t&url=https://massage2203.blogspot.com/2022/07/5-of-best-back-rub-weapons.html
https://www.google.com.sg/url?sa=t&url=https://massage2203.blogspot.com/2022/07/5-of-best-back-rub-weapons.html
https://www.google.com.sa/url?sa=t&url=https://massage2203.blogspot.com/2022/07/5-of-best-back-rub-weapons.html
https://www.google.com.qa/url?sa=t&url=https://massage2203.blogspot.com/2022/07/5-of-best-back-rub-weapons.html
https://www.google.com.py/url?sa=t&url=https://massage2203.blogspot.com/2022/07/5-of-best-back-rub-weapons.html
https://www.google.com.pr/url?sa=t&url=https://massage2203.blogspot.com/2022/07/5-of-best-back-rub-weapons.html
https://www.google.com.pk/url?sa=t&url=https://massage2203.blogspot.com/2022/07/5-of-best-back-rub-weapons.html
https://www.google.com.ph/url?sa=t&url=https://massage2203.blogspot.com/2022/07/5-of-best-back-rub-weapons.html
https://www.google.com.pe/url?sa=t&url=https://massage2203.blogspot.com/2022/07/5-of-best-back-rub-weapons.html
https://www.google.com.pa/url?sa=t&url=https://massage2203.blogspot.com/2022/07/5-of-best-back-rub-weapons.html
https://www.google.com.om/url?sa=t&url=https://massage2203.blogspot.com/2022/07/5-of-best-back-rub-weapons.html
https://www.google.com.ni/url?sa=t&url=https://massage2203.blogspot.com/2022/07/5-of-best-back-rub-weapons.html
https://www.google.com.ng/url?sa=t&url=https://massage2203.blogspot.com/2022/07/5-of-best-back-rub-weapons.html
https://www.google.com.na/url?sa=t&url=https://massage2203.blogspot.com/2022/07/5-of-best-back-rub-weapons.html
https://www.google.com.mz/url?sa=t&url=https://massage2203.blogspot.com/2022/07/5-of-best-back-rub-weapons.html
https://www.google.com.my/url?sa=t&url=https://massage2203.blogspot.com/2022/07/5-of-best-back-rub-weapons.html
https://www.google.com.mx/url?sa=t&url=https://massage2203.blogspot.com/2022/07/5-of-best-back-rub-weapons.html
https://www.google.com.mt/url?sa=t&url=https://massage2203.blogspot.com/2022/07/5-of-best-back-rub-weapons.html
https://www.google.com.ly/url?sa=t&url=https://massage2203.blogspot.com/2022/07/5-of-best-back-rub-weapons.html
https://www.google.com.lb/url?sa=t&url=https://massage2203.blogspot.com/2022/07/5-of-best-back-rub-weapons.html
https://www.google.com.kw/url?sa=t&url=https://massage2203.blogspot.com/2022/07/5-of-best-back-rub-weapons.html
https://www.google.com.kh/url?sa=t&url=https://massage2203.blogspot.com/2022/07/5-of-best-back-rub-weapons.html
https://www.google.com.jm/url?sa=t&url=https://massage2203.blogspot.com/2022/07/5-of-best-back-rub-weapons.html
https://www.google.com.hk/url?sa=t&url=https://massage2203.blogspot.com/2022/07/5-of-best-back-rub-weapons.html
https://www.google.com.gt/url?sa=t&url=https://massage2203.blogspot.com/2022/07/5-of-best-back-rub-weapons.html
https://www.google.com.gi/url?sa=t&url=https://massage2203.blogspot.com/2022/07/5-of-best-back-rub-weapons.html
https://www.google.com.gh/url?sa=t&url=https://massage2203.blogspot.com/2022/07/5-of-best-back-rub-weapons.html
https://www.google.com.fj/url?sa=t&url=https://massage2203.blogspot.com/2022/07/5-of-best-back-rub-weapons.html
https://www.google.com.et/url?sa=t&url=https://massage2203.blogspot.com/2022/07/5-of-best-back-rub-weapons.html
https://www.google.com.eg/url?sa=t&url=https://massage2203.blogspot.com/2022/07/5-of-best-back-rub-weapons.html
https://www.google.com.ec/url?sa=t&url=https://massage2203.blogspot.com/2022/07/5-of-best-back-rub-weapons.html
https://www.google.com.do/url?sa=t&url=https://massage2203.blogspot.com/2022/07/5-of-best-back-rub-weapons.html
https://www.google.com.cy/url?sa=t&url=https://massage2203.blogspot.com/2022/07/5-of-best-back-rub-weapons.html
https://www.google.com.cu/url?sa=t&url=https://massage2203.blogspot.com/2022/07/5-of-best-back-rub-weapons.html
https://www.google.com.co/url?sa=t&url=https://massage2203.blogspot.com/2022/07/5-of-best-back-rub-weapons.html
https://www.google.com.bz/url?sa=t&url=https://massage2203.blogspot.com/2022/07/5-of-best-back-rub-weapons.html
https://www.google.com.br/url?sa=t&url=https://massage2203.blogspot.com/2022/07/5-of-best-back-rub-weapons.html
https://www.google.com.bo/url?sa=t&url=https://massage2203.blogspot.com/2022/07/5-of-best-back-rub-weapons.html
https://www.google.com.bn/url?sa=t&url=https://massage2203.blogspot.com/2022/07/5-of-best-back-rub-weapons.html
https://www.google.com.bh/url?sa=t&url=https://massage2203.blogspot.com/2022/07/5-of-best-back-rub-weapons.html
https://www.google.com.bd/url?sa=t&url=https://massage2203.blogspot.com/2022/07/5-of-best-back-rub-weapons.html
https://www.google.com.au/url?sa=t&url=https://massage2203.blogspot.com/2022/07/5-of-best-back-rub-weapons.html
https://www.google.com.ar/url?sa=t&url=https://massage2203.blogspot.com/2022/07/5-of-best-back-rub-weapons.html
https://www.google.com.ag/url?sa=t&url=https://massage2203.blogspot.com/2022/07/5-of-best-back-rub-weapons.html
https://www.google.com.af/url?sa=t&url=https://massage2203.blogspot.com/2022/07/5-of-best-back-rub-weapons.html
https://www.google.co.za/url?sa=t&url=https://massage2203.blogspot.com/2022/07/5-of-best-back-rub-weapons.html
https://www.google.co.ve/url?sa=t&url=https://massage2203.blogspot.com/2022/07/5-of-best-back-rub-weapons.html
https://www.google.co.uk/url?sa=t&url=https://massage2203.blogspot.com/2022/07/5-of-best-back-rub-weapons.html
https://www.google.co.ug/url?sa=t&url=https://massage2203.blogspot.com/2022/07/5-of-best-back-rub-weapons.html
https://www.google.co.tz/url?sa=t&url=https://massage2203.blogspot.com/2022/07/5-of-best-back-rub-weapons.html
https://www.google.co.th/url?sa=t&url=https://massage2203.blogspot.com/2022/07/5-of-best-back-rub-weapons.html
https://www.google.co.nz/url?sa=t&url=https://massage2203.blogspot.com/2022/07/5-of-best-back-rub-weapons.html
https://www.google.co.ma/url?sa=t&url=https://massage2203.blogspot.com/2022/07/5-of-best-back-rub-weapons.html
https://www.google.co.ls/url?sa=t&url=https://massage2203.blogspot.com/2022/07/5-of-best-back-rub-weapons.html
https://www.google.co.kr/url?sa=t&url=https://massage2203.blogspot.com/2022/07/5-of-best-back-rub-weapons.html
https://www.google.co.ke/url?sa=t&url=https://massage2203.blogspot.com/2022/07/5-of-best-back-rub-weapons.html
https://www.google.co.jp/url?sa=t&url=https://massage2203.blogspot.com/2022/07/5-of-best-back-rub-weapons.html
https://www.google.co.in/url?sa=t&url=https://massage2203.blogspot.com/2022/07/5-of-best-back-rub-weapons.html
https://www.google.co.il/url?sa=t&url=https://massage2203.blogspot.com/2022/07/5-of-best-back-rub-weapons.html
https://www.google.co.id/url?sa=t&url=https://massage2203.blogspot.com/2022/07/5-of-best-back-rub-weapons.html
https://www.google.co.cr/url?sa=t&url=https://massage2203.blogspot.com/2022/07/5-of-best-back-rub-weapons.html
https://www.google.co.bw/url?sa=t&url=https://massage2203.blogspot.com/2022/07/5-of-best-back-rub-weapons.html
https://www.google.cm/url?sa=t&url=https://massage2203.blogspot.com/2022/07/5-of-best-back-rub-weapons.html
https://www.google.cl/url?sa=t&url=https://massage2203.blogspot.com/2022/07/5-of-best-back-rub-weapons.html
https://www.google.ci/url?sa=t&url=https://massage2203.blogspot.com/2022/07/5-of-best-back-rub-weapons.html
https://www.google.ch/url?sa=t&url=https://massage2203.blogspot.com/2022/07/5-of-best-back-rub-weapons.html
https://www.google.cd/url?sa=t&url=https://massage2203.blogspot.com/2022/07/5-of-best-back-rub-weapons.html
https://www.google.cat/url?sa=t&url=https://massage2203.blogspot.com/2022/07/5-of-best-back-rub-weapons.html
https://www.google.ca/url?sa=t&url=https://massage2203.blogspot.com/2022/07/5-of-best-back-rub-weapons.html
https://www.google.by/url?sa=t&url=https://massage2203.blogspot.com/2022/07/5-of-best-back-rub-weapons.html
https://www.google.bs/url?sa=t&url=https://massage2203.blogspot.com/2022/07/5-of-best-back-rub-weapons.html
https://www.google.bi/url?sa=t&url=https://massage2203.blogspot.com/2022/07/5-of-best-back-rub-weapons.html
https://www.google.bg/url?sa=t&url=https://massage2203.blogspot.com/2022/07/5-of-best-back-rub-weapons.html
https://www.google.bf/url?sa=t&url=https://massage2203.blogspot.com/2022/07/5-of-best-back-rub-weapons.html
https://www.google.be/url?sa=t&url=https://massage2203.blogspot.com/2022/07/5-of-best-back-rub-weapons.html
https://www.google.ba/url?sa=t&url=https://massage2203.blogspot.com/2022/07/5-of-best-back-rub-weapons.html
https://www.google.az/url?sa=t&url=https://massage2203.blogspot.com/2022/07/5-of-best-back-rub-weapons.html
https://www.google.at/url?sa=t&url=https://massage2203.blogspot.com/2022/07/5-of-best-back-rub-weapons.html
https://www.google.as/url?sa=t&url=https://massage2203.blogspot.com/2022/07/5-of-best-back-rub-weapons.html
https://www.google.am/url?sa=t&url=https://massage2203.blogspot.com/2022/07/5-of-best-back-rub-weapons.html
https://www.google.al/url?sa=t&url=https://massage2203.blogspot.com/2022/07/5-of-best-back-rub-weapons.html
https://www.google.ae/url?sa=t&url=https://massage2203.blogspot.com/2022/07/5-of-best-back-rub-weapons.html
https://www.google.ad/url?sa=t&url=https://massage2203.blogspot.com/2022/07/5-of-best-back-rub-weapons.html
https://plus.google.com/url?q=https://massage2203.blogspot.com/2022/07/5-of-best-back-rub-weapons.html
https://maps.google.tn/url?sa=t&url=https://massage2203.blogspot.com/2022/07/5-of-best-back-rub-weapons.html
https://maps.google.sn/url?sa=t&url=https://massage2203.blogspot.com/2022/07/5-of-best-back-rub-weapons.html
https://maps.google.sk/url?sa=t&url=https://massage2203.blogspot.com/2022/07/5-of-best-back-rub-weapons.html
https://maps.google.si/url?sa=t&url=https://massage2203.blogspot.com/2022/07/5-of-best-back-rub-weapons.html
https://maps.google.sh/url?sa=t&url=https://massage2203.blogspot.com/2022/07/5-of-best-back-rub-weapons.html
https://maps.google.se/url?sa=t&url=https://massage2203.blogspot.com/2022/07/5-of-best-back-rub-weapons.html
https://maps.google.rw/url?sa=t&url=https://massage2203.blogspot.com/2022/07/5-of-best-back-rub-weapons.html
https://maps.google.ru/url?sa=t&url=https://massage2203.blogspot.com/2022/07/5-of-best-back-rub-weapons.html
https://maps.google.rs/url?sa=t&url=https://massage2203.blogspot.com/2022/07/5-of-best-back-rub-weapons.html
https://maps.google.ro/url?sa=t&url=https://massage2203.blogspot.com/2022/07/5-of-best-back-rub-weapons.html
https://maps.google.pt/url?sa=t&url=https://massage2203.blogspot.com/2022/07/5-of-best-back-rub-weapons.html
https://maps.google.pl/url?sa=t&url=https://massage2203.blogspot.com/2022/07/5-of-best-back-rub-weapons.html
https://maps.google.no/url?sa=t&url=https://massage2203.blogspot.com/2022/07/5-of-best-back-rub-weapons.html
https://maps.google.nl/url?sa=t&url=https://massage2203.blogspot.com/2022/07/5-of-best-back-rub-weapons.html
https://maps.google.mw/url?sa=t&url=https://massage2203.blogspot.com/2022/07/5-of-best-back-rub-weapons.html
https://maps.google.mv/url?sa=t&url=https://massage2203.blogspot.com/2022/07/5-of-best-back-rub-weapons.html
https://maps.google.mu/url?sa=t&url=https://massage2203.blogspot.com/2022/07/5-of-best-back-rub-weapons.html
https://maps.google.ms/url?sa=t&url=https://massage2203.blogspot.com/2022/07/5-of-best-back-rub-weapons.html
https://maps.google.mn/url?sa=t&url=https://massage2203.blogspot.com/2022/07/5-of-best-back-rub-weapons.html
https://maps.google.mk/url?sa=t&url=https://massage2203.blogspot.com/2022/07/5-of-best-back-rub-weapons.html
https://maps.google.mg/url?sa=t&url=https://massage2203.blogspot.com/2022/07/5-of-best-back-rub-weapons.html
https://maps.google.lv/url?sa=t&url=https://massage2203.blogspot.com/2022/07/5-of-best-back-rub-weapons.html
https://maps.google.lu/url?sa=t&url=https://massage2203.blogspot.com/2022/07/5-of-best-back-rub-weapons.html
https://maps.google.lt/url?sa=t&url=https://massage2203.blogspot.com/2022/07/5-of-best-back-rub-weapons.html
https://maps.google.lk/url?sa=t&url=https://massage2203.blogspot.com/2022/07/5-of-best-back-rub-weapons.html
https://maps.google.li/url?sa=t&url=https://massage2203.blogspot.com/2022/07/5-of-best-back-rub-weapons.html
https://maps.google.la/url?sa=t&url=https://massage2203.blogspot.com/2022/07/5-of-best-back-rub-weapons.html
https://maps.google.kz/url?sa=t&url=https://massage2203.blogspot.com/2022/07/5-of-best-back-rub-weapons.html
https://maps.google.kg/url?sa=t&url=https://massage2203.blogspot.com/2022/07/5-of-best-back-rub-weapons.html
https://maps.google.jo/url?sa=t&url=https://massage2203.blogspot.com/2022/07/5-of-best-back-rub-weapons.html
https://maps.google.je/url?sa=t&url=https://massage2203.blogspot.com/2022/07/5-of-best-back-rub-weapons.html
https://maps.google.it/url?sa=t&url=https://massage2203.blogspot.com/2022/07/5-of-best-back-rub-weapons.html
https://maps.google.is/url?sa=t&url=https://massage2203.blogspot.com/2022/07/5-of-best-back-rub-weapons.html
https://maps.google.iq/url?sa=t&url=https://massage2203.blogspot.com/2022/07/5-of-best-back-rub-weapons.html
https://maps.google.ie/url?sa=t&url=https://massage2203.blogspot.com/2022/07/5-of-best-back-rub-weapons.html
https://maps.google.hu/url?sa=t&url=https://massage2203.blogspot.com/2022/07/5-of-best-back-rub-weapons.html
https://maps.google.ht/url?sa=t&url=https://massage2203.blogspot.com/2022/07/5-of-best-back-rub-weapons.html
https://maps.google.hr/url?sa=t&url=https://massage2203.blogspot.com/2022/07/5-of-best-back-rub-weapons.html
https://maps.google.hn/url?sa=t&url=https://massage2203.blogspot.com/2022/07/5-of-best-back-rub-weapons.html
https://maps.google.gr/url?sa=t&url=https://massage2203.blogspot.com/2022/07/5-of-best-back-rub-weapons.html
https://maps.google.gm/url?sa=t&url=https://massage2203.blogspot.com/2022/07/5-of-best-back-rub-weapons.html
https://maps.google.gl/url?sa=t&url=https://massage2203.blogspot.com/2022/07/5-of-best-back-rub-weapons.html
https://maps.google.gg/url?sa=t&url=https://massage2203.blogspot.com/2022/07/5-of-best-back-rub-weapons.html
https://maps.google.ge/url?sa=t&url=https://massage2203.blogspot.com/2022/07/5-of-best-back-rub-weapons.html
https://maps.google.fr/url?sa=t&url=https://massage2203.blogspot.com/2022/07/5-of-best-back-rub-weapons.html
https://maps.google.fm/url?sa=t&url=https://massage2203.blogspot.com/2022/07/5-of-best-back-rub-weapons.html
https://maps.google.fi/url?sa=t&url=https://massage2203.blogspot.com/2022/07/5-of-best-back-rub-weapons.html
https://maps.google.es/url?sa=t&url=https://massage2203.blogspot.com/2022/07/5-of-best-back-rub-weapons.html
https://maps.google.ee/url?sa=t&url=https://massage2203.blogspot.com/2022/07/5-of-best-back-rub-weapons.html
https://maps.google.dz/url?sa=t&url=https://massage2203.blogspot.com/2022/07/5-of-best-back-rub-weapons.html
https://maps.google.dk/url?sa=t&url=https://massage2203.blogspot.com/2022/07/5-of-best-back-rub-weapons.html
https://maps.google.dj/url?sa=t&url=https://massage2203.blogspot.com/2022/07/5-of-best-back-rub-weapons.html
https://maps.google.de/url?sa=t&url=https://massage2203.blogspot.com/2022/07/5-of-best-back-rub-weapons.html
https://maps.google.cz/url?sa=t&url=https://massage2203.blogspot.com/2022/07/5-of-best-back-rub-weapons.html
https://maps.google.com/url?sa=t&url=https://massage2203.blogspot.com/2022/07/5-of-best-back-rub-weapons.html
https://maps.google.com.uy/url?sa=t&url=https://massage2203.blogspot.com/2022/07/5-of-best-back-rub-weapons.html
https://maps.google.com.ua/url?sa=t&url=https://massage2203.blogspot.com/2022/07/5-of-best-back-rub-weapons.html
https://maps.google.com.tw/url?sa=t&url=https://massage2203.blogspot.com/2022/07/5-of-best-back-rub-weapons.html
https://maps.google.com.tr/url?sa=t&url=https://massage2203.blogspot.com/2022/07/5-of-best-back-rub-weapons.html
https://maps.google.com.sv/url?sa=t&url=https://massage2203.blogspot.com/2022/07/5-of-best-back-rub-weapons.html
https://maps.google.com.sg/url?sa=t&url=https://massage2203.blogspot.com/2022/07/5-of-best-back-rub-weapons.html
https://maps.google.com.sa/url?sa=t&url=https://massage2203.blogspot.com/2022/07/5-of-best-back-rub-weapons.html
https://maps.google.com.qa/url?sa=t&url=https://massage2203.blogspot.com/2022/07/5-of-best-back-rub-weapons.html
https://maps.google.com.py/url?sa=t&url=https://massage2203.blogspot.com/2022/07/5-of-best-back-rub-weapons.html
https://maps.google.com.pr/url?sa=t&url=https://massage2203.blogspot.com/2022/07/5-of-best-back-rub-weapons.html
https://maps.google.com.ph/url?sa=t&url=https://massage2203.blogspot.com/2022/07/5-of-best-back-rub-weapons.html
https://maps.google.com.pe/url?sa=t&url=https://massage2203.blogspot.com/2022/07/5-of-best-back-rub-weapons.html
https://maps.google.com.pa/url?sa=t&url=https://massage2203.blogspot.com/2022/07/5-of-best-back-rub-weapons.html
https://maps.google.com.om/url?sa=t&url=https://massage2203.blogspot.com/2022/07/5-of-best-back-rub-weapons.html
https://maps.google.com.ni/url?sa=t&url=https://massage2203.blogspot.com/2022/07/5-of-best-back-rub-weapons.html
https://maps.google.com.ng/url?sa=t&url=https://massage2203.blogspot.com/2022/07/5-of-best-back-rub-weapons.html
https://maps.google.com.na/url?sa=t&url=https://massage2203.blogspot.com/2022/07/5-of-best-back-rub-weapons.html
https://maps.google.com.mz/url?sa=t&url=https://massage2203.blogspot.com/2022/07/5-of-best-back-rub-weapons.html
https://maps.google.com.my/url?sa=t&url=https://massage2203.blogspot.com/2022/07/5-of-best-back-rub-weapons.html
https://maps.google.com.mx/url?sa=t&url=https://massage2203.blogspot.com/2022/07/5-of-best-back-rub-weapons.html
https://maps.google.com.mt/url?sa=t&url=https://massage2203.blogspot.com/2022/07/5-of-best-back-rub-weapons.html
https://maps.google.com.ly/url?sa=t&url=https://massage2203.blogspot.com/2022/07/5-of-best-back-rub-weapons.html
https://maps.google.com.lb/url?sa=t&url=https://massage2203.blogspot.com/2022/07/5-of-best-back-rub-weapons.html
https://maps.google.com.kw/url?sa=t&url=https://massage2203.blogspot.com/2022/07/5-of-best-back-rub-weapons.html
https://maps.google.com.kh/url?sa=t&url=https://massage2203.blogspot.com/2022/07/5-of-best-back-rub-weapons.html
https://maps.google.com.jm/url?sa=t&url=https://massage2203.blogspot.com/2022/07/5-of-best-back-rub-weapons.html
https://maps.google.com.hk/url?sa=t&url=https://massage2203.blogspot.com/2022/07/5-of-best-back-rub-weapons.html
https://maps.google.com.gt/url?sa=t&url=https://massage2203.blogspot.com/2022/07/5-of-best-back-rub-weapons.html
https://maps.google.com.gi/url?sa=t&url=https://massage2203.blogspot.com/2022/07/5-of-best-back-rub-weapons.html
https://maps.google.com.gh/url?sa=t&url=https://massage2203.blogspot.com/2022/07/5-of-best-back-rub-weapons.html
https://maps.google.com.fj/url?sa=t&url=https://massage2203.blogspot.com/2022/07/5-of-best-back-rub-weapons.html
https://maps.google.com.et/url?sa=t&url=https://massage2203.blogspot.com/2022/07/5-of-best-back-rub-weapons.html
https://maps.google.com.eg/url?sa=t&url=https://massage2203.blogspot.com/2022/07/5-of-best-back-rub-weapons.html
https://maps.google.com.ec/url?sa=t&url=https://massage2203.blogspot.com/2022/07/5-of-best-back-rub-weapons.html
https://maps.google.com.do/url?sa=t&url=https://massage2203.blogspot.com/2022/07/5-of-best-back-rub-weapons.html
https://maps.google.com.cu/url?sa=t&url=https://massage2203.blogspot.com/2022/07/5-of-best-back-rub-weapons.html
https://maps.google.com.co/url?sa=t&url=https://massage2203.blogspot.com/2022/07/5-of-best-back-rub-weapons.html
https://maps.google.com.bz/url?sa=t&url=https://massage2203.blogspot.com/2022/07/5-of-best-back-rub-weapons.html
https://maps.google.com.br/url?sa=t&url=https://massage2203.blogspot.com/2022/07/5-of-best-back-rub-weapons.html
https://maps.google.com.bo/url?sa=t&url=https://massage2203.blogspot.com/2022/07/5-of-best-back-rub-weapons.html
https://maps.google.com.bn/url?sa=t&url=https://massage2203.blogspot.com/2022/07/5-of-best-back-rub-weapons.html
https://maps.google.com.bh/url?sa=t&url=https://massage2203.blogspot.com/2022/07/5-of-best-back-rub-weapons.html
https://maps.google.com.bd/url?sa=t&url=https://massage2203.blogspot.com/2022/07/5-of-best-back-rub-weapons.html
https://maps.google.com.au/url?sa=t&url=https://massage2203.blogspot.com/2022/07/5-of-best-back-rub-weapons.html
https://maps.google.com.ar/url?sa=t&url=https://massage2203.blogspot.com/2022/07/5-of-best-back-rub-weapons.html
https://maps.google.com.ag/url?sa=t&url=https://massage2203.blogspot.com/2022/07/5-of-best-back-rub-weapons.html
https://maps.google.co.za/url?sa=t&url=https://massage2203.blogspot.com/2022/07/5-of-best-back-rub-weapons.html
https://maps.google.co.ve/url?sa=t&url=https://massage2203.blogspot.com/2022/07/5-of-best-back-rub-weapons.html
https://maps.google.co.uk/url?sa=t&url=https://massage2203.blogspot.com/2022/07/5-of-best-back-rub-weapons.html
https://maps.google.co.ug/url?sa=t&url=https://massage2203.blogspot.com/2022/07/5-of-best-back-rub-weapons.html
https://maps.google.co.tz/url?sa=t&url=https://massage2203.blogspot.com/2022/07/5-of-best-back-rub-weapons.html
https://maps.google.co.th/url?sa=t&url=https://massage2203.blogspot.com/2022/07/5-of-best-back-rub-weapons.html
https://maps.google.co.nz/url?sa=t&url=https://massage2203.blogspot.com/2022/07/5-of-best-back-rub-weapons.html
https://maps.google.co.ls/url?sa=t&url=https://massage2203.blogspot.com/2022/07/5-of-best-back-rub-weapons.html
https://maps.google.co.kr/url?sa=t&url=https://massage2203.blogspot.com/2022/07/5-of-best-back-rub-weapons.html
https://maps.google.co.ke/url?sa=t&url=https://massage2203.blogspot.com/2022/07/5-of-best-back-rub-weapons.html
https://maps.google.co.jp/url?sa=t&url=https://massage2203.blogspot.com/2022/07/5-of-best-back-rub-weapons.html
https://maps.google.co.in/url?sa=t&url=https://massage2203.blogspot.com/2022/07/5-of-best-back-rub-weapons.html
https://maps.google.co.il/url?sa=t&url=https://massage2203.blogspot.com/2022/07/5-of-best-back-rub-weapons.html
https://maps.google.co.id/url?sa=t&url=https://massage2203.blogspot.com/2022/07/5-of-best-back-rub-weapons.html
https://maps.google.co.cr/url?sa=t&url=https://massage2203.blogspot.com/2022/07/5-of-best-back-rub-weapons.html
https://maps.google.co.bw/url?sa=t&url=https://massage2203.blogspot.com/2022/07/5-of-best-back-rub-weapons.html
https://maps.google.cm/url?sa=t&url=https://massage2203.blogspot.com/2022/07/5-of-best-back-rub-weapons.html
https://maps.google.cl/url?sa=t&url=https://massage2203.blogspot.com/2022/07/5-of-best-back-rub-weapons.html
https://maps.google.ci/url?sa=t&url=https://massage2203.blogspot.com/2022/07/5-of-best-back-rub-weapons.html
https://maps.google.ch/url?sa=t&url=https://massage2203.blogspot.com/2022/07/5-of-best-back-rub-weapons.html
https://maps.google.cd/url?sa=t&url=https://massage2203.blogspot.com/2022/07/5-of-best-back-rub-weapons.html
https://maps.google.cat/url?sa=t&url=https://massage2203.blogspot.com/2022/07/5-of-best-back-rub-weapons.html
https://maps.google.ca/url?sa=t&url=https://massage2203.blogspot.com/2022/07/5-of-best-back-rub-weapons.html
https://maps.google.by/url?sa=t&url=https://massage2203.blogspot.com/2022/07/5-of-best-back-rub-weapons.html
https://maps.google.bs/url?sa=t&url=https://massage2203.blogspot.com/2022/07/5-of-best-back-rub-weapons.html
https://maps.google.bi/url?sa=t&url=https://massage2203.blogspot.com/2022/07/5-of-best-back-rub-weapons.html
https://maps.google.bg/url?sa=t&url=https://massage2203.blogspot.com/2022/07/5-of-best-back-rub-weapons.html
https://maps.google.bf/url?sa=t&url=https://massage2203.blogspot.com/2022/07/5-of-best-back-rub-weapons.html
https://maps.google.be/url?sa=t&url=https://massage2203.blogspot.com/2022/07/5-of-best-back-rub-weapons.html
https://maps.google.ba/url?sa=t&url=https://massage2203.blogspot.com/2022/07/5-of-best-back-rub-weapons.html
https://maps.google.at/url?sa=t&url=https://massage2203.blogspot.com/2022/07/5-of-best-back-rub-weapons.html
https://maps.google.as/url?sa=t&url=https://massage2203.blogspot.com/2022/07/5-of-best-back-rub-weapons.html
https://maps.google.ae/url?sa=t&url=https://massage2203.blogspot.com/2022/07/5-of-best-back-rub-weapons.html
https://maps.google.ad/url?sa=t&url=https://massage2203.blogspot.com/2022/07/5-of-best-back-rub-weapons.html
https://images.google.tn/url?sa=t&url=https://massage2203.blogspot.com/2022/07/5-of-best-back-rub-weapons.html
https://images.google.sn/url?sa=t&url=https://massage2203.blogspot.com/2022/07/5-of-best-back-rub-weapons.html
https://images.google.sk/url?sa=t&url=https://massage2203.blogspot.com/2022/07/5-of-best-back-rub-weapons.html
https://images.google.si/url?sa=t&url=https://massage2203.blogspot.com/2022/07/5-of-best-back-rub-weapons.html
https://images.google.sh/url?sa=t&url=https://massage2203.blogspot.com/2022/07/5-of-best-back-rub-weapons.html
https://images.google.se/url?sa=t&url=https://massage2203.blogspot.com/2022/07/5-of-best-back-rub-weapons.html
https://images.google.rw/url?sa=t&url=https://massage2203.blogspot.com/2022/07/5-of-best-back-rub-weapons.html
https://images.google.ru/url?sa=t&url=https://massage2203.blogspot.com/2022/07/5-of-best-back-rub-weapons.html
https://images.google.rs/url?sa=t&url=https://massage2203.blogspot.com/2022/07/5-of-best-back-rub-weapons.html
https://images.google.ro/url?sa=t&url=https://massage2203.blogspot.com/2022/07/5-of-best-back-rub-weapons.html
https://images.google.pt/url?sa=t&url=https://massage2203.blogspot.com/2022/07/5-of-best-back-rub-weapons.html
https://images.google.ps/url?sa=t&url=https://massage2203.blogspot.com/2022/07/5-of-best-back-rub-weapons.html
https://images.google.pl/url?sa=t&url=https://massage2203.blogspot.com/2022/07/5-of-best-back-rub-weapons.html
https://images.google.no/url?sa=t&url=https://massage2203.blogspot.com/2022/07/5-of-best-back-rub-weapons.html
https://images.google.nl/url?sa=t&url=https://massage2203.blogspot.com/2022/07/5-of-best-back-rub-weapons.html
https://images.google.mw/url?sa=t&url=https://massage2203.blogspot.com/2022/07/5-of-best-back-rub-weapons.html
https://images.google.mv/url?sa=t&url=https://massage2203.blogspot.com/2022/07/5-of-best-back-rub-weapons.html
https://images.google.mu/url?sa=t&url=https://massage2203.blogspot.com/2022/07/5-of-best-back-rub-weapons.html
https://images.google.ms/url?sa=t&url=https://massage2203.blogspot.com/2022/07/5-of-best-back-rub-weapons.html
https://images.google.mn/url?sa=t&url=https://massage2203.blogspot.com/2022/07/5-of-best-back-rub-weapons.html
https://images.google.mk/url?sa=t&url=https://massage2203.blogspot.com/2022/07/5-of-best-back-rub-weapons.html
https://images.google.mg/url?sa=t&url=https://massage2203.blogspot.com/2022/07/5-of-best-back-rub-weapons.html
https://images.google.me/url?sa=t&url=https://massage2203.blogspot.com/2022/07/5-of-best-back-rub-weapons.html
https://images.google.md/url?sa=t&url=https://massage2203.blogspot.com/2022/07/5-of-best-back-rub-weapons.html
https://images.google.lv/url?sa=t&url=https://massage2203.blogspot.com/2022/07/5-of-best-back-rub-weapons.html
https://images.google.lu/url?sa=t&url=https://massage2203.blogspot.com/2022/07/5-of-best-back-rub-weapons.html
https://images.google.lt/url?sa=t&url=https://massage2203.blogspot.com/2022/07/5-of-best-back-rub-weapons.html
https://images.google.lk/url?sa=t&url=https://massage2203.blogspot.com/2022/07/5-of-best-back-rub-weapons.html
https://images.google.li/url?sa=t&url=https://massage2203.blogspot.com/2022/07/5-of-best-back-rub-weapons.html
https://images.google.la/url?sa=t&url=https://massage2203.blogspot.com/2022/07/5-of-best-back-rub-weapons.html
https://images.google.kz/url?sa=t&url=https://massage2203.blogspot.com/2022/07/5-of-best-back-rub-weapons.html
https://images.google.kg/url?sa=t&url=https://massage2203.blogspot.com/2022/07/5-of-best-back-rub-weapons.html
https://images.google.jo/url?sa=t&url=https://massage2203.blogspot.com/2022/07/5-of-best-back-rub-weapons.html
https://images.google.je/url?sa=t&url=https://massage2203.blogspot.com/2022/07/5-of-best-back-rub-weapons.html
https://images.google.it/url?sa=t&url=https://massage2203.blogspot.com/2022/07/5-of-best-back-rub-weapons.html
https://images.google.is/url?sa=t&url=https://massage2203.blogspot.com/2022/07/5-of-best-back-rub-weapons.html
https://images.google.iq/url?sa=t&url=https://massage2203.blogspot.com/2022/07/5-of-best-back-rub-weapons.html
https://images.google.ie/url?sa=t&url=https://massage2203.blogspot.com/2022/07/5-of-best-back-rub-weapons.html
https://images.google.hu/url?sa=t&url=https://massage2203.blogspot.com/2022/07/5-of-best-back-rub-weapons.html
https://images.google.ht/url?sa=t&url=https://massage2203.blogspot.com/2022/07/5-of-best-back-rub-weapons.html
https://images.google.hr/url?sa=t&url=https://massage2203.blogspot.com/2022/07/5-of-best-back-rub-weapons.html
https://images.google.hn/url?sa=t&url=https://massage2203.blogspot.com/2022/07/5-of-best-back-rub-weapons.html
https://images.google.gr/url?sa=t&url=https://massage2203.blogspot.com/2022/07/5-of-best-back-rub-weapons.html
https://images.google.gp/url?sa=t&url=https://massage2203.blogspot.com/2022/07/5-of-best-back-rub-weapons.html
https://images.google.gm/url?sa=t&url=https://massage2203.blogspot.com/2022/07/5-of-best-back-rub-weapons.html
https://images.google.gl/url?sa=t&url=https://massage2203.blogspot.com/2022/07/5-of-best-back-rub-weapons.html
https://images.google.gg/url?sa=t&url=https://massage2203.blogspot.com/2022/07/5-of-best-back-rub-weapons.html
https://images.google.ge/url?sa=t&url=https://massage2203.blogspot.com/2022/07/5-of-best-back-rub-weapons.html
https://images.google.fr/url?sa=t&url=https://massage2203.blogspot.com/2022/07/5-of-best-back-rub-weapons.html
https://images.google.fm/url?sa=t&url=https://massage2203.blogspot.com/2022/07/5-of-best-back-rub-weapons.html
https://images.google.fi/url?sa=t&url=https://massage2203.blogspot.com/2022/07/5-of-best-back-rub-weapons.html
https://images.google.es/url?sa=t&url=https://massage2203.blogspot.com/2022/07/5-of-best-back-rub-weapons.html
https://images.google.ee/url?sa=t&url=https://massage2203.blogspot.com/2022/07/5-of-best-back-rub-weapons.html
https://images.google.dz/url?sa=t&url=https://massage2203.blogspot.com/2022/07/5-of-best-back-rub-weapons.html
https://images.google.dm/url?sa=t&url=https://massage2203.blogspot.com/2022/07/5-of-best-back-rub-weapons.html
https://images.google.dk/url?sa=t&url=https://massage2203.blogspot.com/2022/07/5-of-best-back-rub-weapons.html
https://images.google.dj/url?sa=t&url=https://massage2203.blogspot.com/2022/07/5-of-best-back-rub-weapons.html
https://images.google.de/url?sa=t&url=https://massage2203.blogspot.com/2022/07/5-of-best-back-rub-weapons.html
https://images.google.cz/url?sa=t&url=https://massage2203.blogspot.com/2022/07/5-of-best-back-rub-weapons.html
https://images.google.com/url?sa=t&url=https://massage2203.blogspot.com/2022/07/5-of-best-back-rub-weapons.html
https://images.google.com.vn/url?sa=t&url=https://massage2203.blogspot.com/2022/07/5-of-best-back-rub-weapons.html
https://images.google.com.vc/url?sa=t&url=https://massage2203.blogspot.com/2022/07/5-of-best-back-rub-weapons.html
https://images.google.com.uy/url?sa=t&url=https://massage2203.blogspot.com/2022/07/5-of-best-back-rub-weapons.html
https://images.google.com.ua/url?sa=t&url=https://massage2203.blogspot.com/2022/07/5-of-best-back-rub-weapons.html
https://images.google.com.tw/url?sa=t&url=https://massage2203.blogspot.com/2022/07/5-of-best-back-rub-weapons.html
https://images.google.com.tr/url?sa=t&url=https://massage2203.blogspot.com/2022/07/5-of-best-back-rub-weapons.html
https://images.google.com.sv/url?sa=t&url=https://massage2203.blogspot.com/2022/07/5-of-best-back-rub-weapons.html
https://images.google.com.sg/url?sa=t&url=https://massage2203.blogspot.com/2022/07/5-of-best-back-rub-weapons.html
https://images.google.com.sa/url?sa=t&url=https://massage2203.blogspot.com/2022/07/5-of-best-back-rub-weapons.html
https://images.google.com.qa/url?sa=t&url=https://massage2203.blogspot.com/2022/07/5-of-best-back-rub-weapons.html
https://images.google.com.py/url?sa=t&url=https://massage2203.blogspot.com/2022/07/5-of-best-back-rub-weapons.html
https://images.google.com.pr/url?sa=t&url=https://massage2203.blogspot.com/2022/07/5-of-best-back-rub-weapons.html
https://images.google.com.pk/url?sa=t&url=https://massage2203.blogspot.com/2022/07/5-of-best-back-rub-weapons.html
https://images.google.com.ph/url?sa=t&url=https://massage2203.blogspot.com/2022/07/5-of-best-back-rub-weapons.html
https://images.google.com.pe/url?sa=t&url=https://massage2203.blogspot.com/2022/07/5-of-best-back-rub-weapons.html
https://images.google.com.pa/url?sa=t&url=https://massage2203.blogspot.com/2022/07/5-of-best-back-rub-weapons.html
https://images.google.com.om/url?sa=t&url=https://massage2203.blogspot.com/2022/07/5-of-best-back-rub-weapons.html
https://images.google.com.np/url?sa=t&url=https://massage2203.blogspot.com/2022/07/5-of-best-back-rub-weapons.html
https://images.google.com.ni/url?sa=t&url=https://massage2203.blogspot.com/2022/07/5-of-best-back-rub-weapons.html
https://images.google.com.ng/url?sa=t&url=https://massage2203.blogspot.com/2022/07/5-of-best-back-rub-weapons.html
https://images.google.com.na/url?sa=t&url=https://massage2203.blogspot.com/2022/07/5-of-best-back-rub-weapons.html
https://images.google.com.mz/url?sa=t&url=https://massage2203.blogspot.com/2022/07/5-of-best-back-rub-weapons.html
https://images.google.com.my/url?sa=t&url=https://massage2203.blogspot.com/2022/07/5-of-best-back-rub-weapons.html
https://images.google.com.mx/url?sa=t&url=https://massage2203.blogspot.com/2022/07/5-of-best-back-rub-weapons.html
https://images.google.com.mt/url?sa=t&url=https://massage2203.blogspot.com/2022/07/5-of-best-back-rub-weapons.html
https://images.google.com.ly/url?sa=t&url=https://massage2203.blogspot.com/2022/07/5-of-best-back-rub-weapons.html
https://images.google.com.lb/url?sa=t&url=https://massage2203.blogspot.com/2022/07/5-of-best-back-rub-weapons.html
https://images.google.com.kw/url?sa=t&url=https://massage2203.blogspot.com/2022/07/5-of-best-back-rub-weapons.html
https://images.google.com.kh/url?sa=t&url=https://massage2203.blogspot.com/2022/07/5-of-best-back-rub-weapons.html
https://images.google.com.jm/url?sa=t&url=https://massage2203.blogspot.com/2022/07/5-of-best-back-rub-weapons.html
https://images.google.com.hk/url?sa=t&url=https://massage2203.blogspot.com/2022/07/5-of-best-back-rub-weapons.html
https://images.google.com.gt/url?sa=t&url=https://massage2203.blogspot.com/2022/07/5-of-best-back-rub-weapons.html
https://images.google.com.gi/url?sa=t&url=https://massage2203.blogspot.com/2022/07/5-of-best-back-rub-weapons.html
https://images.google.com.gh/url?sa=t&url=https://massage2203.blogspot.com/2022/07/5-of-best-back-rub-weapons.html
https://images.google.com.fj/url?sa=t&url=https://massage2203.blogspot.com/2022/07/5-of-best-back-rub-weapons.html
https://images.google.com.et/url?sa=t&url=https://massage2203.blogspot.com/2022/07/5-of-best-back-rub-weapons.html
https://images.google.com.eg/url?sa=t&url=https://massage2203.blogspot.com/2022/07/5-of-best-back-rub-weapons.html
https://images.google.com.ec/url?sa=t&url=https://massage2203.blogspot.com/2022/07/5-of-best-back-rub-weapons.html
https://images.google.com.do/url?sa=t&url=https://massage2203.blogspot.com/2022/07/5-of-best-back-rub-weapons.html
https://images.google.com.cy/url?sa=t&url=https://massage2203.blogspot.com/2022/07/5-of-best-back-rub-weapons.html
https://images.google.com.cu/url?sa=t&url=https://massage2203.blogspot.com/2022/07/5-of-best-back-rub-weapons.html
https://images.google.com.co/url?sa=t&url=https://massage2203.blogspot.com/2022/07/5-of-best-back-rub-weapons.html
https://images.google.com.bz/url?sa=t&url=https://massage2203.blogspot.com/2022/07/5-of-best-back-rub-weapons.html
https://images.google.com.br/url?sa=t&url=https://massage2203.blogspot.com/2022/07/5-of-best-back-rub-weapons.html
https://images.google.com.bo/url?sa=t&url=https://massage2203.blogspot.com/2022/07/5-of-best-back-rub-weapons.html
https://images.google.com.bn/url?sa=t&url=https://massage2203.blogspot.com/2022/07/5-of-best-back-rub-weapons.html
https://images.google.com.bh/url?sa=t&url=https://massage2203.blogspot.com/2022/07/5-of-best-back-rub-weapons.html
https://images.google.com.bd/url?sa=t&url=https://massage2203.blogspot.com/2022/07/5-of-best-back-rub-weapons.html
https://images.google.com.au/url?sa=t&url=https://massage2203.blogspot.com/2022/07/5-of-best-back-rub-weapons.html
https://images.google.com.ar/url?sa=t&url=https://massage2203.blogspot.com/2022/07/5-of-best-back-rub-weapons.html
https://images.google.com.ag/url?sa=t&url=https://massage2203.blogspot.com/2022/07/5-of-best-back-rub-weapons.html
https://images.google.com.af/url?sa=t&url=https://massage2203.blogspot.com/2022/07/5-of-best-back-rub-weapons.html
https://images.google.co.zm/url?sa=t&url=https://massage2203.blogspot.com/2022/07/5-of-best-back-rub-weapons.html
https://images.google.co.za/url?sa=t&url=https://massage2203.blogspot.com/2022/07/5-of-best-back-rub-weapons.html
https://images.google.co.za/url?q=https://massage2203.blogspot.com/2022/07/5-of-best-back-rub-weapons.html
https://images.google.co.ve/url?sa=t&url=https://massage2203.blogspot.com/2022/07/5-of-best-back-rub-weapons.html
https://images.google.co.uz/url?sa=t&url=https://massage2203.blogspot.com/2022/07/5-of-best-back-rub-weapons.html
https://images.google.co.uk/url?sa=t&url=https://massage2203.blogspot.com/2022/07/5-of-best-back-rub-weapons.html
https://images.google.co.ug/url?sa=t&url=https://massage2203.blogspot.com/2022/07/5-of-best-back-rub-weapons.html
https://images.google.co.tz/url?sa=t&url=https://massage2203.blogspot.com/2022/07/5-of-best-back-rub-weapons.html
https://images.google.co.th/url?sa=t&url=https://massage2203.blogspot.com/2022/07/5-of-best-back-rub-weapons.html
https://images.google.co.th/url?q=https://massage2203.blogspot.com/2022/07/5-of-best-back-rub-weapons.html
https://images.google.co.nz/url?sa=t&url=https://massage2203.blogspot.com/2022/07/5-of-best-back-rub-weapons.html
https://images.google.co.ma/url?sa=t&url=https://massage2203.blogspot.com/2022/07/5-of-best-back-rub-weapons.html
https://images.google.co.ls/url?sa=t&url=https://massage2203.blogspot.com/2022/07/5-of-best-back-rub-weapons.html
https://images.google.co.kr/url?sa=t&url=https://massage2203.blogspot.com/2022/07/5-of-best-back-rub-weapons.html
https://images.google.co.kr/url?q=https://massage2203.blogspot.com/2022/07/5-of-best-back-rub-weapons.html
https://images.google.co.ke/url?sa=t&url=https://massage2203.blogspot.com/2022/07/5-of-best-back-rub-weapons.html
https://images.google.co.jp/url?sa=t&url=https://massage2203.blogspot.com/2022/07/5-of-best-back-rub-weapons.html
https://images.google.co.in/url?sa=t&url=https://massage2203.blogspot.com/2022/07/5-of-best-back-rub-weapons.html
https://images.google.co.il/url?sa=t&url=https://massage2203.blogspot.com/2022/07/5-of-best-back-rub-weapons.html
https://images.google.co.id/url?sa=t&url=https://massage2203.blogspot.com/2022/07/5-of-best-back-rub-weapons.html
https://images.google.co.id/url?q=https://massage2203.blogspot.com/2022/07/5-of-best-back-rub-weapons.html
https://images.google.co.cr/url?sa=t&url=https://massage2203.blogspot.com/2022/07/5-of-best-back-rub-weapons.html
https://images.google.co.cr/url?q=https://massage2203.blogspot.com/2022/07/5-of-best-back-rub-weapons.html
https://images.google.co.ck/url?sa=t&url=https://massage2203.blogspot.com/2022/07/5-of-best-back-rub-weapons.html
https://images.google.co.bw/url?sa=t&url=https://massage2203.blogspot.com/2022/07/5-of-best-back-rub-weapons.html
https://images.google.cm/url?sa=t&url=https://massage2203.blogspot.com/2022/07/5-of-best-back-rub-weapons.html
https://images.google.cl/url?sa=t&url=https://massage2203.blogspot.com/2022/07/5-of-best-back-rub-weapons.html
https://images.google.ci/url?sa=t&url=https://massage2203.blogspot.com/2022/07/5-of-best-back-rub-weapons.html
https://images.google.ch/url?sa=t&url=https://massage2203.blogspot.com/2022/07/5-of-best-back-rub-weapons.html
https://images.google.cg/url?sa=t&url=https://massage2203.blogspot.com/2022/07/5-of-best-back-rub-weapons.html
https://images.google.cd/url?sa=t&url=https://massage2203.blogspot.com/2022/07/5-of-best-back-rub-weapons.html
https://images.google.cat/url?sa=t&url=https://massage2203.blogspot.com/2022/07/5-of-best-back-rub-weapons.html
https://images.google.ca/url?sa=t&url=https://massage2203.blogspot.com/2022/07/5-of-best-back-rub-weapons.html
https://images.google.by/url?sa=t&url=https://massage2203.blogspot.com/2022/07/5-of-best-back-rub-weapons.html
https://images.google.bs/url?sa=t&url=https://massage2203.blogspot.com/2022/07/5-of-best-back-rub-weapons.html
https://images.google.bi/url?sa=t&url=https://massage2203.blogspot.com/2022/07/5-of-best-back-rub-weapons.html
https://images.google.bg/url?sa=t&url=https://massage2203.blogspot.com/2022/07/5-of-best-back-rub-weapons.html
https://images.google.bf/url?sa=t&url=https://massage2203.blogspot.com/2022/07/5-of-best-back-rub-weapons.html
https://images.google.be/url?sa=t&url=https://massage2203.blogspot.com/2022/07/5-of-best-back-rub-weapons.html
https://images.google.ba/url?sa=t&url=https://massage2203.blogspot.com/2022/07/5-of-best-back-rub-weapons.html
https://images.google.ba/url?q=https://massage2203.blogspot.com/2022/07/5-of-best-back-rub-weapons.html
https://images.google.az/url?sa=t&url=https://massage2203.blogspot.com/2022/07/5-of-best-back-rub-weapons.html
https://images.google.at/url?sa=t&url=https://massage2203.blogspot.com/2022/07/5-of-best-back-rub-weapons.html
https://images.google.as/url?sa=t&url=https://massage2203.blogspot.com/2022/07/5-of-best-back-rub-weapons.html
https://images.google.am/url?sa=t&url=https://massage2203.blogspot.com/2022/07/5-of-best-back-rub-weapons.html
https://images.google.al/url?sa=t&url=https://massage2203.blogspot.com/2022/07/5-of-best-back-rub-weapons.html
https://images.google.ae/url?sa=t&url=https://massage2203.blogspot.com/2022/07/5-of-best-back-rub-weapons.html
https://images.google.ae/url?q=https://massage2203.blogspot.com/2022/07/5-of-best-back-rub-weapons.html
https://images.google.ad/url?sa=t&url=https://massage2203.blogspot.com/2022/07/5-of-best-back-rub-weapons.html
https://cse.google.vg/url?sa=t&url=https://massage2203.blogspot.com/2022/07/5-of-best-back-rub-weapons.html
https://cse.google.to/url?sa=t&url=https://massage2203.blogspot.com/2022/07/5-of-best-back-rub-weapons.html
https://cse.google.tn/url?sa=t&url=https://massage2203.blogspot.com/2022/07/5-of-best-back-rub-weapons.html
https://cse.google.tm/url?sa=t&url=https://massage2203.blogspot.com/2022/07/5-of-best-back-rub-weapons.html
https://cse.google.sn/url?sa=t&url=https://massage2203.blogspot.com/2022/07/5-of-best-back-rub-weapons.html
https://cse.google.sm/url?sa=t&url=https://massage2203.blogspot.com/2022/07/5-of-best-back-rub-weapons.html
https://cse.google.sk/url?sa=t&url=https://massage2203.blogspot.com/2022/07/5-of-best-back-rub-weapons.html
https://cse.google.si/url?sa=t&url=https://massage2203.blogspot.com/2022/07/5-of-best-back-rub-weapons.html
https://cse.google.sh/url?sa=t&url=https://massage2203.blogspot.com/2022/07/5-of-best-back-rub-weapons.html
https://cse.google.se/url?sa=t&url=https://massage2203.blogspot.com/2022/07/5-of-best-back-rub-weapons.html
https://cse.google.sc/url?sa=t&url=https://massage2203.blogspot.com/2022/07/5-of-best-back-rub-weapons.html
https://cse.google.rw/url?sa=t&url=https://massage2203.blogspot.com/2022/07/5-of-best-back-rub-weapons.html
https://cse.google.rs/url?sa=t&url=https://massage2203.blogspot.com/2022/07/5-of-best-back-rub-weapons.html
https://cse.google.ro/url?sa=t&url=https://massage2203.blogspot.com/2022/07/5-of-best-back-rub-weapons.html
https://cse.google.pt/url?sa=t&url=https://massage2203.blogspot.com/2022/07/5-of-best-back-rub-weapons.html
https://cse.google.ps/url?sa=t&url=https://massage2203.blogspot.com/2022/07/5-of-best-back-rub-weapons.html
https://cse.google.no/url?sa=t&url=https://massage2203.blogspot.com/2022/07/5-of-best-back-rub-weapons.html
https://cse.google.mw/url?sa=t&url=https://massage2203.blogspot.com/2022/07/5-of-best-back-rub-weapons.html
https://cse.google.ms/url?sa=t&url=https://massage2203.blogspot.com/2022/07/5-of-best-back-rub-weapons.html
https://cse.google.mn/url?sa=t&url=https://massage2203.blogspot.com/2022/07/5-of-best-back-rub-weapons.html
https://cse.google.md/url?sa=t&url=https://massage2203.blogspot.com/2022/07/5-of-best-back-rub-weapons.html
https://cse.google.lv/url?sa=t&url=https://massage2203.blogspot.com/2022/07/5-of-best-back-rub-weapons.html
https://cse.google.lu/url?sa=t&url=https://massage2203.blogspot.com/2022/07/5-of-best-back-rub-weapons.html
https://cse.google.lt/url?sa=t&url=https://massage2203.blogspot.com/2022/07/5-of-best-back-rub-weapons.html
https://cse.google.lk/url?sa=t&url=https://massage2203.blogspot.com/2022/07/5-of-best-back-rub-weapons.html
https://cse.google.kz/url?sa=t&url=https://massage2203.blogspot.com/2022/07/5-of-best-back-rub-weapons.html
https://cse.google.kg/url?sa=t&url=https://massage2203.blogspot.com/2022/07/5-of-best-back-rub-weapons.html
https://cse.google.jo/url?sa=t&url=https://massage2203.blogspot.com/2022/07/5-of-best-back-rub-weapons.html
https://cse.google.is/url?sa=t&url=https://massage2203.blogspot.com/2022/07/5-of-best-back-rub-weapons.html
https://cse.google.ie/url?sa=t&url=https://massage2203.blogspot.com/2022/07/5-of-best-back-rub-weapons.html
https://cse.google.hu/url?sa=t&url=https://massage2203.blogspot.com/2022/07/5-of-best-back-rub-weapons.html
https://cse.google.ht/url?sa=t&url=https://massage2203.blogspot.com/2022/07/5-of-best-back-rub-weapons.html
https://cse.google.hr/url?sa=t&url=https://massage2203.blogspot.com/2022/07/5-of-best-back-rub-weapons.html
https://cse.google.gr/url?sa=t&url=https://massage2203.blogspot.com/2022/07/5-of-best-back-rub-weapons.html
https://cse.google.gm/url?sa=t&url=https://massage2203.blogspot.com/2022/07/5-of-best-back-rub-weapons.html
https://cse.google.gl/url?sa=t&url=https://massage2203.blogspot.com/2022/07/5-of-best-back-rub-weapons.html
https://cse.google.gg/url?sa=t&url=https://massage2203.blogspot.com/2022/07/5-of-best-back-rub-weapons.html
https://cse.google.ge/url?sa=t&url=https://massage2203.blogspot.com/2022/07/5-of-best-back-rub-weapons.html
https://cse.google.fm/url?sa=t&url=https://massage2203.blogspot.com/2022/07/5-of-best-back-rub-weapons.html
https://cse.google.fi/url?sa=t&url=https://massage2203.blogspot.com/2022/07/5-of-best-back-rub-weapons.html
https://cse.google.es/url?sa=t&url=https://massage2203.blogspot.com/2022/07/5-of-best-back-rub-weapons.html
https://cse.google.es/url?sa=i&url=https://massage2203.blogspot.com/2022/07/5-of-best-back-rub-weapons.html
https://cse.google.ee/url?sa=t&url=https://massage2203.blogspot.com/2022/07/5-of-best-back-rub-weapons.html
https://cse.google.dm/url?sa=t&url=https://massage2203.blogspot.com/2022/07/5-of-best-back-rub-weapons.html
https://cse.google.dk/url?sa=t&url=https://massage2203.blogspot.com/2022/07/5-of-best-back-rub-weapons.html
https://cse.google.dj/url?sa=t&url=https://massage2203.blogspot.com/2022/07/5-of-best-back-rub-weapons.html
https://cse.google.de/url?sa=t&url=https://massage2203.blogspot.com/2022/07/5-of-best-back-rub-weapons.html
https://cse.google.com/url?sa=t&url=https://massage2203.blogspot.com/2022/07/5-of-best-back-rub-weapons.html
https://cse.google.com.vn/url?sa=t&url=https://massage2203.blogspot.com/2022/07/5-of-best-back-rub-weapons.html
https://cse.google.com.uy/url?sa=t&url=https://massage2203.blogspot.com/2022/07/5-of-best-back-rub-weapons.html
https://cse.google.com.ua/url?sa=t&url=https://massage2203.blogspot.com/2022/07/5-of-best-back-rub-weapons.html
https://cse.google.com.tr/url?sa=t&url=https://massage2203.blogspot.com/2022/07/5-of-best-back-rub-weapons.html
https://cse.google.com.sg/url?sa=t&url=https://massage2203.blogspot.com/2022/07/5-of-best-back-rub-weapons.html
https://cse.google.com.sa/url?sa=t&url=https://massage2203.blogspot.com/2022/07/5-of-best-back-rub-weapons.html
https://cse.google.com.pr/url?sa=t&url=https://massage2203.blogspot.com/2022/07/5-of-best-back-rub-weapons.html
https://cse.google.com.pk/url?sa=t&url=https://massage2203.blogspot.com/2022/07/5-of-best-back-rub-weapons.html
https://cse.google.com.ph/url?sa=t&url=https://massage2203.blogspot.com/2022/07/5-of-best-back-rub-weapons.html
https://cse.google.com.pa/url?sa=t&url=https://massage2203.blogspot.com/2022/07/5-of-best-back-rub-weapons.html
https://cse.google.com.om/url?sa=t&url=https://massage2203.blogspot.com/2022/07/5-of-best-back-rub-weapons.html
https://cse.google.com.np/url?sa=t&url=https://massage2203.blogspot.com/2022/07/5-of-best-back-rub-weapons.html
https://cse.google.com.ng/url?sa=t&url=https://massage2203.blogspot.com/2022/07/5-of-best-back-rub-weapons.html
https://cse.google.com.my/url?sa=t&url=https://massage2203.blogspot.com/2022/07/5-of-best-back-rub-weapons.html
https://cse.google.com.mt/url?sa=t&url=https://massage2203.blogspot.com/2022/07/5-of-best-back-rub-weapons.html
https://cse.google.com.ly/url?sa=t&url=https://massage2203.blogspot.com/2022/07/5-of-best-back-rub-weapons.html
https://cse.google.com.lb/url?sa=t&url=https://massage2203.blogspot.com/2022/07/5-of-best-back-rub-weapons.html
https://cse.google.com.kw/url?sa=t&url=https://massage2203.blogspot.com/2022/07/5-of-best-back-rub-weapons.html
https://cse.google.com.jm/url?sa=t&url=https://massage2203.blogspot.com/2022/07/5-of-best-back-rub-weapons.html
https://cse.google.com.hk/url?sa=t&url=https://massage2203.blogspot.com/2022/07/5-of-best-back-rub-weapons.html
https://cse.google.com.hk/url?sa=i&url=https://massage2203.blogspot.com/2022/07/5-of-best-back-rub-weapons.html
https://cse.google.com.gt/url?sa=t&url=https://massage2203.blogspot.com/2022/07/5-of-best-back-rub-weapons.html
https://cse.google.com.gi/url?sa=t&url=https://massage2203.blogspot.com/2022/07/5-of-best-back-rub-weapons.html
https://cse.google.com.fj/url?sa=t&url=https://massage2203.blogspot.com/2022/07/5-of-best-back-rub-weapons.html
https://cse.google.com.et/url?sa=t&url=https://massage2203.blogspot.com/2022/07/5-of-best-back-rub-weapons.html
https://cse.google.com.eg/url?sa=t&url=https://massage2203.blogspot.com/2022/07/5-of-best-back-rub-weapons.html
https://cse.google.com.ec/url?sa=t&url=https://massage2203.blogspot.com/2022/07/5-of-best-back-rub-weapons.html
https://cse.google.com.do/url?sa=t&url=https://massage2203.blogspot.com/2022/07/5-of-best-back-rub-weapons.html
https://cse.google.com.cu/url?sa=t&url=https://massage2203.blogspot.com/2022/07/5-of-best-back-rub-weapons.html
https://cse.google.com.co/url?sa=t&url=https://massage2203.blogspot.com/2022/07/5-of-best-back-rub-weapons.html
https://cse.google.com.bz/url?sa=t&url=https://massage2203.blogspot.com/2022/07/5-of-best-back-rub-weapons.html
https://cse.google.com.bh/url?sa=t&url=https://massage2203.blogspot.com/2022/07/5-of-best-back-rub-weapons.html
https://cse.google.com.bd/url?sa=t&url=https://massage2203.blogspot.com/2022/07/5-of-best-back-rub-weapons.html
https://cse.google.com.au/url?sa=t&url=https://massage2203.blogspot.com/2022/07/5-of-best-back-rub-weapons.html
https://cse.google.com.ar/url?sa=t&url=https://massage2203.blogspot.com/2022/07/5-of-best-back-rub-weapons.html
https://cse.google.com.ag/url?sa=t&url=https://massage2203.blogspot.com/2022/07/5-of-best-back-rub-weapons.html
https://cse.google.co.zm/url?sa=t&url=https://massage2203.blogspot.com/2022/07/5-of-best-back-rub-weapons.html
https://cse.google.co.za/url?sa=t&url=https://massage2203.blogspot.com/2022/07/5-of-best-back-rub-weapons.html
https://cse.google.co.ve/url?sa=t&url=https://massage2203.blogspot.com/2022/07/5-of-best-back-rub-weapons.html
https://cse.google.co.uz/url?sa=t&url=https://massage2203.blogspot.com/2022/07/5-of-best-back-rub-weapons.html
https://cse.google.co.ug/url?sa=t&url=https://massage2203.blogspot.com/2022/07/5-of-best-back-rub-weapons.html
https://cse.google.co.th/url?sa=t&url=https://massage2203.blogspot.com/2022/07/5-of-best-back-rub-weapons.html
https://cse.google.co.nz/url?sa=t&url=https://massage2203.blogspot.com/2022/07/5-of-best-back-rub-weapons.html
https://cse.google.co.kr/url?sa=t&url=https://massage2203.blogspot.com/2022/07/5-of-best-back-rub-weapons.html
https://cse.google.co.ke/url?sa=t&url=https://massage2203.blogspot.com/2022/07/5-of-best-back-rub-weapons.html
https://cse.google.co.jp/url?sa=t&url=https://massage2203.blogspot.com/2022/07/5-of-best-back-rub-weapons.html
https://cse.google.co.il/url?sa=t&url=https://massage2203.blogspot.com/2022/07/5-of-best-back-rub-weapons.html
https://cse.google.co.id/url?sa=t&url=https://massage2203.blogspot.com/2022/07/5-of-best-back-rub-weapons.html
https://cse.google.co.id/url?sa=i&url=https://massage2203.blogspot.com/2022/07/5-of-best-back-rub-weapons.html
https://cse.google.co.cr/url?sa=t&url=https://massage2203.blogspot.com/2022/07/5-of-best-back-rub-weapons.html
https://cse.google.co.ck/url?sa=t&url=https://massage2203.blogspot.com/2022/07/5-of-best-back-rub-weapons.html
https://cse.google.co.bw/url?sa=t&url=https://massage2203.blogspot.com/2022/07/5-of-best-back-rub-weapons.html
https://cse.google.cm/url?sa=t&url=https://massage2203.blogspot.com/2022/07/5-of-best-back-rub-weapons.html
https://cse.google.cl/url?sa=t&url=https://massage2203.blogspot.com/2022/07/5-of-best-back-rub-weapons.html
https://cse.google.ci/url?sa=t&url=https://massage2203.blogspot.com/2022/07/5-of-best-back-rub-weapons.html
https://cse.google.ch/url?sa=t&url=https://massage2203.blogspot.com/2022/07/5-of-best-back-rub-weapons.html
https://cse.google.ch/url?sa=i&url=https://massage2203.blogspot.com/2022/07/5-of-best-back-rub-weapons.html
https://cse.google.cg/url?sa=t&url=https://massage2203.blogspot.com/2022/07/5-of-best-back-rub-weapons.html
https://cse.google.cd/url?sa=t&url=https://massage2203.blogspot.com/2022/07/5-of-best-back-rub-weapons.html
https://cse.google.by/url?sa=t&url=https://massage2203.blogspot.com/2022/07/5-of-best-back-rub-weapons.html
https://cse.google.bs/url?sa=t&url=https://massage2203.blogspot.com/2022/07/5-of-best-back-rub-weapons.html
https://cse.google.bi/url?sa=t&url=https://massage2203.blogspot.com/2022/07/5-of-best-back-rub-weapons.html
https://cse.google.bg/url?sa=t&url=https://massage2203.blogspot.com/2022/07/5-of-best-back-rub-weapons.html
https://cse.google.be/url?sa=t&url=https://massage2203.blogspot.com/2022/07/5-of-best-back-rub-weapons.html
https://cse.google.be/url?sa=i&url=https://massage2203.blogspot.com/2022/07/5-of-best-back-rub-weapons.html
https://cse.google.ba/url?sa=t&url=https://massage2203.blogspot.com/2022/07/5-of-best-back-rub-weapons.html
https://cse.google.az/url?sa=t&url=https://massage2203.blogspot.com/2022/07/5-of-best-back-rub-weapons.html
https://cse.google.at/url?sa=t&url=https://massage2203.blogspot.com/2022/07/5-of-best-back-rub-weapons.html
https://cse.google.am/url?sa=t&url=https://massage2203.blogspot.com/2022/07/5-of-best-back-rub-weapons.html
https://cse.google.ae/url?sa=t&url=https://massage2203.blogspot.com/2022/07/5-of-best-back-rub-weapons.html
https://clients1.google.vg/url?sa=t&url=https://massage2203.blogspot.com/2022/07/5-of-best-back-rub-weapons.html
https://clients1.google.to/url?sa=t&url=https://massage2203.blogspot.com/2022/07/5-of-best-back-rub-weapons.html
https://clients1.google.tn/url?sa=t&url=https://massage2203.blogspot.com/2022/07/5-of-best-back-rub-weapons.html
https://clients1.google.tm/url?sa=t&url=https://massage2203.blogspot.com/2022/07/5-of-best-back-rub-weapons.html
https://clients1.google.sn/url?sa=t&url=https://massage2203.blogspot.com/2022/07/5-of-best-back-rub-weapons.html
https://clients1.google.sm/url?sa=t&url=https://massage2203.blogspot.com/2022/07/5-of-best-back-rub-weapons.html
https://clients1.google.sk/url?sa=t&url=https://massage2203.blogspot.com/2022/07/5-of-best-back-rub-weapons.html
https://clients1.google.si/url?sa=t&url=https://massage2203.blogspot.com/2022/07/5-of-best-back-rub-weapons.html
https://clients1.google.sh/url?sa=t&url=https://massage2203.blogspot.com/2022/07/5-of-best-back-rub-weapons.html
https://clients1.google.se/url?sa=t&url=https://massage2203.blogspot.com/2022/07/5-of-best-back-rub-weapons.html
https://clients1.google.sc/url?sa=t&url=https://massage2203.blogspot.com/2022/07/5-of-best-back-rub-weapons.html
https://clients1.google.rw/url?sa=t&url=https://massage2203.blogspot.com/2022/07/5-of-best-back-rub-weapons.html
https://clients1.google.rs/url?sa=t&url=https://massage2203.blogspot.com/2022/07/5-of-best-back-rub-weapons.html
https://clients1.google.ro/url?sa=t&url=https://massage2203.blogspot.com/2022/07/5-of-best-back-rub-weapons.html
https://clients1.google.pt/url?sa=t&url=https://massage2203.blogspot.com/2022/07/5-of-best-back-rub-weapons.html
https://clients1.google.ps/url?sa=t&url=https://massage2203.blogspot.com/2022/07/5-of-best-back-rub-weapons.html
https://clients1.google.no/url?sa=t&url=https://massage2203.blogspot.com/2022/07/5-of-best-back-rub-weapons.html
https://clients1.google.mw/url?sa=t&url=https://massage2203.blogspot.com/2022/07/5-of-best-back-rub-weapons.html
https://clients1.google.ms/url?sa=t&url=https://massage2203.blogspot.com/2022/07/5-of-best-back-rub-weapons.html
https://clients1.google.mn/url?sa=t&url=https://massage2203.blogspot.com/2022/07/5-of-best-back-rub-weapons.html
https://clients1.google.md/url?sa=t&url=https://massage2203.blogspot.com/2022/07/5-of-best-back-rub-weapons.html
https://clients1.google.lv/url?sa=t&url=https://massage2203.blogspot.com/2022/07/5-of-best-back-rub-weapons.html
https://clients1.google.lu/url?sa=t&url=https://massage2203.blogspot.com/2022/07/5-of-best-back-rub-weapons.html
https://clients1.google.lt/url?sa=t&url=https://massage2203.blogspot.com/2022/07/5-of-best-back-rub-weapons.html
https://clients1.google.lk/url?sa=t&url=https://massage2203.blogspot.com/2022/07/5-of-best-back-rub-weapons.html
https://clients1.google.kz/url?sa=t&url=https://massage2203.blogspot.com/2022/07/5-of-best-back-rub-weapons.html
https://clients1.google.kg/url?sa=t&url=https://massage2203.blogspot.com/2022/07/5-of-best-back-rub-weapons.html
https://clients1.google.jo/url?sa=t&url=https://massage2203.blogspot.com/2022/07/5-of-best-back-rub-weapons.html
https://clients1.google.is/url?sa=t&url=https://massage2203.blogspot.com/2022/07/5-of-best-back-rub-weapons.html
https://clients1.google.ie/url?sa=t&url=https://massage2203.blogspot.com/2022/07/5-of-best-back-rub-weapons.html
https://clients1.google.ie/url?q=https://massage2203.blogspot.com/2022/07/5-of-best-back-rub-weapons.html
https://clients1.google.hu/url?sa=t&url=https://massage2203.blogspot.com/2022/07/5-of-best-back-rub-weapons.html
https://clients1.google.ht/url?sa=t&url=https://massage2203.blogspot.com/2022/07/5-of-best-back-rub-weapons.html
https://clients1.google.hr/url?sa=t&url=https://massage2203.blogspot.com/2022/07/5-of-best-back-rub-weapons.html
https://clients1.google.gr/url?sa=t&url=https://massage2203.blogspot.com/2022/07/5-of-best-back-rub-weapons.html
https://clients1.google.gm/url?sa=t&url=https://massage2203.blogspot.com/2022/07/5-of-best-back-rub-weapons.html
https://clients1.google.gl/url?sa=t&url=https://massage2203.blogspot.com/2022/07/5-of-best-back-rub-weapons.html
https://clients1.google.gg/url?sa=t&url=https://massage2203.blogspot.com/2022/07/5-of-best-back-rub-weapons.html
https://clients1.google.ge/url?sa=t&url=https://massage2203.blogspot.com/2022/07/5-of-best-back-rub-weapons.html
https://clients1.google.fm/url?sa=t&url=https://massage2203.blogspot.com/2022/07/5-of-best-back-rub-weapons.html
https://clients1.google.fi/url?sa=t&url=https://massage2203.blogspot.com/2022/07/5-of-best-back-rub-weapons.html
https://clients1.google.es/url?sa=t&url=https://massage2203.blogspot.com/2022/07/5-of-best-back-rub-weapons.html
https://clients1.google.es/url?q=https://massage2203.blogspot.com/2022/07/5-of-best-back-rub-weapons.html
https://clients1.google.ee/url?sa=t&url=https://massage2203.blogspot.com/2022/07/5-of-best-back-rub-weapons.html
https://clients1.google.dm/url?sa=t&url=https://massage2203.blogspot.com/2022/07/5-of-best-back-rub-weapons.html
https://clients1.google.dk/url?sa=t&url=https://massage2203.blogspot.com/2022/07/5-of-best-back-rub-weapons.html
https://clients1.google.dj/url?sa=t&url=https://massage2203.blogspot.com/2022/07/5-of-best-back-rub-weapons.html
https://clients1.google.de/url?sa=t&url=https://massage2203.blogspot.com/2022/07/5-of-best-back-rub-weapons.html
https://clients1.google.com.vn/url?sa=t&url=https://massage2203.blogspot.com/2022/07/5-of-best-back-rub-weapons.html
https://clients1.google.com.vc/url?sa=t&url=https://massage2203.blogspot.com/2022/07/5-of-best-back-rub-weapons.html
https://clients1.google.com.uy/url?sa=t&url=https://massage2203.blogspot.com/2022/07/5-of-best-back-rub-weapons.html
https://clients1.google.com.ua/url?sa=t&url=https://massage2203.blogspot.com/2022/07/5-of-best-back-rub-weapons.html
https://clients1.google.com.tr/url?sa=t&url=https://massage2203.blogspot.com/2022/07/5-of-best-back-rub-weapons.html
https://clients1.google.com.tr/url?q=https://massage2203.blogspot.com/2022/07/5-of-best-back-rub-weapons.html
https://clients1.google.com.sg/url?sa=t&url=https://massage2203.blogspot.com/2022/07/5-of-best-back-rub-weapons.html
https://clients1.google.com.sa/url?sa=t&url=https://massage2203.blogspot.com/2022/07/5-of-best-back-rub-weapons.html
https://clients1.google.com.qa/url?sa=t&url=https://massage2203.blogspot.com/2022/07/5-of-best-back-rub-weapons.html
https://clients1.google.com.py/url?sa=t&url=https://massage2203.blogspot.com/2022/07/5-of-best-back-rub-weapons.html
https://clients1.google.com.pr/url?sa=t&url=https://massage2203.blogspot.com/2022/07/5-of-best-back-rub-weapons.html
https://clients1.google.com.pk/url?sa=t&url=https://massage2203.blogspot.com/2022/07/5-of-best-back-rub-weapons.html
https://clients1.google.com.ph/url?sa=t&url=https://massage2203.blogspot.com/2022/07/5-of-best-back-rub-weapons.html
https://clients1.google.com.pa/url?sa=t&url=https://massage2203.blogspot.com/2022/07/5-of-best-back-rub-weapons.html
https://clients1.google.com.np/url?sa=t&url=https://massage2203.blogspot.com/2022/07/5-of-best-back-rub-weapons.html
https://clients1.google.com.ng/url?sa=t&url=https://massage2203.blogspot.com/2022/07/5-of-best-back-rub-weapons.html
https://clients1.google.com.my/url?sa=t&url=https://massage2203.blogspot.com/2022/07/5-of-best-back-rub-weapons.html
https://clients1.google.com.mt/url?sa=t&url=https://massage2203.blogspot.com/2022/07/5-of-best-back-rub-weapons.html
https://clients1.google.com.ly/url?sa=t&url=https://massage2203.blogspot.com/2022/07/5-of-best-back-rub-weapons.html
https://clients1.google.com.lb/url?sa=t&url=https://massage2203.blogspot.com/2022/07/5-of-best-back-rub-weapons.html
https://clients1.google.com.kw/url?sa=t&url=https://massage2203.blogspot.com/2022/07/5-of-best-back-rub-weapons.html
https://clients1.google.com.jm/url?sa=t&url=https://massage2203.blogspot.com/2022/07/5-of-best-back-rub-weapons.html
https://clients1.google.com.hk/url?sa=t&url=https://massage2203.blogspot.com/2022/07/5-of-best-back-rub-weapons.html
https://clients1.google.com.gt/url?sa=t&url=https://massage2203.blogspot.com/2022/07/5-of-best-back-rub-weapons.html
https://clients1.google.com.gi/url?sa=t&url=https://massage2203.blogspot.com/2022/07/5-of-best-back-rub-weapons.html
https://clients1.google.com.fj/url?sa=t&url=https://massage2203.blogspot.com/2022/07/5-of-best-back-rub-weapons.html
https://clients1.google.com.et/url?sa=t&url=https://massage2203.blogspot.com/2022/07/5-of-best-back-rub-weapons.html
https://clients1.google.com.eg/url?sa=t&url=https://massage2203.blogspot.com/2022/07/5-of-best-back-rub-weapons.html
https://clients1.google.com.ec/url?sa=t&url=https://massage2203.blogspot.com/2022/07/5-of-best-back-rub-weapons.html
https://clients1.google.com.do/url?sa=t&url=https://massage2203.blogspot.com/2022/07/5-of-best-back-rub-weapons.html
https://clients1.google.com.co/url?sa=t&url=https://massage2203.blogspot.com/2022/07/5-of-best-back-rub-weapons.html
https://clients1.google.com.co/url?q=https://massage2203.blogspot.com/2022/07/5-of-best-back-rub-weapons.html
https://clients1.google.com.bz/url?sa=t&url=https://massage2203.blogspot.com/2022/07/5-of-best-back-rub-weapons.html
https://clients1.google.com.bh/url?sa=t&url=https://massage2203.blogspot.com/2022/07/5-of-best-back-rub-weapons.html
https://clients1.google.com.bd/url?sa=t&url=https://massage2203.blogspot.com/2022/07/5-of-best-back-rub-weapons.html
https://clients1.google.com.ar/url?sa=t&url=https://massage2203.blogspot.com/2022/07/5-of-best-back-rub-weapons.html
https://clients1.google.com.ag/url?sa=t&url=https://massage2203.blogspot.com/2022/07/5-of-best-back-rub-weapons.html
https://clients1.google.co.zm/url?sa=t&url=https://massage2203.blogspot.com/2022/07/5-of-best-back-rub-weapons.html
https://clients1.google.co.za/url?sa=t&url=https://massage2203.blogspot.com/2022/07/5-of-best-back-rub-weapons.html
https://clients1.google.co.ve/url?sa=t&url=https://massage2203.blogspot.com/2022/07/5-of-best-back-rub-weapons.html
https://clients1.google.co.uz/url?sa=t&url=https://massage2203.blogspot.com/2022/07/5-of-best-back-rub-weapons.html
https://clients1.google.co.ug/url?sa=t&url=https://massage2203.blogspot.com/2022/07/5-of-best-back-rub-weapons.html
https://clients1.google.co.th/url?sa=t&url=https://massage2203.blogspot.com/2022/07/5-of-best-back-rub-weapons.html
https://clients1.google.co.nz/url?sa=t&url=https://massage2203.blogspot.com/2022/07/5-of-best-back-rub-weapons.html
https://clients1.google.co.kr/url?sa=t&url=https://massage2203.blogspot.com/2022/07/5-of-best-back-rub-weapons.html
https://clients1.google.co.ke/url?sa=t&url=https://massage2203.blogspot.com/2022/07/5-of-best-back-rub-weapons.html
https://clients1.google.co.il/url?sa=t&url=https://massage2203.blogspot.com/2022/07/5-of-best-back-rub-weapons.html
https://clients1.google.co.id/url?sa=t&url=https://massage2203.blogspot.com/2022/07/5-of-best-back-rub-weapons.html
https://clients1.google.co.cr/url?sa=t&url=https://massage2203.blogspot.com/2022/07/5-of-best-back-rub-weapons.html
https://clients1.google.co.ck/url?sa=t&url=https://massage2203.blogspot.com/2022/07/5-of-best-back-rub-weapons.html
https://clients1.google.co.bw/url?sa=t&url=https://massage2203.blogspot.com/2022/07/5-of-best-back-rub-weapons.html
https://clients1.google.cm/url?sa=t&url=https://massage2203.blogspot.com/2022/07/5-of-best-back-rub-weapons.html
https://clients1.google.cl/url?sa=t&url=https://massage2203.blogspot.com/2022/07/5-of-best-back-rub-weapons.html
https://clients1.google.cl/url?q=https://massage2203.blogspot.com/2022/07/5-of-best-back-rub-weapons.html
https://clients1.google.ci/url?sa=t&url=https://massage2203.blogspot.com/2022/07/5-of-best-back-rub-weapons.html
https://clients1.google.ch/url?q=https://massage2203.blogspot.com/2022/07/5-of-best-back-rub-weapons.html
https://clients1.google.cg/url?sa=t&url=https://massage2203.blogspot.com/2022/07/5-of-best-back-rub-weapons.html
https://clients1.google.cd/url?sa=t&url=https://massage2203.blogspot.com/2022/07/5-of-best-back-rub-weapons.html
https://clients1.google.by/url?sa=t&url=https://massage2203.blogspot.com/2022/07/5-of-best-back-rub-weapons.html
https://clients1.google.bs/url?sa=t&url=https://massage2203.blogspot.com/2022/07/5-of-best-back-rub-weapons.html
https://clients1.google.bi/url?sa=t&url=https://massage2203.blogspot.com/2022/07/5-of-best-back-rub-weapons.html
https://clients1.google.bg/url?sa=t&url=https://massage2203.blogspot.com/2022/07/5-of-best-back-rub-weapons.html
https://clients1.google.be/url?sa=t&url=https://massage2203.blogspot.com/2022/07/5-of-best-back-rub-weapons.html
https://clients1.google.ba/url?sa=t&url=https://massage2203.blogspot.com/2022/07/5-of-best-back-rub-weapons.html
https://clients1.google.az/url?sa=t&url=https://massage2203.blogspot.com/2022/07/5-of-best-back-rub-weapons.html
https://clients1.google.at/url?sa=t&url=https://massage2203.blogspot.com/2022/07/5-of-best-back-rub-weapons.html
https://clients1.google.am/url?sa=t&url=https://massage2203.blogspot.com/2022/07/5-of-best-back-rub-weapons.html
https://clients1.google.ae/url?sa=t&url=https://massage2203.blogspot.com/2022/07/5-of-best-back-rub-weapons.html
http://toolbarqueries.google.sk/url?sa=t&url=https://massage2203.blogspot.com/2022/07/5-of-best-back-rub-weapons.html
http://toolbarqueries.google.si/url?sa=t&url=https://massage2203.blogspot.com/2022/07/5-of-best-back-rub-weapons.html
http://toolbarqueries.google.se/url?sa=t&url=https://massage2203.blogspot.com/2022/07/5-of-best-back-rub-weapons.html
http://toolbarqueries.google.ru/url?sa=t&url=https://massage2203.blogspot.com/2022/07/5-of-best-back-rub-weapons.html
http://toolbarqueries.google.rs/url?sa=t&url=https://massage2203.blogspot.com/2022/07/5-of-best-back-rub-weapons.html
http://toolbarqueries.google.ro/url?sa=t&url=https://massage2203.blogspot.com/2022/07/5-of-best-back-rub-weapons.html
http://toolbarqueries.google.pl/url?sa=t&url=https://massage2203.blogspot.com/2022/07/5-of-best-back-rub-weapons.html
http://toolbarqueries.google.no/url?sa=t&url=https://massage2203.blogspot.com/2022/07/5-of-best-back-rub-weapons.html
http://toolbarqueries.google.nl/url?sa=t&url=https://massage2203.blogspot.com/2022/07/5-of-best-back-rub-weapons.html
http://toolbarqueries.google.lv/url?sa=t&url=https://massage2203.blogspot.com/2022/07/5-of-best-back-rub-weapons.html
http://toolbarqueries.google.lu/url?sa=t&url=https://massage2203.blogspot.com/2022/07/5-of-best-back-rub-weapons.html
http://toolbarqueries.google.lt/url?sa=t&url=https://massage2203.blogspot.com/2022/07/5-of-best-back-rub-weapons.html
http://toolbarqueries.google.lk/url?sa=t&url=https://massage2203.blogspot.com/2022/07/5-of-best-back-rub-weapons.html
http://toolbarqueries.google.it/url?sa=t&url=https://massage2203.blogspot.com/2022/07/5-of-best-back-rub-weapons.html
http://toolbarqueries.google.is/url?sa=t&url=https://massage2203.blogspot.com/2022/07/5-of-best-back-rub-weapons.html
http://toolbarqueries.google.ie/url?sa=t&url=https://massage2203.blogspot.com/2022/07/5-of-best-back-rub-weapons.html
http://toolbarqueries.google.hu/url?sa=t&url=https://massage2203.blogspot.com/2022/07/5-of-best-back-rub-weapons.html
http://toolbarqueries.google.hr/url?sa=t&url=https://massage2203.blogspot.com/2022/07/5-of-best-back-rub-weapons.html
http://toolbarqueries.google.gr/url?sa=t&url=https://massage2203.blogspot.com/2022/07/5-of-best-back-rub-weapons.html
http://toolbarqueries.google.fr/url?sa=t&url=https://massage2203.blogspot.com/2022/07/5-of-best-back-rub-weapons.html
http://toolbarqueries.google.fi/url?sa=t&url=https://massage2203.blogspot.com/2022/07/5-of-best-back-rub-weapons.html
http://toolbarqueries.google.es/url?sa=t&url=https://massage2203.blogspot.com/2022/07/5-of-best-back-rub-weapons.html
http://toolbarqueries.google.ee/url?sa=t&url=https://massage2203.blogspot.com/2022/07/5-of-best-back-rub-weapons.html
http://toolbarqueries.google.dk/url?sa=t&url=https://massage2203.blogspot.com/2022/07/5-of-best-back-rub-weapons.html
http://toolbarqueries.google.de/url?sa=t&url=https://massage2203.blogspot.com/2022/07/5-of-best-back-rub-weapons.html
http://toolbarqueries.google.cz/url?sa=t&url=https://massage2203.blogspot.com/2022/07/5-of-best-back-rub-weapons.html
http://toolbarqueries.google.com.vn/url?sa=t&url=https://massage2203.blogspot.com/2022/07/5-of-best-back-rub-weapons.html
http://toolbarqueries.google.com.uy/url?sa=t&url=https://massage2203.blogspot.com/2022/07/5-of-best-back-rub-weapons.html
http://toolbarqueries.google.com.tw/url?sa=t&url=https://massage2203.blogspot.com/2022/07/5-of-best-back-rub-weapons.html
http://toolbarqueries.google.com.tr/url?sa=t&url=https://massage2203.blogspot.com/2022/07/5-of-best-back-rub-weapons.html
http://toolbarqueries.google.com.sa/url?sa=t&url=https://massage2203.blogspot.com/2022/07/5-of-best-back-rub-weapons.html
http://toolbarqueries.google.com.py/url?sa=t&url=https://massage2203.blogspot.com/2022/07/5-of-best-back-rub-weapons.html
http://toolbarqueries.google.com.pr/url?sa=t&url=https://massage2203.blogspot.com/2022/07/5-of-best-back-rub-weapons.html
http://toolbarqueries.google.com.pk/url?sa=t&url=https://massage2203.blogspot.com/2022/07/5-of-best-back-rub-weapons.html
http://toolbarqueries.google.com.pe/url?sa=t&url=https://massage2203.blogspot.com/2022/07/5-of-best-back-rub-weapons.html
http://toolbarqueries.google.com.my/url?sa=t&url=https://massage2203.blogspot.com/2022/07/5-of-best-back-rub-weapons.html
http://toolbarqueries.google.com.hk/url?sa=t&url=https://massage2203.blogspot.com/2022/07/5-of-best-back-rub-weapons.html
http://toolbarqueries.google.com.gt/url?sa=t&url=https://massage2203.blogspot.com/2022/07/5-of-best-back-rub-weapons.html
http://toolbarqueries.google.com.gh/url?sa=t&url=https://massage2203.blogspot.com/2022/07/5-of-best-back-rub-weapons.html
http://toolbarqueries.google.com.eg/url?sa=t&url=https://massage2203.blogspot.com/2022/07/5-of-best-back-rub-weapons.html
http://toolbarqueries.google.com.ec/url?sa=t&url=https://massage2203.blogspot.com/2022/07/5-of-best-back-rub-weapons.html
http://toolbarqueries.google.com.do/url?sa=t&url=https://massage2203.blogspot.com/2022/07/5-of-best-back-rub-weapons.html
http://toolbarqueries.google.com.cu/url?sa=t&url=https://massage2203.blogspot.com/2022/07/5-of-best-back-rub-weapons.html
http://toolbarqueries.google.com.br/url?sa=t&url=https://massage2203.blogspot.com/2022/07/5-of-best-back-rub-weapons.html
http://toolbarqueries.google.com.au/url?sa=t&url=https://massage2203.blogspot.com/2022/07/5-of-best-back-rub-weapons.html
http://toolbarqueries.google.com.ar/url?sa=t&url=https://massage2203.blogspot.com/2022/07/5-of-best-back-rub-weapons.html
http://toolbarqueries.google.co.za/url?sa=t&url=https://massage2203.blogspot.com/2022/07/5-of-best-back-rub-weapons.html
http://toolbarqueries.google.co.ve/url?sa=t&url=https://massage2203.blogspot.com/2022/07/5-of-best-back-rub-weapons.html
http://toolbarqueries.google.co.uk/url?sa=t&url=https://massage2203.blogspot.com/2022/07/5-of-best-back-rub-weapons.html
http://toolbarqueries.google.co.ug/url?sa=t&url=https://massage2203.blogspot.com/2022/07/5-of-best-back-rub-weapons.html
http://toolbarqueries.google.co.th/url?sa=t&url=https://massage2203.blogspot.com/2022/07/5-of-best-back-rub-weapons.html
http://toolbarqueries.google.co.nz/url?sa=t&url=https://massage2203.blogspot.com/2022/07/5-of-best-back-rub-weapons.html
http://toolbarqueries.google.co.kr/url?sa=t&url=https://massage2203.blogspot.com/2022/07/5-of-best-back-rub-weapons.html
http://toolbarqueries.google.co.ke/url?sa=t&url=https://massage2203.blogspot.com/2022/07/5-of-best-back-rub-weapons.html
http://toolbarqueries.google.co.jp/url?sa=t&url=https://massage2203.blogspot.com/2022/07/5-of-best-back-rub-weapons.html
http://toolbarqueries.google.co.in/url?sa=t&url=https://massage2203.blogspot.com/2022/07/5-of-best-back-rub-weapons.html
http://toolbarqueries.google.co.il/url?sa=t&url=https://massage2203.blogspot.com/2022/07/5-of-best-back-rub-weapons.html
http://toolbarqueries.google.co.id/url?sa=t&url=https://massage2203.blogspot.com/2022/07/5-of-best-back-rub-weapons.html
http://toolbarqueries.google.co.cr/url?sa=t&url=https://massage2203.blogspot.com/2022/07/5-of-best-back-rub-weapons.html
http://toolbarqueries.google.co.bw/url?sa=t&url=https://massage2203.blogspot.com/2022/07/5-of-best-back-rub-weapons.html
http://toolbarqueries.google.cl/url?sa=t&url=https://massage2203.blogspot.com/2022/07/5-of-best-back-rub-weapons.html
http://toolbarqueries.google.ch/url?sa=t&url=https://massage2203.blogspot.com/2022/07/5-of-best-back-rub-weapons.html
http://toolbarqueries.google.ca/url?sa=t&url=https://massage2203.blogspot.com/2022/07/5-of-best-back-rub-weapons.html
http://toolbarqueries.google.bg/url?sa=t&url=https://massage2203.blogspot.com/2022/07/5-of-best-back-rub-weapons.html
http://toolbarqueries.google.at/url?sa=t&url=https://massage2203.blogspot.com/2022/07/5-of-best-back-rub-weapons.html
http://toolbarqueries.google.ae/url?sa=t&url=https://massage2203.blogspot.com/2022/07/5-of-best-back-rub-weapons.html
https://sportstoto7.com/
blairebble@gmail.com 07/05
https://www.google.tn/url?sa=t&url=https://hhttps://sportsbetting010.blogspot.com/2022/07/ac-milan-and-5-betting-options-for.html
https://www.google.sn/url?sa=t&url=https://hhttps://sportsbetting010.blogspot.com/2022/07/ac-milan-and-5-betting-options-for.html
https://www.google.sk/url?sa=t&url=https://hhttps://sportsbetting010.blogspot.com/2022/07/ac-milan-and-5-betting-options-for.html
https://www.google.si/url?sa=t&url=https://hhttps://sportsbetting010.blogspot.com/2022/07/ac-milan-and-5-betting-options-for.html
https://www.google.sh/url?sa=t&url=https://hhttps://sportsbetting010.blogspot.com/2022/07/ac-milan-and-5-betting-options-for.html
https://www.google.se/url?sa=t&url=https://hhttps://sportsbetting010.blogspot.com/2022/07/ac-milan-and-5-betting-options-for.html
https://www.google.rw/url?sa=t&url=https://hhttps://sportsbetting010.blogspot.com/2022/07/ac-milan-and-5-betting-options-for.html
https://www.google.ru/url?sa=t&url=https://hhttps://sportsbetting010.blogspot.com/2022/07/ac-milan-and-5-betting-options-for.html
https://www.google.rs/url?sa=t&url=https://hhttps://sportsbetting010.blogspot.com/2022/07/ac-milan-and-5-betting-options-for.html
https://www.google.ro/url?sa=t&url=https://hhttps://sportsbetting010.blogspot.com/2022/07/ac-milan-and-5-betting-options-for.html
https://www.google.pt/url?sa=t&url=https://hhttps://sportsbetting010.blogspot.com/2022/07/ac-milan-and-5-betting-options-for.html
https://www.google.ps/url?sa=t&url=https://hhttps://sportsbetting010.blogspot.com/2022/07/ac-milan-and-5-betting-options-for.html
https://www.google.pl/url?sa=t&url=https://hhttps://sportsbetting010.blogspot.com/2022/07/ac-milan-and-5-betting-options-for.html
https://www.google.no/url?sa=t&url=https://hhttps://sportsbetting010.blogspot.com/2022/07/ac-milan-and-5-betting-options-for.html
https://www.google.nl/url?sa=t&url=https://hhttps://sportsbetting010.blogspot.com/2022/07/ac-milan-and-5-betting-options-for.html
https://www.google.mw/url?sa=t&url=https://hhttps://sportsbetting010.blogspot.com/2022/07/ac-milan-and-5-betting-options-for.html
https://www.google.mv/url?sa=t&url=https://hhttps://sportsbetting010.blogspot.com/2022/07/ac-milan-and-5-betting-options-for.html
https://www.google.mu/url?sa=t&url=https://hhttps://sportsbetting010.blogspot.com/2022/07/ac-milan-and-5-betting-options-for.html
https://www.google.ms/url?sa=t&url=https://hhttps://sportsbetting010.blogspot.com/2022/07/ac-milan-and-5-betting-options-for.html
https://www.google.mn/url?sa=t&url=https://hhttps://sportsbetting010.blogspot.com/2022/07/ac-milan-and-5-betting-options-for.html
https://www.google.mk/url?sa=t&url=https://hhttps://sportsbetting010.blogspot.com/2022/07/ac-milan-and-5-betting-options-for.html
https://www.google.mg/url?sa=t&url=https://hhttps://sportsbetting010.blogspot.com/2022/07/ac-milan-and-5-betting-options-for.html
https://www.google.me/url?sa=t&url=https://hhttps://sportsbetting010.blogspot.com/2022/07/ac-milan-and-5-betting-options-for.html
https://www.google.md/url?sa=t&url=https://hhttps://sportsbetting010.blogspot.com/2022/07/ac-milan-and-5-betting-options-for.html
https://www.google.lv/url?sa=t&url=https://hhttps://sportsbetting010.blogspot.com/2022/07/ac-milan-and-5-betting-options-for.html
https://www.google.lu/url?sa=t&url=https://hhttps://sportsbetting010.blogspot.com/2022/07/ac-milan-and-5-betting-options-for.html
https://www.google.lt/url?sa=t&url=https://hhttps://sportsbetting010.blogspot.com/2022/07/ac-milan-and-5-betting-options-for.html
https://www.google.lk/url?sa=t&url=https://hhttps://sportsbetting010.blogspot.com/2022/07/ac-milan-and-5-betting-options-for.html
https://www.google.li/url?sa=t&url=https://hhttps://sportsbetting010.blogspot.com/2022/07/ac-milan-and-5-betting-options-for.html
https://www.google.la/url?sa=t&url=https://hhttps://sportsbetting010.blogspot.com/2022/07/ac-milan-and-5-betting-options-for.html
https://www.google.kz/url?sa=t&url=https://hhttps://sportsbetting010.blogspot.com/2022/07/ac-milan-and-5-betting-options-for.html
https://www.google.kg/url?sa=t&url=https://hhttps://sportsbetting010.blogspot.com/2022/07/ac-milan-and-5-betting-options-for.html
https://www.google.jo/url?sa=t&url=https://hhttps://sportsbetting010.blogspot.com/2022/07/ac-milan-and-5-betting-options-for.html
https://www.google.je/url?sa=t&url=https://hhttps://sportsbetting010.blogspot.com/2022/07/ac-milan-and-5-betting-options-for.html
https://www.google.it/url?sa=t&url=https://hhttps://sportsbetting010.blogspot.com/2022/07/ac-milan-and-5-betting-options-for.html
https://www.google.is/url?sa=t&url=https://hhttps://sportsbetting010.blogspot.com/2022/07/ac-milan-and-5-betting-options-for.html
https://www.google.iq/url?sa=t&url=https://hhttps://sportsbetting010.blogspot.com/2022/07/ac-milan-and-5-betting-options-for.html
https://www.google.ie/url?sa=t&url=https://hhttps://sportsbetting010.blogspot.com/2022/07/ac-milan-and-5-betting-options-for.html
https://www.google.hu/url?sa=t&url=https://hhttps://sportsbetting010.blogspot.com/2022/07/ac-milan-and-5-betting-options-for.html
https://www.google.ht/url?sa=t&url=https://hhttps://sportsbetting010.blogspot.com/2022/07/ac-milan-and-5-betting-options-for.html
https://www.google.hr/url?sa=t&url=https://hhttps://sportsbetting010.blogspot.com/2022/07/ac-milan-and-5-betting-options-for.html
https://www.google.hn/url?sa=t&url=https://hhttps://sportsbetting010.blogspot.com/2022/07/ac-milan-and-5-betting-options-for.html
https://www.google.gr/url?sa=t&url=https://hhttps://sportsbetting010.blogspot.com/2022/07/ac-milan-and-5-betting-options-for.html
https://www.google.gp/url?sa=t&url=https://hhttps://sportsbetting010.blogspot.com/2022/07/ac-milan-and-5-betting-options-for.html
https://www.google.gm/url?sa=t&url=https://hhttps://sportsbetting010.blogspot.com/2022/07/ac-milan-and-5-betting-options-for.html
https://www.google.gl/url?sa=t&url=https://hhttps://sportsbetting010.blogspot.com/2022/07/ac-milan-and-5-betting-options-for.html
https://www.google.gg/url?sa=t&url=https://hhttps://sportsbetting010.blogspot.com/2022/07/ac-milan-and-5-betting-options-for.html
https://www.google.ge/url?sa=t&url=https://hhttps://sportsbetting010.blogspot.com/2022/07/ac-milan-and-5-betting-options-for.html
https://www.google.fr/url?sa=t&url=https://hhttps://sportsbetting010.blogspot.com/2022/07/ac-milan-and-5-betting-options-for.html
https://www.google.fm/url?sa=t&url=https://hhttps://sportsbetting010.blogspot.com/2022/07/ac-milan-and-5-betting-options-for.html
https://www.google.fi/url?sa=t&url=https://hhttps://sportsbetting010.blogspot.com/2022/07/ac-milan-and-5-betting-options-for.html
https://www.google.es/url?sa=t&url=https://hhttps://sportsbetting010.blogspot.com/2022/07/ac-milan-and-5-betting-options-for.html
https://www.google.ee/url?sa=t&url=https://hhttps://sportsbetting010.blogspot.com/2022/07/ac-milan-and-5-betting-options-for.html
https://www.google.dz/url?sa=t&url=https://hhttps://sportsbetting010.blogspot.com/2022/07/ac-milan-and-5-betting-options-for.html
https://www.google.dk/url?sa=t&url=https://hhttps://sportsbetting010.blogspot.com/2022/07/ac-milan-and-5-betting-options-for.html
https://www.google.dj/url?sa=t&url=https://hhttps://sportsbetting010.blogspot.com/2022/07/ac-milan-and-5-betting-options-for.html
https://www.google.de/url?sa=t&url=https://hhttps://sportsbetting010.blogspot.com/2022/07/ac-milan-and-5-betting-options-for.html
https://www.google.cz/url?sa=t&url=https://hhttps://sportsbetting010.blogspot.com/2022/07/ac-milan-and-5-betting-options-for.html
https://www.google.com/url?sa=t&url=https://hhttps://sportsbetting010.blogspot.com/2022/07/ac-milan-and-5-betting-options-for.html
https://www.google.com.vn/url?sa=t&url=https://hhttps://sportsbetting010.blogspot.com/2022/07/ac-milan-and-5-betting-options-for.html
https://www.google.com.uy/url?sa=t&url=https://hhttps://sportsbetting010.blogspot.com/2022/07/ac-milan-and-5-betting-options-for.html
https://www.google.com.ua/url?sa=t&url=https://hhttps://sportsbetting010.blogspot.com/2022/07/ac-milan-and-5-betting-options-for.html
https://www.google.com.tw/url?sa=t&url=https://hhttps://sportsbetting010.blogspot.com/2022/07/ac-milan-and-5-betting-options-for.html
https://www.google.com.tr/url?sa=t&url=https://hhttps://sportsbetting010.blogspot.com/2022/07/ac-milan-and-5-betting-options-for.html
https://www.google.com.sv/url?sa=t&url=https://hhttps://sportsbetting010.blogspot.com/2022/07/ac-milan-and-5-betting-options-for.html
https://www.google.com.sg/url?sa=t&url=https://hhttps://sportsbetting010.blogspot.com/2022/07/ac-milan-and-5-betting-options-for.html
https://www.google.com.sa/url?sa=t&url=https://hhttps://sportsbetting010.blogspot.com/2022/07/ac-milan-and-5-betting-options-for.html
https://www.google.com.qa/url?sa=t&url=https://hhttps://sportsbetting010.blogspot.com/2022/07/ac-milan-and-5-betting-options-for.html
https://www.google.com.py/url?sa=t&url=https://hhttps://sportsbetting010.blogspot.com/2022/07/ac-milan-and-5-betting-options-for.html
https://www.google.com.pr/url?sa=t&url=https://hhttps://sportsbetting010.blogspot.com/2022/07/ac-milan-and-5-betting-options-for.html
https://www.google.com.pk/url?sa=t&url=https://hhttps://sportsbetting010.blogspot.com/2022/07/ac-milan-and-5-betting-options-for.html
https://www.google.com.ph/url?sa=t&url=https://hhttps://sportsbetting010.blogspot.com/2022/07/ac-milan-and-5-betting-options-for.html
https://www.google.com.pe/url?sa=t&url=https://hhttps://sportsbetting010.blogspot.com/2022/07/ac-milan-and-5-betting-options-for.html
https://www.google.com.pa/url?sa=t&url=https://hhttps://sportsbetting010.blogspot.com/2022/07/ac-milan-and-5-betting-options-for.html
https://www.google.com.om/url?sa=t&url=https://hhttps://sportsbetting010.blogspot.com/2022/07/ac-milan-and-5-betting-options-for.html
https://www.google.com.ni/url?sa=t&url=https://hhttps://sportsbetting010.blogspot.com/2022/07/ac-milan-and-5-betting-options-for.html
https://www.google.com.ng/url?sa=t&url=https://hhttps://sportsbetting010.blogspot.com/2022/07/ac-milan-and-5-betting-options-for.html
https://www.google.com.na/url?sa=t&url=https://hhttps://sportsbetting010.blogspot.com/2022/07/ac-milan-and-5-betting-options-for.html
https://www.google.com.mz/url?sa=t&url=https://hhttps://sportsbetting010.blogspot.com/2022/07/ac-milan-and-5-betting-options-for.html
https://www.google.com.my/url?sa=t&url=https://hhttps://sportsbetting010.blogspot.com/2022/07/ac-milan-and-5-betting-options-for.html
https://www.google.com.mx/url?sa=t&url=https://hhttps://sportsbetting010.blogspot.com/2022/07/ac-milan-and-5-betting-options-for.html
https://www.google.com.mt/url?sa=t&url=https://hhttps://sportsbetting010.blogspot.com/2022/07/ac-milan-and-5-betting-options-for.html
https://www.google.com.ly/url?sa=t&url=https://hhttps://sportsbetting010.blogspot.com/2022/07/ac-milan-and-5-betting-options-for.html
https://www.google.com.lb/url?sa=t&url=https://hhttps://sportsbetting010.blogspot.com/2022/07/ac-milan-and-5-betting-options-for.html
https://www.google.com.kw/url?sa=t&url=https://hhttps://sportsbetting010.blogspot.com/2022/07/ac-milan-and-5-betting-options-for.html
https://www.google.com.kh/url?sa=t&url=https://hhttps://sportsbetting010.blogspot.com/2022/07/ac-milan-and-5-betting-options-for.html
https://www.google.com.jm/url?sa=t&url=https://hhttps://sportsbetting010.blogspot.com/2022/07/ac-milan-and-5-betting-options-for.html
https://www.google.com.hk/url?sa=t&url=https://hhttps://sportsbetting010.blogspot.com/2022/07/ac-milan-and-5-betting-options-for.html
https://www.google.com.gt/url?sa=t&url=https://hhttps://sportsbetting010.blogspot.com/2022/07/ac-milan-and-5-betting-options-for.html
https://www.google.com.gi/url?sa=t&url=https://hhttps://sportsbetting010.blogspot.com/2022/07/ac-milan-and-5-betting-options-for.html
https://www.google.com.gh/url?sa=t&url=https://hhttps://sportsbetting010.blogspot.com/2022/07/ac-milan-and-5-betting-options-for.html
https://www.google.com.fj/url?sa=t&url=https://hhttps://sportsbetting010.blogspot.com/2022/07/ac-milan-and-5-betting-options-for.html
https://www.google.com.et/url?sa=t&url=https://hhttps://sportsbetting010.blogspot.com/2022/07/ac-milan-and-5-betting-options-for.html
https://www.google.com.eg/url?sa=t&url=https://hhttps://sportsbetting010.blogspot.com/2022/07/ac-milan-and-5-betting-options-for.html
https://www.google.com.ec/url?sa=t&url=https://hhttps://sportsbetting010.blogspot.com/2022/07/ac-milan-and-5-betting-options-for.html
https://www.google.com.do/url?sa=t&url=https://hhttps://sportsbetting010.blogspot.com/2022/07/ac-milan-and-5-betting-options-for.html
https://www.google.com.cy/url?sa=t&url=https://hhttps://sportsbetting010.blogspot.com/2022/07/ac-milan-and-5-betting-options-for.html
https://www.google.com.cu/url?sa=t&url=https://hhttps://sportsbetting010.blogspot.com/2022/07/ac-milan-and-5-betting-options-for.html
https://www.google.com.co/url?sa=t&url=https://hhttps://sportsbetting010.blogspot.com/2022/07/ac-milan-and-5-betting-options-for.html
https://www.google.com.bz/url?sa=t&url=https://hhttps://sportsbetting010.blogspot.com/2022/07/ac-milan-and-5-betting-options-for.html
https://www.google.com.br/url?sa=t&url=https://hhttps://sportsbetting010.blogspot.com/2022/07/ac-milan-and-5-betting-options-for.html
https://www.google.com.bo/url?sa=t&url=https://hhttps://sportsbetting010.blogspot.com/2022/07/ac-milan-and-5-betting-options-for.html
https://www.google.com.bn/url?sa=t&url=https://hhttps://sportsbetting010.blogspot.com/2022/07/ac-milan-and-5-betting-options-for.html
https://www.google.com.bh/url?sa=t&url=https://hhttps://sportsbetting010.blogspot.com/2022/07/ac-milan-and-5-betting-options-for.html
https://www.google.com.bd/url?sa=t&url=https://hhttps://sportsbetting010.blogspot.com/2022/07/ac-milan-and-5-betting-options-for.html
https://www.google.com.au/url?sa=t&url=https://hhttps://sportsbetting010.blogspot.com/2022/07/ac-milan-and-5-betting-options-for.html
https://www.google.com.ar/url?sa=t&url=https://hhttps://sportsbetting010.blogspot.com/2022/07/ac-milan-and-5-betting-options-for.html
https://www.google.com.ag/url?sa=t&url=https://hhttps://sportsbetting010.blogspot.com/2022/07/ac-milan-and-5-betting-options-for.html
https://www.google.com.af/url?sa=t&url=https://hhttps://sportsbetting010.blogspot.com/2022/07/ac-milan-and-5-betting-options-for.html
https://www.google.co.za/url?sa=t&url=https://hhttps://sportsbetting010.blogspot.com/2022/07/ac-milan-and-5-betting-options-for.html
https://www.google.co.ve/url?sa=t&url=https://hhttps://sportsbetting010.blogspot.com/2022/07/ac-milan-and-5-betting-options-for.html
https://www.google.co.uk/url?sa=t&url=https://hhttps://sportsbetting010.blogspot.com/2022/07/ac-milan-and-5-betting-options-for.html
https://www.google.co.ug/url?sa=t&url=https://hhttps://sportsbetting010.blogspot.com/2022/07/ac-milan-and-5-betting-options-for.html
https://www.google.co.tz/url?sa=t&url=https://hhttps://sportsbetting010.blogspot.com/2022/07/ac-milan-and-5-betting-options-for.html
https://www.google.co.th/url?sa=t&url=https://hhttps://sportsbetting010.blogspot.com/2022/07/ac-milan-and-5-betting-options-for.html
https://www.google.co.nz/url?sa=t&url=https://hhttps://sportsbetting010.blogspot.com/2022/07/ac-milan-and-5-betting-options-for.html
https://www.google.co.ma/url?sa=t&url=https://hhttps://sportsbetting010.blogspot.com/2022/07/ac-milan-and-5-betting-options-for.html
https://www.google.co.ls/url?sa=t&url=https://hhttps://sportsbetting010.blogspot.com/2022/07/ac-milan-and-5-betting-options-for.html
https://www.google.co.kr/url?sa=t&url=https://hhttps://sportsbetting010.blogspot.com/2022/07/ac-milan-and-5-betting-options-for.html
https://www.google.co.ke/url?sa=t&url=https://hhttps://sportsbetting010.blogspot.com/2022/07/ac-milan-and-5-betting-options-for.html
https://www.google.co.jp/url?sa=t&url=https://hhttps://sportsbetting010.blogspot.com/2022/07/ac-milan-and-5-betting-options-for.html
https://www.google.co.in/url?sa=t&url=https://hhttps://sportsbetting010.blogspot.com/2022/07/ac-milan-and-5-betting-options-for.html
https://www.google.co.il/url?sa=t&url=https://hhttps://sportsbetting010.blogspot.com/2022/07/ac-milan-and-5-betting-options-for.html
https://www.google.co.id/url?sa=t&url=https://hhttps://sportsbetting010.blogspot.com/2022/07/ac-milan-and-5-betting-options-for.html
https://www.google.co.cr/url?sa=t&url=https://hhttps://sportsbetting010.blogspot.com/2022/07/ac-milan-and-5-betting-options-for.html
https://www.google.co.bw/url?sa=t&url=https://hhttps://sportsbetting010.blogspot.com/2022/07/ac-milan-and-5-betting-options-for.html
https://www.google.cm/url?sa=t&url=https://hhttps://sportsbetting010.blogspot.com/2022/07/ac-milan-and-5-betting-options-for.html
https://www.google.cl/url?sa=t&url=https://hhttps://sportsbetting010.blogspot.com/2022/07/ac-milan-and-5-betting-options-for.html
https://www.google.ci/url?sa=t&url=https://hhttps://sportsbetting010.blogspot.com/2022/07/ac-milan-and-5-betting-options-for.html
https://www.google.ch/url?sa=t&url=https://hhttps://sportsbetting010.blogspot.com/2022/07/ac-milan-and-5-betting-options-for.html
https://www.google.cd/url?sa=t&url=https://hhttps://sportsbetting010.blogspot.com/2022/07/ac-milan-and-5-betting-options-for.html
https://www.google.cat/url?sa=t&url=https://hhttps://sportsbetting010.blogspot.com/2022/07/ac-milan-and-5-betting-options-for.html
https://www.google.ca/url?sa=t&url=https://hhttps://sportsbetting010.blogspot.com/2022/07/ac-milan-and-5-betting-options-for.html
https://www.google.by/url?sa=t&url=https://hhttps://sportsbetting010.blogspot.com/2022/07/ac-milan-and-5-betting-options-for.html
https://www.google.bs/url?sa=t&url=https://hhttps://sportsbetting010.blogspot.com/2022/07/ac-milan-and-5-betting-options-for.html
https://www.google.bi/url?sa=t&url=https://hhttps://sportsbetting010.blogspot.com/2022/07/ac-milan-and-5-betting-options-for.html
https://www.google.bg/url?sa=t&url=https://hhttps://sportsbetting010.blogspot.com/2022/07/ac-milan-and-5-betting-options-for.html
https://www.google.bf/url?sa=t&url=https://hhttps://sportsbetting010.blogspot.com/2022/07/ac-milan-and-5-betting-options-for.html
https://www.google.be/url?sa=t&url=https://hhttps://sportsbetting010.blogspot.com/2022/07/ac-milan-and-5-betting-options-for.html
https://www.google.ba/url?sa=t&url=https://hhttps://sportsbetting010.blogspot.com/2022/07/ac-milan-and-5-betting-options-for.html
https://www.google.az/url?sa=t&url=https://hhttps://sportsbetting010.blogspot.com/2022/07/ac-milan-and-5-betting-options-for.html
https://www.google.at/url?sa=t&url=https://hhttps://sportsbetting010.blogspot.com/2022/07/ac-milan-and-5-betting-options-for.html
https://www.google.as/url?sa=t&url=https://hhttps://sportsbetting010.blogspot.com/2022/07/ac-milan-and-5-betting-options-for.html
https://www.google.am/url?sa=t&url=https://hhttps://sportsbetting010.blogspot.com/2022/07/ac-milan-and-5-betting-options-for.html
https://www.google.al/url?sa=t&url=https://hhttps://sportsbetting010.blogspot.com/2022/07/ac-milan-and-5-betting-options-for.html
https://www.google.ae/url?sa=t&url=https://hhttps://sportsbetting010.blogspot.com/2022/07/ac-milan-and-5-betting-options-for.html
https://www.google.ad/url?sa=t&url=https://hhttps://sportsbetting010.blogspot.com/2022/07/ac-milan-and-5-betting-options-for.html
https://plus.google.com/url?q=https://hhttps://sportsbetting010.blogspot.com/2022/07/ac-milan-and-5-betting-options-for.html
https://maps.google.tn/url?sa=t&url=https://hhttps://sportsbetting010.blogspot.com/2022/07/ac-milan-and-5-betting-options-for.html
https://maps.google.sn/url?sa=t&url=https://hhttps://sportsbetting010.blogspot.com/2022/07/ac-milan-and-5-betting-options-for.html
https://maps.google.sk/url?sa=t&url=https://hhttps://sportsbetting010.blogspot.com/2022/07/ac-milan-and-5-betting-options-for.html
https://maps.google.si/url?sa=t&url=https://hhttps://sportsbetting010.blogspot.com/2022/07/ac-milan-and-5-betting-options-for.html
https://maps.google.sh/url?sa=t&url=https://hhttps://sportsbetting010.blogspot.com/2022/07/ac-milan-and-5-betting-options-for.html
https://maps.google.se/url?sa=t&url=https://hhttps://sportsbetting010.blogspot.com/2022/07/ac-milan-and-5-betting-options-for.html
https://maps.google.rw/url?sa=t&url=https://hhttps://sportsbetting010.blogspot.com/2022/07/ac-milan-and-5-betting-options-for.html
https://maps.google.ru/url?sa=t&url=https://hhttps://sportsbetting010.blogspot.com/2022/07/ac-milan-and-5-betting-options-for.html
https://maps.google.rs/url?sa=t&url=https://hhttps://sportsbetting010.blogspot.com/2022/07/ac-milan-and-5-betting-options-for.html
https://maps.google.ro/url?sa=t&url=https://hhttps://sportsbetting010.blogspot.com/2022/07/ac-milan-and-5-betting-options-for.html
https://maps.google.pt/url?sa=t&url=https://hhttps://sportsbetting010.blogspot.com/2022/07/ac-milan-and-5-betting-options-for.html
https://maps.google.pl/url?sa=t&url=https://hhttps://sportsbetting010.blogspot.com/2022/07/ac-milan-and-5-betting-options-for.html
https://maps.google.no/url?sa=t&url=https://hhttps://sportsbetting010.blogspot.com/2022/07/ac-milan-and-5-betting-options-for.html
https://maps.google.nl/url?sa=t&url=https://hhttps://sportsbetting010.blogspot.com/2022/07/ac-milan-and-5-betting-options-for.html
https://maps.google.mw/url?sa=t&url=https://hhttps://sportsbetting010.blogspot.com/2022/07/ac-milan-and-5-betting-options-for.html
https://maps.google.mv/url?sa=t&url=https://hhttps://sportsbetting010.blogspot.com/2022/07/ac-milan-and-5-betting-options-for.html
https://maps.google.mu/url?sa=t&url=https://hhttps://sportsbetting010.blogspot.com/2022/07/ac-milan-and-5-betting-options-for.html
https://maps.google.ms/url?sa=t&url=https://hhttps://sportsbetting010.blogspot.com/2022/07/ac-milan-and-5-betting-options-for.html
https://maps.google.mn/url?sa=t&url=https://hhttps://sportsbetting010.blogspot.com/2022/07/ac-milan-and-5-betting-options-for.html
https://maps.google.mk/url?sa=t&url=https://hhttps://sportsbetting010.blogspot.com/2022/07/ac-milan-and-5-betting-options-for.html
https://maps.google.mg/url?sa=t&url=https://hhttps://sportsbetting010.blogspot.com/2022/07/ac-milan-and-5-betting-options-for.html
https://maps.google.lv/url?sa=t&url=https://hhttps://sportsbetting010.blogspot.com/2022/07/ac-milan-and-5-betting-options-for.html
https://maps.google.lu/url?sa=t&url=https://hhttps://sportsbetting010.blogspot.com/2022/07/ac-milan-and-5-betting-options-for.html
https://maps.google.lt/url?sa=t&url=https://hhttps://sportsbetting010.blogspot.com/2022/07/ac-milan-and-5-betting-options-for.html
https://maps.google.lk/url?sa=t&url=https://hhttps://sportsbetting010.blogspot.com/2022/07/ac-milan-and-5-betting-options-for.html
https://maps.google.li/url?sa=t&url=https://hhttps://sportsbetting010.blogspot.com/2022/07/ac-milan-and-5-betting-options-for.html
https://maps.google.la/url?sa=t&url=https://hhttps://sportsbetting010.blogspot.com/2022/07/ac-milan-and-5-betting-options-for.html
https://maps.google.kz/url?sa=t&url=https://hhttps://sportsbetting010.blogspot.com/2022/07/ac-milan-and-5-betting-options-for.html
https://maps.google.kg/url?sa=t&url=https://hhttps://sportsbetting010.blogspot.com/2022/07/ac-milan-and-5-betting-options-for.html
https://maps.google.jo/url?sa=t&url=https://hhttps://sportsbetting010.blogspot.com/2022/07/ac-milan-and-5-betting-options-for.html
https://maps.google.je/url?sa=t&url=https://hhttps://sportsbetting010.blogspot.com/2022/07/ac-milan-and-5-betting-options-for.html
https://maps.google.it/url?sa=t&url=https://hhttps://sportsbetting010.blogspot.com/2022/07/ac-milan-and-5-betting-options-for.html
https://maps.google.is/url?sa=t&url=https://hhttps://sportsbetting010.blogspot.com/2022/07/ac-milan-and-5-betting-options-for.html
https://maps.google.iq/url?sa=t&url=https://hhttps://sportsbetting010.blogspot.com/2022/07/ac-milan-and-5-betting-options-for.html
https://maps.google.ie/url?sa=t&url=https://hhttps://sportsbetting010.blogspot.com/2022/07/ac-milan-and-5-betting-options-for.html
https://maps.google.hu/url?sa=t&url=https://hhttps://sportsbetting010.blogspot.com/2022/07/ac-milan-and-5-betting-options-for.html
https://maps.google.ht/url?sa=t&url=https://hhttps://sportsbetting010.blogspot.com/2022/07/ac-milan-and-5-betting-options-for.html
https://maps.google.hr/url?sa=t&url=https://hhttps://sportsbetting010.blogspot.com/2022/07/ac-milan-and-5-betting-options-for.html
https://maps.google.hn/url?sa=t&url=https://hhttps://sportsbetting010.blogspot.com/2022/07/ac-milan-and-5-betting-options-for.html
https://maps.google.gr/url?sa=t&url=https://hhttps://sportsbetting010.blogspot.com/2022/07/ac-milan-and-5-betting-options-for.html
https://maps.google.gm/url?sa=t&url=https://hhttps://sportsbetting010.blogspot.com/2022/07/ac-milan-and-5-betting-options-for.html
https://maps.google.gl/url?sa=t&url=https://hhttps://sportsbetting010.blogspot.com/2022/07/ac-milan-and-5-betting-options-for.html
https://maps.google.gg/url?sa=t&url=https://hhttps://sportsbetting010.blogspot.com/2022/07/ac-milan-and-5-betting-options-for.html
https://maps.google.ge/url?sa=t&url=https://hhttps://sportsbetting010.blogspot.com/2022/07/ac-milan-and-5-betting-options-for.html
https://maps.google.fr/url?sa=t&url=https://hhttps://sportsbetting010.blogspot.com/2022/07/ac-milan-and-5-betting-options-for.html
https://maps.google.fm/url?sa=t&url=https://hhttps://sportsbetting010.blogspot.com/2022/07/ac-milan-and-5-betting-options-for.html
https://maps.google.fi/url?sa=t&url=https://hhttps://sportsbetting010.blogspot.com/2022/07/ac-milan-and-5-betting-options-for.html
https://maps.google.es/url?sa=t&url=https://hhttps://sportsbetting010.blogspot.com/2022/07/ac-milan-and-5-betting-options-for.html
https://maps.google.ee/url?sa=t&url=https://hhttps://sportsbetting010.blogspot.com/2022/07/ac-milan-and-5-betting-options-for.html
https://maps.google.dz/url?sa=t&url=https://hhttps://sportsbetting010.blogspot.com/2022/07/ac-milan-and-5-betting-options-for.html
https://maps.google.dk/url?sa=t&url=https://hhttps://sportsbetting010.blogspot.com/2022/07/ac-milan-and-5-betting-options-for.html
https://maps.google.dj/url?sa=t&url=https://hhttps://sportsbetting010.blogspot.com/2022/07/ac-milan-and-5-betting-options-for.html
https://maps.google.de/url?sa=t&url=https://hhttps://sportsbetting010.blogspot.com/2022/07/ac-milan-and-5-betting-options-for.html
https://maps.google.cz/url?sa=t&url=https://hhttps://sportsbetting010.blogspot.com/2022/07/ac-milan-and-5-betting-options-for.html
https://maps.google.com/url?sa=t&url=https://hhttps://sportsbetting010.blogspot.com/2022/07/ac-milan-and-5-betting-options-for.html
https://maps.google.com.uy/url?sa=t&url=https://hhttps://sportsbetting010.blogspot.com/2022/07/ac-milan-and-5-betting-options-for.html
https://maps.google.com.ua/url?sa=t&url=https://hhttps://sportsbetting010.blogspot.com/2022/07/ac-milan-and-5-betting-options-for.html
https://maps.google.com.tw/url?sa=t&url=https://hhttps://sportsbetting010.blogspot.com/2022/07/ac-milan-and-5-betting-options-for.html
https://maps.google.com.tr/url?sa=t&url=https://hhttps://sportsbetting010.blogspot.com/2022/07/ac-milan-and-5-betting-options-for.html
https://maps.google.com.sv/url?sa=t&url=https://hhttps://sportsbetting010.blogspot.com/2022/07/ac-milan-and-5-betting-options-for.html
https://maps.google.com.sg/url?sa=t&url=https://hhttps://sportsbetting010.blogspot.com/2022/07/ac-milan-and-5-betting-options-for.html
https://maps.google.com.sa/url?sa=t&url=https://hhttps://sportsbetting010.blogspot.com/2022/07/ac-milan-and-5-betting-options-for.html
https://maps.google.com.qa/url?sa=t&url=https://hhttps://sportsbetting010.blogspot.com/2022/07/ac-milan-and-5-betting-options-for.html
https://maps.google.com.py/url?sa=t&url=https://hhttps://sportsbetting010.blogspot.com/2022/07/ac-milan-and-5-betting-options-for.html
https://maps.google.com.pr/url?sa=t&url=https://hhttps://sportsbetting010.blogspot.com/2022/07/ac-milan-and-5-betting-options-for.html
https://maps.google.com.ph/url?sa=t&url=https://hhttps://sportsbetting010.blogspot.com/2022/07/ac-milan-and-5-betting-options-for.html
https://maps.google.com.pe/url?sa=t&url=https://hhttps://sportsbetting010.blogspot.com/2022/07/ac-milan-and-5-betting-options-for.html
https://maps.google.com.pa/url?sa=t&url=https://hhttps://sportsbetting010.blogspot.com/2022/07/ac-milan-and-5-betting-options-for.html
https://maps.google.com.om/url?sa=t&url=https://hhttps://sportsbetting010.blogspot.com/2022/07/ac-milan-and-5-betting-options-for.html
https://maps.google.com.ni/url?sa=t&url=https://hhttps://sportsbetting010.blogspot.com/2022/07/ac-milan-and-5-betting-options-for.html
https://maps.google.com.ng/url?sa=t&url=https://hhttps://sportsbetting010.blogspot.com/2022/07/ac-milan-and-5-betting-options-for.html
https://maps.google.com.na/url?sa=t&url=https://hhttps://sportsbetting010.blogspot.com/2022/07/ac-milan-and-5-betting-options-for.html
https://maps.google.com.mz/url?sa=t&url=https://hhttps://sportsbetting010.blogspot.com/2022/07/ac-milan-and-5-betting-options-for.html
https://maps.google.com.my/url?sa=t&url=https://hhttps://sportsbetting010.blogspot.com/2022/07/ac-milan-and-5-betting-options-for.html
https://maps.google.com.mx/url?sa=t&url=https://hhttps://sportsbetting010.blogspot.com/2022/07/ac-milan-and-5-betting-options-for.html
https://maps.google.com.mt/url?sa=t&url=https://hhttps://sportsbetting010.blogspot.com/2022/07/ac-milan-and-5-betting-options-for.html
https://maps.google.com.ly/url?sa=t&url=https://hhttps://sportsbetting010.blogspot.com/2022/07/ac-milan-and-5-betting-options-for.html
https://maps.google.com.lb/url?sa=t&url=https://hhttps://sportsbetting010.blogspot.com/2022/07/ac-milan-and-5-betting-options-for.html
https://maps.google.com.kw/url?sa=t&url=https://hhttps://sportsbetting010.blogspot.com/2022/07/ac-milan-and-5-betting-options-for.html
https://maps.google.com.kh/url?sa=t&url=https://hhttps://sportsbetting010.blogspot.com/2022/07/ac-milan-and-5-betting-options-for.html
https://maps.google.com.jm/url?sa=t&url=https://hhttps://sportsbetting010.blogspot.com/2022/07/ac-milan-and-5-betting-options-for.html
https://maps.google.com.hk/url?sa=t&url=https://hhttps://sportsbetting010.blogspot.com/2022/07/ac-milan-and-5-betting-options-for.html
https://maps.google.com.gt/url?sa=t&url=https://hhttps://sportsbetting010.blogspot.com/2022/07/ac-milan-and-5-betting-options-for.html
https://maps.google.com.gi/url?sa=t&url=https://hhttps://sportsbetting010.blogspot.com/2022/07/ac-milan-and-5-betting-options-for.html
https://maps.google.com.gh/url?sa=t&url=https://hhttps://sportsbetting010.blogspot.com/2022/07/ac-milan-and-5-betting-options-for.html
https://maps.google.com.fj/url?sa=t&url=https://hhttps://sportsbetting010.blogspot.com/2022/07/ac-milan-and-5-betting-options-for.html
https://maps.google.com.et/url?sa=t&url=https://hhttps://sportsbetting010.blogspot.com/2022/07/ac-milan-and-5-betting-options-for.html
https://maps.google.com.eg/url?sa=t&url=https://hhttps://sportsbetting010.blogspot.com/2022/07/ac-milan-and-5-betting-options-for.html
https://maps.google.com.ec/url?sa=t&url=https://hhttps://sportsbetting010.blogspot.com/2022/07/ac-milan-and-5-betting-options-for.html
https://maps.google.com.do/url?sa=t&url=https://hhttps://sportsbetting010.blogspot.com/2022/07/ac-milan-and-5-betting-options-for.html
https://maps.google.com.cu/url?sa=t&url=https://hhttps://sportsbetting010.blogspot.com/2022/07/ac-milan-and-5-betting-options-for.html
https://maps.google.com.co/url?sa=t&url=https://hhttps://sportsbetting010.blogspot.com/2022/07/ac-milan-and-5-betting-options-for.html
https://maps.google.com.bz/url?sa=t&url=https://hhttps://sportsbetting010.blogspot.com/2022/07/ac-milan-and-5-betting-options-for.html
https://maps.google.com.br/url?sa=t&url=https://hhttps://sportsbetting010.blogspot.com/2022/07/ac-milan-and-5-betting-options-for.html
https://maps.google.com.bo/url?sa=t&url=https://hhttps://sportsbetting010.blogspot.com/2022/07/ac-milan-and-5-betting-options-for.html
https://maps.google.com.bn/url?sa=t&url=https://hhttps://sportsbetting010.blogspot.com/2022/07/ac-milan-and-5-betting-options-for.html
https://maps.google.com.bh/url?sa=t&url=https://hhttps://sportsbetting010.blogspot.com/2022/07/ac-milan-and-5-betting-options-for.html
https://maps.google.com.bd/url?sa=t&url=https://hhttps://sportsbetting010.blogspot.com/2022/07/ac-milan-and-5-betting-options-for.html
https://maps.google.com.au/url?sa=t&url=https://hhttps://sportsbetting010.blogspot.com/2022/07/ac-milan-and-5-betting-options-for.html
https://maps.google.com.ar/url?sa=t&url=https://hhttps://sportsbetting010.blogspot.com/2022/07/ac-milan-and-5-betting-options-for.html
https://maps.google.com.ag/url?sa=t&url=https://hhttps://sportsbetting010.blogspot.com/2022/07/ac-milan-and-5-betting-options-for.html
https://maps.google.co.za/url?sa=t&url=https://hhttps://sportsbetting010.blogspot.com/2022/07/ac-milan-and-5-betting-options-for.html
https://maps.google.co.ve/url?sa=t&url=https://hhttps://sportsbetting010.blogspot.com/2022/07/ac-milan-and-5-betting-options-for.html
https://maps.google.co.uk/url?sa=t&url=https://hhttps://sportsbetting010.blogspot.com/2022/07/ac-milan-and-5-betting-options-for.html
https://maps.google.co.ug/url?sa=t&url=https://hhttps://sportsbetting010.blogspot.com/2022/07/ac-milan-and-5-betting-options-for.html
https://maps.google.co.tz/url?sa=t&url=https://hhttps://sportsbetting010.blogspot.com/2022/07/ac-milan-and-5-betting-options-for.html
https://maps.google.co.th/url?sa=t&url=https://hhttps://sportsbetting010.blogspot.com/2022/07/ac-milan-and-5-betting-options-for.html
https://maps.google.co.nz/url?sa=t&url=https://hhttps://sportsbetting010.blogspot.com/2022/07/ac-milan-and-5-betting-options-for.html
https://maps.google.co.ls/url?sa=t&url=https://hhttps://sportsbetting010.blogspot.com/2022/07/ac-milan-and-5-betting-options-for.html
https://maps.google.co.kr/url?sa=t&url=https://hhttps://sportsbetting010.blogspot.com/2022/07/ac-milan-and-5-betting-options-for.html
https://maps.google.co.ke/url?sa=t&url=https://hhttps://sportsbetting010.blogspot.com/2022/07/ac-milan-and-5-betting-options-for.html
https://maps.google.co.jp/url?sa=t&url=https://hhttps://sportsbetting010.blogspot.com/2022/07/ac-milan-and-5-betting-options-for.html
https://maps.google.co.in/url?sa=t&url=https://hhttps://sportsbetting010.blogspot.com/2022/07/ac-milan-and-5-betting-options-for.html
https://maps.google.co.il/url?sa=t&url=https://hhttps://sportsbetting010.blogspot.com/2022/07/ac-milan-and-5-betting-options-for.html
https://maps.google.co.id/url?sa=t&url=https://hhttps://sportsbetting010.blogspot.com/2022/07/ac-milan-and-5-betting-options-for.html
https://maps.google.co.cr/url?sa=t&url=https://hhttps://sportsbetting010.blogspot.com/2022/07/ac-milan-and-5-betting-options-for.html
https://maps.google.co.bw/url?sa=t&url=https://hhttps://sportsbetting010.blogspot.com/2022/07/ac-milan-and-5-betting-options-for.html
https://maps.google.cm/url?sa=t&url=https://hhttps://sportsbetting010.blogspot.com/2022/07/ac-milan-and-5-betting-options-for.html
https://maps.google.cl/url?sa=t&url=https://hhttps://sportsbetting010.blogspot.com/2022/07/ac-milan-and-5-betting-options-for.html
https://maps.google.ci/url?sa=t&url=https://hhttps://sportsbetting010.blogspot.com/2022/07/ac-milan-and-5-betting-options-for.html
https://maps.google.ch/url?sa=t&url=https://hhttps://sportsbetting010.blogspot.com/2022/07/ac-milan-and-5-betting-options-for.html
https://maps.google.cd/url?sa=t&url=https://hhttps://sportsbetting010.blogspot.com/2022/07/ac-milan-and-5-betting-options-for.html
https://maps.google.cat/url?sa=t&url=https://hhttps://sportsbetting010.blogspot.com/2022/07/ac-milan-and-5-betting-options-for.html
https://maps.google.ca/url?sa=t&url=https://hhttps://sportsbetting010.blogspot.com/2022/07/ac-milan-and-5-betting-options-for.html
https://maps.google.by/url?sa=t&url=https://hhttps://sportsbetting010.blogspot.com/2022/07/ac-milan-and-5-betting-options-for.html
https://maps.google.bs/url?sa=t&url=https://hhttps://sportsbetting010.blogspot.com/2022/07/ac-milan-and-5-betting-options-for.html
https://maps.google.bi/url?sa=t&url=https://hhttps://sportsbetting010.blogspot.com/2022/07/ac-milan-and-5-betting-options-for.html
https://maps.google.bg/url?sa=t&url=https://hhttps://sportsbetting010.blogspot.com/2022/07/ac-milan-and-5-betting-options-for.html
https://maps.google.bf/url?sa=t&url=https://hhttps://sportsbetting010.blogspot.com/2022/07/ac-milan-and-5-betting-options-for.html
https://maps.google.be/url?sa=t&url=https://hhttps://sportsbetting010.blogspot.com/2022/07/ac-milan-and-5-betting-options-for.html
https://maps.google.ba/url?sa=t&url=https://hhttps://sportsbetting010.blogspot.com/2022/07/ac-milan-and-5-betting-options-for.html
https://maps.google.at/url?sa=t&url=https://hhttps://sportsbetting010.blogspot.com/2022/07/ac-milan-and-5-betting-options-for.html
https://maps.google.as/url?sa=t&url=https://hhttps://sportsbetting010.blogspot.com/2022/07/ac-milan-and-5-betting-options-for.html
https://maps.google.ae/url?sa=t&url=https://hhttps://sportsbetting010.blogspot.com/2022/07/ac-milan-and-5-betting-options-for.html
https://maps.google.ad/url?sa=t&url=https://hhttps://sportsbetting010.blogspot.com/2022/07/ac-milan-and-5-betting-options-for.html
https://images.google.tn/url?sa=t&url=https://hhttps://sportsbetting010.blogspot.com/2022/07/ac-milan-and-5-betting-options-for.html
https://images.google.sn/url?sa=t&url=https://hhttps://sportsbetting010.blogspot.com/2022/07/ac-milan-and-5-betting-options-for.html
https://images.google.sk/url?sa=t&url=https://hhttps://sportsbetting010.blogspot.com/2022/07/ac-milan-and-5-betting-options-for.html
https://images.google.si/url?sa=t&url=https://hhttps://sportsbetting010.blogspot.com/2022/07/ac-milan-and-5-betting-options-for.html
https://images.google.sh/url?sa=t&url=https://hhttps://sportsbetting010.blogspot.com/2022/07/ac-milan-and-5-betting-options-for.html
https://images.google.se/url?sa=t&url=https://hhttps://sportsbetting010.blogspot.com/2022/07/ac-milan-and-5-betting-options-for.html
https://images.google.rw/url?sa=t&url=https://hhttps://sportsbetting010.blogspot.com/2022/07/ac-milan-and-5-betting-options-for.html
https://images.google.ru/url?sa=t&url=https://hhttps://sportsbetting010.blogspot.com/2022/07/ac-milan-and-5-betting-options-for.html
https://images.google.rs/url?sa=t&url=https://hhttps://sportsbetting010.blogspot.com/2022/07/ac-milan-and-5-betting-options-for.html
https://images.google.ro/url?sa=t&url=https://hhttps://sportsbetting010.blogspot.com/2022/07/ac-milan-and-5-betting-options-for.html
https://images.google.pt/url?sa=t&url=https://hhttps://sportsbetting010.blogspot.com/2022/07/ac-milan-and-5-betting-options-for.html
https://images.google.ps/url?sa=t&url=https://hhttps://sportsbetting010.blogspot.com/2022/07/ac-milan-and-5-betting-options-for.html
https://images.google.pl/url?sa=t&url=https://hhttps://sportsbetting010.blogspot.com/2022/07/ac-milan-and-5-betting-options-for.html
https://images.google.no/url?sa=t&url=https://hhttps://sportsbetting010.blogspot.com/2022/07/ac-milan-and-5-betting-options-for.html
https://images.google.nl/url?sa=t&url=https://hhttps://sportsbetting010.blogspot.com/2022/07/ac-milan-and-5-betting-options-for.html
https://images.google.mw/url?sa=t&url=https://hhttps://sportsbetting010.blogspot.com/2022/07/ac-milan-and-5-betting-options-for.html
https://images.google.mv/url?sa=t&url=https://hhttps://sportsbetting010.blogspot.com/2022/07/ac-milan-and-5-betting-options-for.html
https://images.google.mu/url?sa=t&url=https://hhttps://sportsbetting010.blogspot.com/2022/07/ac-milan-and-5-betting-options-for.html
https://images.google.ms/url?sa=t&url=https://hhttps://sportsbetting010.blogspot.com/2022/07/ac-milan-and-5-betting-options-for.html
https://images.google.mn/url?sa=t&url=https://hhttps://sportsbetting010.blogspot.com/2022/07/ac-milan-and-5-betting-options-for.html
https://images.google.mk/url?sa=t&url=https://hhttps://sportsbetting010.blogspot.com/2022/07/ac-milan-and-5-betting-options-for.html
https://images.google.mg/url?sa=t&url=https://hhttps://sportsbetting010.blogspot.com/2022/07/ac-milan-and-5-betting-options-for.html
https://images.google.me/url?sa=t&url=https://hhttps://sportsbetting010.blogspot.com/2022/07/ac-milan-and-5-betting-options-for.html
https://images.google.md/url?sa=t&url=https://hhttps://sportsbetting010.blogspot.com/2022/07/ac-milan-and-5-betting-options-for.html
https://images.google.lv/url?sa=t&url=https://hhttps://sportsbetting010.blogspot.com/2022/07/ac-milan-and-5-betting-options-for.html
https://images.google.lu/url?sa=t&url=https://hhttps://sportsbetting010.blogspot.com/2022/07/ac-milan-and-5-betting-options-for.html
https://images.google.lt/url?sa=t&url=https://hhttps://sportsbetting010.blogspot.com/2022/07/ac-milan-and-5-betting-options-for.html
https://images.google.lk/url?sa=t&url=https://hhttps://sportsbetting010.blogspot.com/2022/07/ac-milan-and-5-betting-options-for.html
https://images.google.li/url?sa=t&url=https://hhttps://sportsbetting010.blogspot.com/2022/07/ac-milan-and-5-betting-options-for.html
https://images.google.la/url?sa=t&url=https://hhttps://sportsbetting010.blogspot.com/2022/07/ac-milan-and-5-betting-options-for.html
https://images.google.kz/url?sa=t&url=https://hhttps://sportsbetting010.blogspot.com/2022/07/ac-milan-and-5-betting-options-for.html
https://images.google.kg/url?sa=t&url=https://hhttps://sportsbetting010.blogspot.com/2022/07/ac-milan-and-5-betting-options-for.html
https://images.google.jo/url?sa=t&url=https://hhttps://sportsbetting010.blogspot.com/2022/07/ac-milan-and-5-betting-options-for.html
https://images.google.je/url?sa=t&url=https://hhttps://sportsbetting010.blogspot.com/2022/07/ac-milan-and-5-betting-options-for.html
https://images.google.it/url?sa=t&url=https://hhttps://sportsbetting010.blogspot.com/2022/07/ac-milan-and-5-betting-options-for.html
https://images.google.is/url?sa=t&url=https://hhttps://sportsbetting010.blogspot.com/2022/07/ac-milan-and-5-betting-options-for.html
https://images.google.iq/url?sa=t&url=https://hhttps://sportsbetting010.blogspot.com/2022/07/ac-milan-and-5-betting-options-for.html
https://images.google.ie/url?sa=t&url=https://hhttps://sportsbetting010.blogspot.com/2022/07/ac-milan-and-5-betting-options-for.html
https://images.google.hu/url?sa=t&url=https://hhttps://sportsbetting010.blogspot.com/2022/07/ac-milan-and-5-betting-options-for.html
https://images.google.ht/url?sa=t&url=https://hhttps://sportsbetting010.blogspot.com/2022/07/ac-milan-and-5-betting-options-for.html
https://images.google.hr/url?sa=t&url=https://hhttps://sportsbetting010.blogspot.com/2022/07/ac-milan-and-5-betting-options-for.html
https://images.google.hn/url?sa=t&url=https://hhttps://sportsbetting010.blogspot.com/2022/07/ac-milan-and-5-betting-options-for.html
https://images.google.gr/url?sa=t&url=https://hhttps://sportsbetting010.blogspot.com/2022/07/ac-milan-and-5-betting-options-for.html
https://images.google.gp/url?sa=t&url=https://hhttps://sportsbetting010.blogspot.com/2022/07/ac-milan-and-5-betting-options-for.html
https://images.google.gm/url?sa=t&url=https://hhttps://sportsbetting010.blogspot.com/2022/07/ac-milan-and-5-betting-options-for.html
https://images.google.gl/url?sa=t&url=https://hhttps://sportsbetting010.blogspot.com/2022/07/ac-milan-and-5-betting-options-for.html
https://images.google.gg/url?sa=t&url=https://hhttps://sportsbetting010.blogspot.com/2022/07/ac-milan-and-5-betting-options-for.html
https://images.google.ge/url?sa=t&url=https://hhttps://sportsbetting010.blogspot.com/2022/07/ac-milan-and-5-betting-options-for.html
https://images.google.fr/url?sa=t&url=https://hhttps://sportsbetting010.blogspot.com/2022/07/ac-milan-and-5-betting-options-for.html
https://images.google.fm/url?sa=t&url=https://hhttps://sportsbetting010.blogspot.com/2022/07/ac-milan-and-5-betting-options-for.html
https://images.google.fi/url?sa=t&url=https://hhttps://sportsbetting010.blogspot.com/2022/07/ac-milan-and-5-betting-options-for.html
https://images.google.es/url?sa=t&url=https://hhttps://sportsbetting010.blogspot.com/2022/07/ac-milan-and-5-betting-options-for.html
https://images.google.ee/url?sa=t&url=https://hhttps://sportsbetting010.blogspot.com/2022/07/ac-milan-and-5-betting-options-for.html
https://images.google.dz/url?sa=t&url=https://hhttps://sportsbetting010.blogspot.com/2022/07/ac-milan-and-5-betting-options-for.html
https://images.google.dm/url?sa=t&url=https://hhttps://sportsbetting010.blogspot.com/2022/07/ac-milan-and-5-betting-options-for.html
https://images.google.dk/url?sa=t&url=https://hhttps://sportsbetting010.blogspot.com/2022/07/ac-milan-and-5-betting-options-for.html
https://images.google.dj/url?sa=t&url=https://hhttps://sportsbetting010.blogspot.com/2022/07/ac-milan-and-5-betting-options-for.html
https://images.google.de/url?sa=t&url=https://hhttps://sportsbetting010.blogspot.com/2022/07/ac-milan-and-5-betting-options-for.html
https://images.google.cz/url?sa=t&url=https://hhttps://sportsbetting010.blogspot.com/2022/07/ac-milan-and-5-betting-options-for.html
https://images.google.com/url?sa=t&url=https://hhttps://sportsbetting010.blogspot.com/2022/07/ac-milan-and-5-betting-options-for.html
https://images.google.com.vn/url?sa=t&url=https://hhttps://sportsbetting010.blogspot.com/2022/07/ac-milan-and-5-betting-options-for.html
https://images.google.com.vc/url?sa=t&url=https://hhttps://sportsbetting010.blogspot.com/2022/07/ac-milan-and-5-betting-options-for.html
https://images.google.com.uy/url?sa=t&url=https://hhttps://sportsbetting010.blogspot.com/2022/07/ac-milan-and-5-betting-options-for.html
https://images.google.com.ua/url?sa=t&url=https://hhttps://sportsbetting010.blogspot.com/2022/07/ac-milan-and-5-betting-options-for.html
https://images.google.com.tw/url?sa=t&url=https://hhttps://sportsbetting010.blogspot.com/2022/07/ac-milan-and-5-betting-options-for.html
https://images.google.com.tr/url?sa=t&url=https://hhttps://sportsbetting010.blogspot.com/2022/07/ac-milan-and-5-betting-options-for.html
https://images.google.com.sv/url?sa=t&url=https://hhttps://sportsbetting010.blogspot.com/2022/07/ac-milan-and-5-betting-options-for.html
https://images.google.com.sg/url?sa=t&url=https://hhttps://sportsbetting010.blogspot.com/2022/07/ac-milan-and-5-betting-options-for.html
https://images.google.com.sa/url?sa=t&url=https://hhttps://sportsbetting010.blogspot.com/2022/07/ac-milan-and-5-betting-options-for.html
https://images.google.com.qa/url?sa=t&url=https://hhttps://sportsbetting010.blogspot.com/2022/07/ac-milan-and-5-betting-options-for.html
https://images.google.com.py/url?sa=t&url=https://hhttps://sportsbetting010.blogspot.com/2022/07/ac-milan-and-5-betting-options-for.html
https://images.google.com.pr/url?sa=t&url=https://hhttps://sportsbetting010.blogspot.com/2022/07/ac-milan-and-5-betting-options-for.html
https://images.google.com.pk/url?sa=t&url=https://hhttps://sportsbetting010.blogspot.com/2022/07/ac-milan-and-5-betting-options-for.html
https://images.google.com.ph/url?sa=t&url=https://hhttps://sportsbetting010.blogspot.com/2022/07/ac-milan-and-5-betting-options-for.html
https://images.google.com.pe/url?sa=t&url=https://hhttps://sportsbetting010.blogspot.com/2022/07/ac-milan-and-5-betting-options-for.html
https://images.google.com.pa/url?sa=t&url=https://hhttps://sportsbetting010.blogspot.com/2022/07/ac-milan-and-5-betting-options-for.html
https://images.google.com.om/url?sa=t&url=https://hhttps://sportsbetting010.blogspot.com/2022/07/ac-milan-and-5-betting-options-for.html
https://images.google.com.np/url?sa=t&url=https://hhttps://sportsbetting010.blogspot.com/2022/07/ac-milan-and-5-betting-options-for.html
https://images.google.com.ni/url?sa=t&url=https://hhttps://sportsbetting010.blogspot.com/2022/07/ac-milan-and-5-betting-options-for.html
https://images.google.com.ng/url?sa=t&url=https://hhttps://sportsbetting010.blogspot.com/2022/07/ac-milan-and-5-betting-options-for.html
https://images.google.com.na/url?sa=t&url=https://hhttps://sportsbetting010.blogspot.com/2022/07/ac-milan-and-5-betting-options-for.html
https://images.google.com.mz/url?sa=t&url=https://hhttps://sportsbetting010.blogspot.com/2022/07/ac-milan-and-5-betting-options-for.html
https://images.google.com.my/url?sa=t&url=https://hhttps://sportsbetting010.blogspot.com/2022/07/ac-milan-and-5-betting-options-for.html
https://images.google.com.mx/url?sa=t&url=https://hhttps://sportsbetting010.blogspot.com/2022/07/ac-milan-and-5-betting-options-for.html
https://images.google.com.mt/url?sa=t&url=https://hhttps://sportsbetting010.blogspot.com/2022/07/ac-milan-and-5-betting-options-for.html
https://images.google.com.ly/url?sa=t&url=https://hhttps://sportsbetting010.blogspot.com/2022/07/ac-milan-and-5-betting-options-for.html
https://images.google.com.lb/url?sa=t&url=https://hhttps://sportsbetting010.blogspot.com/2022/07/ac-milan-and-5-betting-options-for.html
https://images.google.com.kw/url?sa=t&url=https://hhttps://sportsbetting010.blogspot.com/2022/07/ac-milan-and-5-betting-options-for.html
https://images.google.com.kh/url?sa=t&url=https://hhttps://sportsbetting010.blogspot.com/2022/07/ac-milan-and-5-betting-options-for.html
https://images.google.com.jm/url?sa=t&url=https://hhttps://sportsbetting010.blogspot.com/2022/07/ac-milan-and-5-betting-options-for.html
https://images.google.com.hk/url?sa=t&url=https://hhttps://sportsbetting010.blogspot.com/2022/07/ac-milan-and-5-betting-options-for.html
https://images.google.com.gt/url?sa=t&url=https://hhttps://sportsbetting010.blogspot.com/2022/07/ac-milan-and-5-betting-options-for.html
https://images.google.com.gi/url?sa=t&url=https://hhttps://sportsbetting010.blogspot.com/2022/07/ac-milan-and-5-betting-options-for.html
https://images.google.com.gh/url?sa=t&url=https://hhttps://sportsbetting010.blogspot.com/2022/07/ac-milan-and-5-betting-options-for.html
https://images.google.com.fj/url?sa=t&url=https://hhttps://sportsbetting010.blogspot.com/2022/07/ac-milan-and-5-betting-options-for.html
https://images.google.com.et/url?sa=t&url=https://hhttps://sportsbetting010.blogspot.com/2022/07/ac-milan-and-5-betting-options-for.html
https://images.google.com.eg/url?sa=t&url=https://hhttps://sportsbetting010.blogspot.com/2022/07/ac-milan-and-5-betting-options-for.html
https://images.google.com.ec/url?sa=t&url=https://hhttps://sportsbetting010.blogspot.com/2022/07/ac-milan-and-5-betting-options-for.html
https://images.google.com.do/url?sa=t&url=https://hhttps://sportsbetting010.blogspot.com/2022/07/ac-milan-and-5-betting-options-for.html
https://images.google.com.cy/url?sa=t&url=https://hhttps://sportsbetting010.blogspot.com/2022/07/ac-milan-and-5-betting-options-for.html
https://images.google.com.cu/url?sa=t&url=https://hhttps://sportsbetting010.blogspot.com/2022/07/ac-milan-and-5-betting-options-for.html
https://images.google.com.co/url?sa=t&url=https://hhttps://sportsbetting010.blogspot.com/2022/07/ac-milan-and-5-betting-options-for.html
https://images.google.com.bz/url?sa=t&url=https://hhttps://sportsbetting010.blogspot.com/2022/07/ac-milan-and-5-betting-options-for.html
https://images.google.com.br/url?sa=t&url=https://hhttps://sportsbetting010.blogspot.com/2022/07/ac-milan-and-5-betting-options-for.html
https://images.google.com.bo/url?sa=t&url=https://hhttps://sportsbetting010.blogspot.com/2022/07/ac-milan-and-5-betting-options-for.html
https://images.google.com.bn/url?sa=t&url=https://hhttps://sportsbetting010.blogspot.com/2022/07/ac-milan-and-5-betting-options-for.html
https://images.google.com.bh/url?sa=t&url=https://hhttps://sportsbetting010.blogspot.com/2022/07/ac-milan-and-5-betting-options-for.html
https://images.google.com.bd/url?sa=t&url=https://hhttps://sportsbetting010.blogspot.com/2022/07/ac-milan-and-5-betting-options-for.html
https://images.google.com.au/url?sa=t&url=https://hhttps://sportsbetting010.blogspot.com/2022/07/ac-milan-and-5-betting-options-for.html
https://images.google.com.ar/url?sa=t&url=https://hhttps://sportsbetting010.blogspot.com/2022/07/ac-milan-and-5-betting-options-for.html
https://images.google.com.ag/url?sa=t&url=https://hhttps://sportsbetting010.blogspot.com/2022/07/ac-milan-and-5-betting-options-for.html
https://images.google.com.af/url?sa=t&url=https://hhttps://sportsbetting010.blogspot.com/2022/07/ac-milan-and-5-betting-options-for.html
https://images.google.co.zm/url?sa=t&url=https://hhttps://sportsbetting010.blogspot.com/2022/07/ac-milan-and-5-betting-options-for.html
https://images.google.co.za/url?sa=t&url=https://hhttps://sportsbetting010.blogspot.com/2022/07/ac-milan-and-5-betting-options-for.html
https://images.google.co.za/url?q=https://hhttps://sportsbetting010.blogspot.com/2022/07/ac-milan-and-5-betting-options-for.html
https://images.google.co.ve/url?sa=t&url=https://hhttps://sportsbetting010.blogspot.com/2022/07/ac-milan-and-5-betting-options-for.html
https://images.google.co.uz/url?sa=t&url=https://hhttps://sportsbetting010.blogspot.com/2022/07/ac-milan-and-5-betting-options-for.html
https://images.google.co.uk/url?sa=t&url=https://hhttps://sportsbetting010.blogspot.com/2022/07/ac-milan-and-5-betting-options-for.html
https://images.google.co.ug/url?sa=t&url=https://hhttps://sportsbetting010.blogspot.com/2022/07/ac-milan-and-5-betting-options-for.html
https://images.google.co.tz/url?sa=t&url=https://hhttps://sportsbetting010.blogspot.com/2022/07/ac-milan-and-5-betting-options-for.html
https://images.google.co.th/url?sa=t&url=https://hhttps://sportsbetting010.blogspot.com/2022/07/ac-milan-and-5-betting-options-for.html
https://images.google.co.th/url?q=https://hhttps://sportsbetting010.blogspot.com/2022/07/ac-milan-and-5-betting-options-for.html
https://images.google.co.nz/url?sa=t&url=https://hhttps://sportsbetting010.blogspot.com/2022/07/ac-milan-and-5-betting-options-for.html
https://images.google.co.ma/url?sa=t&url=https://hhttps://sportsbetting010.blogspot.com/2022/07/ac-milan-and-5-betting-options-for.html
https://images.google.co.ls/url?sa=t&url=https://hhttps://sportsbetting010.blogspot.com/2022/07/ac-milan-and-5-betting-options-for.html
https://images.google.co.kr/url?sa=t&url=https://hhttps://sportsbetting010.blogspot.com/2022/07/ac-milan-and-5-betting-options-for.html
https://images.google.co.kr/url?q=https://hhttps://sportsbetting010.blogspot.com/2022/07/ac-milan-and-5-betting-options-for.html
https://images.google.co.ke/url?sa=t&url=https://hhttps://sportsbetting010.blogspot.com/2022/07/ac-milan-and-5-betting-options-for.html
https://images.google.co.jp/url?sa=t&url=https://hhttps://sportsbetting010.blogspot.com/2022/07/ac-milan-and-5-betting-options-for.html
https://images.google.co.in/url?sa=t&url=https://hhttps://sportsbetting010.blogspot.com/2022/07/ac-milan-and-5-betting-options-for.html
https://images.google.co.il/url?sa=t&url=https://hhttps://sportsbetting010.blogspot.com/2022/07/ac-milan-and-5-betting-options-for.html
https://images.google.co.id/url?sa=t&url=https://hhttps://sportsbetting010.blogspot.com/2022/07/ac-milan-and-5-betting-options-for.html
https://images.google.co.id/url?q=https://hhttps://sportsbetting010.blogspot.com/2022/07/ac-milan-and-5-betting-options-for.html
https://images.google.co.cr/url?sa=t&url=https://hhttps://sportsbetting010.blogspot.com/2022/07/ac-milan-and-5-betting-options-for.html
https://images.google.co.cr/url?q=https://hhttps://sportsbetting010.blogspot.com/2022/07/ac-milan-and-5-betting-options-for.html
https://images.google.co.ck/url?sa=t&url=https://hhttps://sportsbetting010.blogspot.com/2022/07/ac-milan-and-5-betting-options-for.html
https://images.google.co.bw/url?sa=t&url=https://hhttps://sportsbetting010.blogspot.com/2022/07/ac-milan-and-5-betting-options-for.html
https://images.google.cm/url?sa=t&url=https://hhttps://sportsbetting010.blogspot.com/2022/07/ac-milan-and-5-betting-options-for.html
https://images.google.cl/url?sa=t&url=https://hhttps://sportsbetting010.blogspot.com/2022/07/ac-milan-and-5-betting-options-for.html
https://images.google.ci/url?sa=t&url=https://hhttps://sportsbetting010.blogspot.com/2022/07/ac-milan-and-5-betting-options-for.html
https://images.google.ch/url?sa=t&url=https://hhttps://sportsbetting010.blogspot.com/2022/07/ac-milan-and-5-betting-options-for.html
https://images.google.cg/url?sa=t&url=https://hhttps://sportsbetting010.blogspot.com/2022/07/ac-milan-and-5-betting-options-for.html
https://images.google.cd/url?sa=t&url=https://hhttps://sportsbetting010.blogspot.com/2022/07/ac-milan-and-5-betting-options-for.html
https://images.google.cat/url?sa=t&url=https://hhttps://sportsbetting010.blogspot.com/2022/07/ac-milan-and-5-betting-options-for.html
https://images.google.ca/url?sa=t&url=https://hhttps://sportsbetting010.blogspot.com/2022/07/ac-milan-and-5-betting-options-for.html
https://images.google.by/url?sa=t&url=https://hhttps://sportsbetting010.blogspot.com/2022/07/ac-milan-and-5-betting-options-for.html
https://images.google.bs/url?sa=t&url=https://hhttps://sportsbetting010.blogspot.com/2022/07/ac-milan-and-5-betting-options-for.html
https://images.google.bi/url?sa=t&url=https://hhttps://sportsbetting010.blogspot.com/2022/07/ac-milan-and-5-betting-options-for.html
https://images.google.bg/url?sa=t&url=https://hhttps://sportsbetting010.blogspot.com/2022/07/ac-milan-and-5-betting-options-for.html
https://images.google.bf/url?sa=t&url=https://hhttps://sportsbetting010.blogspot.com/2022/07/ac-milan-and-5-betting-options-for.html
https://images.google.be/url?sa=t&url=https://hhttps://sportsbetting010.blogspot.com/2022/07/ac-milan-and-5-betting-options-for.html
https://images.google.ba/url?sa=t&url=https://hhttps://sportsbetting010.blogspot.com/2022/07/ac-milan-and-5-betting-options-for.html
https://images.google.ba/url?q=https://hhttps://sportsbetting010.blogspot.com/2022/07/ac-milan-and-5-betting-options-for.html
https://images.google.az/url?sa=t&url=https://hhttps://sportsbetting010.blogspot.com/2022/07/ac-milan-and-5-betting-options-for.html
https://images.google.at/url?sa=t&url=https://hhttps://sportsbetting010.blogspot.com/2022/07/ac-milan-and-5-betting-options-for.html
https://images.google.as/url?sa=t&url=https://hhttps://sportsbetting010.blogspot.com/2022/07/ac-milan-and-5-betting-options-for.html
https://images.google.am/url?sa=t&url=https://hhttps://sportsbetting010.blogspot.com/2022/07/ac-milan-and-5-betting-options-for.html
https://images.google.al/url?sa=t&url=https://hhttps://sportsbetting010.blogspot.com/2022/07/ac-milan-and-5-betting-options-for.html
https://images.google.ae/url?sa=t&url=https://hhttps://sportsbetting010.blogspot.com/2022/07/ac-milan-and-5-betting-options-for.html
https://images.google.ae/url?q=https://hhttps://sportsbetting010.blogspot.com/2022/07/ac-milan-and-5-betting-options-for.html
https://images.google.ad/url?sa=t&url=https://hhttps://sportsbetting010.blogspot.com/2022/07/ac-milan-and-5-betting-options-for.html
https://cse.google.vg/url?sa=t&url=https://hhttps://sportsbetting010.blogspot.com/2022/07/ac-milan-and-5-betting-options-for.html
https://cse.google.to/url?sa=t&url=https://hhttps://sportsbetting010.blogspot.com/2022/07/ac-milan-and-5-betting-options-for.html
https://cse.google.tn/url?sa=t&url=https://hhttps://sportsbetting010.blogspot.com/2022/07/ac-milan-and-5-betting-options-for.html
https://cse.google.tm/url?sa=t&url=https://hhttps://sportsbetting010.blogspot.com/2022/07/ac-milan-and-5-betting-options-for.html
https://cse.google.sn/url?sa=t&url=https://hhttps://sportsbetting010.blogspot.com/2022/07/ac-milan-and-5-betting-options-for.html
https://cse.google.sm/url?sa=t&url=https://hhttps://sportsbetting010.blogspot.com/2022/07/ac-milan-and-5-betting-options-for.html
https://cse.google.sk/url?sa=t&url=https://hhttps://sportsbetting010.blogspot.com/2022/07/ac-milan-and-5-betting-options-for.html
https://cse.google.si/url?sa=t&url=https://hhttps://sportsbetting010.blogspot.com/2022/07/ac-milan-and-5-betting-options-for.html
https://cse.google.sh/url?sa=t&url=https://hhttps://sportsbetting010.blogspot.com/2022/07/ac-milan-and-5-betting-options-for.html
https://cse.google.se/url?sa=t&url=https://hhttps://sportsbetting010.blogspot.com/2022/07/ac-milan-and-5-betting-options-for.html
https://cse.google.sc/url?sa=t&url=https://hhttps://sportsbetting010.blogspot.com/2022/07/ac-milan-and-5-betting-options-for.html
https://cse.google.rw/url?sa=t&url=https://hhttps://sportsbetting010.blogspot.com/2022/07/ac-milan-and-5-betting-options-for.html
https://cse.google.rs/url?sa=t&url=https://hhttps://sportsbetting010.blogspot.com/2022/07/ac-milan-and-5-betting-options-for.html
https://cse.google.ro/url?sa=t&url=https://hhttps://sportsbetting010.blogspot.com/2022/07/ac-milan-and-5-betting-options-for.html
https://cse.google.pt/url?sa=t&url=https://hhttps://sportsbetting010.blogspot.com/2022/07/ac-milan-and-5-betting-options-for.html
https://cse.google.ps/url?sa=t&url=https://hhttps://sportsbetting010.blogspot.com/2022/07/ac-milan-and-5-betting-options-for.html
https://cse.google.no/url?sa=t&url=https://hhttps://sportsbetting010.blogspot.com/2022/07/ac-milan-and-5-betting-options-for.html
https://cse.google.mw/url?sa=t&url=https://hhttps://sportsbetting010.blogspot.com/2022/07/ac-milan-and-5-betting-options-for.html
https://cse.google.ms/url?sa=t&url=https://hhttps://sportsbetting010.blogspot.com/2022/07/ac-milan-and-5-betting-options-for.html
https://cse.google.mn/url?sa=t&url=https://hhttps://sportsbetting010.blogspot.com/2022/07/ac-milan-and-5-betting-options-for.html
https://cse.google.md/url?sa=t&url=https://hhttps://sportsbetting010.blogspot.com/2022/07/ac-milan-and-5-betting-options-for.html
https://cse.google.lv/url?sa=t&url=https://hhttps://sportsbetting010.blogspot.com/2022/07/ac-milan-and-5-betting-options-for.html
https://cse.google.lu/url?sa=t&url=https://hhttps://sportsbetting010.blogspot.com/2022/07/ac-milan-and-5-betting-options-for.html
https://cse.google.lt/url?sa=t&url=https://hhttps://sportsbetting010.blogspot.com/2022/07/ac-milan-and-5-betting-options-for.html
https://cse.google.lk/url?sa=t&url=https://hhttps://sportsbetting010.blogspot.com/2022/07/ac-milan-and-5-betting-options-for.html
https://cse.google.kz/url?sa=t&url=https://hhttps://sportsbetting010.blogspot.com/2022/07/ac-milan-and-5-betting-options-for.html
https://cse.google.kg/url?sa=t&url=https://hhttps://sportsbetting010.blogspot.com/2022/07/ac-milan-and-5-betting-options-for.html
https://cse.google.jo/url?sa=t&url=https://hhttps://sportsbetting010.blogspot.com/2022/07/ac-milan-and-5-betting-options-for.html
https://cse.google.is/url?sa=t&url=https://hhttps://sportsbetting010.blogspot.com/2022/07/ac-milan-and-5-betting-options-for.html
https://cse.google.ie/url?sa=t&url=https://hhttps://sportsbetting010.blogspot.com/2022/07/ac-milan-and-5-betting-options-for.html
https://cse.google.hu/url?sa=t&url=https://hhttps://sportsbetting010.blogspot.com/2022/07/ac-milan-and-5-betting-options-for.html
https://cse.google.ht/url?sa=t&url=https://hhttps://sportsbetting010.blogspot.com/2022/07/ac-milan-and-5-betting-options-for.html
https://cse.google.hr/url?sa=t&url=https://hhttps://sportsbetting010.blogspot.com/2022/07/ac-milan-and-5-betting-options-for.html
https://cse.google.gr/url?sa=t&url=https://hhttps://sportsbetting010.blogspot.com/2022/07/ac-milan-and-5-betting-options-for.html
https://cse.google.gm/url?sa=t&url=https://hhttps://sportsbetting010.blogspot.com/2022/07/ac-milan-and-5-betting-options-for.html
https://cse.google.gl/url?sa=t&url=https://hhttps://sportsbetting010.blogspot.com/2022/07/ac-milan-and-5-betting-options-for.html
https://cse.google.gg/url?sa=t&url=https://hhttps://sportsbetting010.blogspot.com/2022/07/ac-milan-and-5-betting-options-for.html
https://cse.google.ge/url?sa=t&url=https://hhttps://sportsbetting010.blogspot.com/2022/07/ac-milan-and-5-betting-options-for.html
https://cse.google.fm/url?sa=t&url=https://hhttps://sportsbetting010.blogspot.com/2022/07/ac-milan-and-5-betting-options-for.html
https://cse.google.fi/url?sa=t&url=https://hhttps://sportsbetting010.blogspot.com/2022/07/ac-milan-and-5-betting-options-for.html
https://cse.google.es/url?sa=t&url=https://hhttps://sportsbetting010.blogspot.com/2022/07/ac-milan-and-5-betting-options-for.html
https://cse.google.es/url?sa=i&url=https://hhttps://sportsbetting010.blogspot.com/2022/07/ac-milan-and-5-betting-options-for.html
https://cse.google.ee/url?sa=t&url=https://hhttps://sportsbetting010.blogspot.com/2022/07/ac-milan-and-5-betting-options-for.html
https://cse.google.dm/url?sa=t&url=https://hhttps://sportsbetting010.blogspot.com/2022/07/ac-milan-and-5-betting-options-for.html
https://cse.google.dk/url?sa=t&url=https://hhttps://sportsbetting010.blogspot.com/2022/07/ac-milan-and-5-betting-options-for.html
https://cse.google.dj/url?sa=t&url=https://hhttps://sportsbetting010.blogspot.com/2022/07/ac-milan-and-5-betting-options-for.html
https://cse.google.de/url?sa=t&url=https://hhttps://sportsbetting010.blogspot.com/2022/07/ac-milan-and-5-betting-options-for.html
https://cse.google.com/url?sa=t&url=https://hhttps://sportsbetting010.blogspot.com/2022/07/ac-milan-and-5-betting-options-for.html
https://cse.google.com.vn/url?sa=t&url=https://hhttps://sportsbetting010.blogspot.com/2022/07/ac-milan-and-5-betting-options-for.html
https://cse.google.com.uy/url?sa=t&url=https://hhttps://sportsbetting010.blogspot.com/2022/07/ac-milan-and-5-betting-options-for.html
https://cse.google.com.ua/url?sa=t&url=https://hhttps://sportsbetting010.blogspot.com/2022/07/ac-milan-and-5-betting-options-for.html
https://cse.google.com.tr/url?sa=t&url=https://hhttps://sportsbetting010.blogspot.com/2022/07/ac-milan-and-5-betting-options-for.html
https://cse.google.com.sg/url?sa=t&url=https://hhttps://sportsbetting010.blogspot.com/2022/07/ac-milan-and-5-betting-options-for.html
https://cse.google.com.sa/url?sa=t&url=https://hhttps://sportsbetting010.blogspot.com/2022/07/ac-milan-and-5-betting-options-for.html
https://cse.google.com.pr/url?sa=t&url=https://hhttps://sportsbetting010.blogspot.com/2022/07/ac-milan-and-5-betting-options-for.html
https://cse.google.com.pk/url?sa=t&url=https://hhttps://sportsbetting010.blogspot.com/2022/07/ac-milan-and-5-betting-options-for.html
https://cse.google.com.ph/url?sa=t&url=https://hhttps://sportsbetting010.blogspot.com/2022/07/ac-milan-and-5-betting-options-for.html
https://cse.google.com.pa/url?sa=t&url=https://hhttps://sportsbetting010.blogspot.com/2022/07/ac-milan-and-5-betting-options-for.html
https://cse.google.com.om/url?sa=t&url=https://hhttps://sportsbetting010.blogspot.com/2022/07/ac-milan-and-5-betting-options-for.html
https://cse.google.com.np/url?sa=t&url=https://hhttps://sportsbetting010.blogspot.com/2022/07/ac-milan-and-5-betting-options-for.html
https://cse.google.com.ng/url?sa=t&url=https://hhttps://sportsbetting010.blogspot.com/2022/07/ac-milan-and-5-betting-options-for.html
https://cse.google.com.my/url?sa=t&url=https://hhttps://sportsbetting010.blogspot.com/2022/07/ac-milan-and-5-betting-options-for.html
https://cse.google.com.mt/url?sa=t&url=https://hhttps://sportsbetting010.blogspot.com/2022/07/ac-milan-and-5-betting-options-for.html
https://cse.google.com.ly/url?sa=t&url=https://hhttps://sportsbetting010.blogspot.com/2022/07/ac-milan-and-5-betting-options-for.html
https://cse.google.com.lb/url?sa=t&url=https://hhttps://sportsbetting010.blogspot.com/2022/07/ac-milan-and-5-betting-options-for.html
https://cse.google.com.kw/url?sa=t&url=https://hhttps://sportsbetting010.blogspot.com/2022/07/ac-milan-and-5-betting-options-for.html
https://cse.google.com.jm/url?sa=t&url=https://hhttps://sportsbetting010.blogspot.com/2022/07/ac-milan-and-5-betting-options-for.html
https://cse.google.com.hk/url?sa=t&url=https://hhttps://sportsbetting010.blogspot.com/2022/07/ac-milan-and-5-betting-options-for.html
https://cse.google.com.hk/url?sa=i&url=https://hhttps://sportsbetting010.blogspot.com/2022/07/ac-milan-and-5-betting-options-for.html
https://cse.google.com.gt/url?sa=t&url=https://hhttps://sportsbetting010.blogspot.com/2022/07/ac-milan-and-5-betting-options-for.html
https://cse.google.com.gi/url?sa=t&url=https://hhttps://sportsbetting010.blogspot.com/2022/07/ac-milan-and-5-betting-options-for.html
https://cse.google.com.fj/url?sa=t&url=https://hhttps://sportsbetting010.blogspot.com/2022/07/ac-milan-and-5-betting-options-for.html
https://cse.google.com.et/url?sa=t&url=https://hhttps://sportsbetting010.blogspot.com/2022/07/ac-milan-and-5-betting-options-for.html
https://cse.google.com.eg/url?sa=t&url=https://hhttps://sportsbetting010.blogspot.com/2022/07/ac-milan-and-5-betting-options-for.html
https://cse.google.com.ec/url?sa=t&url=https://hhttps://sportsbetting010.blogspot.com/2022/07/ac-milan-and-5-betting-options-for.html
https://cse.google.com.do/url?sa=t&url=https://hhttps://sportsbetting010.blogspot.com/2022/07/ac-milan-and-5-betting-options-for.html
https://cse.google.com.cu/url?sa=t&url=https://hhttps://sportsbetting010.blogspot.com/2022/07/ac-milan-and-5-betting-options-for.html
https://cse.google.com.co/url?sa=t&url=https://hhttps://sportsbetting010.blogspot.com/2022/07/ac-milan-and-5-betting-options-for.html
https://cse.google.com.bz/url?sa=t&url=https://hhttps://sportsbetting010.blogspot.com/2022/07/ac-milan-and-5-betting-options-for.html
https://cse.google.com.bh/url?sa=t&url=https://hhttps://sportsbetting010.blogspot.com/2022/07/ac-milan-and-5-betting-options-for.html
https://cse.google.com.bd/url?sa=t&url=https://hhttps://sportsbetting010.blogspot.com/2022/07/ac-milan-and-5-betting-options-for.html
https://cse.google.com.au/url?sa=t&url=https://hhttps://sportsbetting010.blogspot.com/2022/07/ac-milan-and-5-betting-options-for.html
https://cse.google.com.ar/url?sa=t&url=https://hhttps://sportsbetting010.blogspot.com/2022/07/ac-milan-and-5-betting-options-for.html
https://cse.google.com.ag/url?sa=t&url=https://hhttps://sportsbetting010.blogspot.com/2022/07/ac-milan-and-5-betting-options-for.html
https://cse.google.co.zm/url?sa=t&url=https://hhttps://sportsbetting010.blogspot.com/2022/07/ac-milan-and-5-betting-options-for.html
https://cse.google.co.za/url?sa=t&url=https://hhttps://sportsbetting010.blogspot.com/2022/07/ac-milan-and-5-betting-options-for.html
https://cse.google.co.ve/url?sa=t&url=https://hhttps://sportsbetting010.blogspot.com/2022/07/ac-milan-and-5-betting-options-for.html
https://cse.google.co.uz/url?sa=t&url=https://hhttps://sportsbetting010.blogspot.com/2022/07/ac-milan-and-5-betting-options-for.html
https://cse.google.co.ug/url?sa=t&url=https://hhttps://sportsbetting010.blogspot.com/2022/07/ac-milan-and-5-betting-options-for.html
https://cse.google.co.th/url?sa=t&url=https://hhttps://sportsbetting010.blogspot.com/2022/07/ac-milan-and-5-betting-options-for.html
https://cse.google.co.nz/url?sa=t&url=https://hhttps://sportsbetting010.blogspot.com/2022/07/ac-milan-and-5-betting-options-for.html
https://cse.google.co.kr/url?sa=t&url=https://hhttps://sportsbetting010.blogspot.com/2022/07/ac-milan-and-5-betting-options-for.html
https://cse.google.co.ke/url?sa=t&url=https://hhttps://sportsbetting010.blogspot.com/2022/07/ac-milan-and-5-betting-options-for.html
https://cse.google.co.jp/url?sa=t&url=https://hhttps://sportsbetting010.blogspot.com/2022/07/ac-milan-and-5-betting-options-for.html
https://cse.google.co.il/url?sa=t&url=https://hhttps://sportsbetting010.blogspot.com/2022/07/ac-milan-and-5-betting-options-for.html
https://cse.google.co.id/url?sa=t&url=https://hhttps://sportsbetting010.blogspot.com/2022/07/ac-milan-and-5-betting-options-for.html
https://cse.google.co.id/url?sa=i&url=https://hhttps://sportsbetting010.blogspot.com/2022/07/ac-milan-and-5-betting-options-for.html
https://cse.google.co.cr/url?sa=t&url=https://hhttps://sportsbetting010.blogspot.com/2022/07/ac-milan-and-5-betting-options-for.html
https://cse.google.co.ck/url?sa=t&url=https://hhttps://sportsbetting010.blogspot.com/2022/07/ac-milan-and-5-betting-options-for.html
https://cse.google.co.bw/url?sa=t&url=https://hhttps://sportsbetting010.blogspot.com/2022/07/ac-milan-and-5-betting-options-for.html
https://cse.google.cm/url?sa=t&url=https://hhttps://sportsbetting010.blogspot.com/2022/07/ac-milan-and-5-betting-options-for.html
https://cse.google.cl/url?sa=t&url=https://hhttps://sportsbetting010.blogspot.com/2022/07/ac-milan-and-5-betting-options-for.html
https://cse.google.ci/url?sa=t&url=https://hhttps://sportsbetting010.blogspot.com/2022/07/ac-milan-and-5-betting-options-for.html
https://cse.google.ch/url?sa=t&url=https://hhttps://sportsbetting010.blogspot.com/2022/07/ac-milan-and-5-betting-options-for.html
https://cse.google.ch/url?sa=i&url=https://hhttps://sportsbetting010.blogspot.com/2022/07/ac-milan-and-5-betting-options-for.html
https://cse.google.cg/url?sa=t&url=https://hhttps://sportsbetting010.blogspot.com/2022/07/ac-milan-and-5-betting-options-for.html
https://cse.google.cd/url?sa=t&url=https://hhttps://sportsbetting010.blogspot.com/2022/07/ac-milan-and-5-betting-options-for.html
https://cse.google.by/url?sa=t&url=https://hhttps://sportsbetting010.blogspot.com/2022/07/ac-milan-and-5-betting-options-for.html
https://cse.google.bs/url?sa=t&url=https://hhttps://sportsbetting010.blogspot.com/2022/07/ac-milan-and-5-betting-options-for.html
https://cse.google.bi/url?sa=t&url=https://hhttps://sportsbetting010.blogspot.com/2022/07/ac-milan-and-5-betting-options-for.html
https://cse.google.bg/url?sa=t&url=https://hhttps://sportsbetting010.blogspot.com/2022/07/ac-milan-and-5-betting-options-for.html
https://cse.google.be/url?sa=t&url=https://hhttps://sportsbetting010.blogspot.com/2022/07/ac-milan-and-5-betting-options-for.html
https://cse.google.be/url?sa=i&url=https://hhttps://sportsbetting010.blogspot.com/2022/07/ac-milan-and-5-betting-options-for.html
https://cse.google.ba/url?sa=t&url=https://hhttps://sportsbetting010.blogspot.com/2022/07/ac-milan-and-5-betting-options-for.html
https://cse.google.az/url?sa=t&url=https://hhttps://sportsbetting010.blogspot.com/2022/07/ac-milan-and-5-betting-options-for.html
https://cse.google.at/url?sa=t&url=https://hhttps://sportsbetting010.blogspot.com/2022/07/ac-milan-and-5-betting-options-for.html
https://cse.google.am/url?sa=t&url=https://hhttps://sportsbetting010.blogspot.com/2022/07/ac-milan-and-5-betting-options-for.html
https://cse.google.ae/url?sa=t&url=https://hhttps://sportsbetting010.blogspot.com/2022/07/ac-milan-and-5-betting-options-for.html
https://clients1.google.vg/url?sa=t&url=https://hhttps://sportsbetting010.blogspot.com/2022/07/ac-milan-and-5-betting-options-for.html
https://clients1.google.to/url?sa=t&url=https://hhttps://sportsbetting010.blogspot.com/2022/07/ac-milan-and-5-betting-options-for.html
https://clients1.google.tn/url?sa=t&url=https://hhttps://sportsbetting010.blogspot.com/2022/07/ac-milan-and-5-betting-options-for.html
https://clients1.google.tm/url?sa=t&url=https://hhttps://sportsbetting010.blogspot.com/2022/07/ac-milan-and-5-betting-options-for.html
https://clients1.google.sn/url?sa=t&url=https://hhttps://sportsbetting010.blogspot.com/2022/07/ac-milan-and-5-betting-options-for.html
https://clients1.google.sm/url?sa=t&url=https://hhttps://sportsbetting010.blogspot.com/2022/07/ac-milan-and-5-betting-options-for.html
https://clients1.google.sk/url?sa=t&url=https://hhttps://sportsbetting010.blogspot.com/2022/07/ac-milan-and-5-betting-options-for.html
https://clients1.google.si/url?sa=t&url=https://hhttps://sportsbetting010.blogspot.com/2022/07/ac-milan-and-5-betting-options-for.html
https://clients1.google.sh/url?sa=t&url=https://hhttps://sportsbetting010.blogspot.com/2022/07/ac-milan-and-5-betting-options-for.html
https://clients1.google.se/url?sa=t&url=https://hhttps://sportsbetting010.blogspot.com/2022/07/ac-milan-and-5-betting-options-for.html
https://clients1.google.sc/url?sa=t&url=https://hhttps://sportsbetting010.blogspot.com/2022/07/ac-milan-and-5-betting-options-for.html
https://clients1.google.rw/url?sa=t&url=https://hhttps://sportsbetting010.blogspot.com/2022/07/ac-milan-and-5-betting-options-for.html
https://clients1.google.rs/url?sa=t&url=https://hhttps://sportsbetting010.blogspot.com/2022/07/ac-milan-and-5-betting-options-for.html
https://clients1.google.ro/url?sa=t&url=https://hhttps://sportsbetting010.blogspot.com/2022/07/ac-milan-and-5-betting-options-for.html
https://clients1.google.pt/url?sa=t&url=https://hhttps://sportsbetting010.blogspot.com/2022/07/ac-milan-and-5-betting-options-for.html
https://clients1.google.ps/url?sa=t&url=https://hhttps://sportsbetting010.blogspot.com/2022/07/ac-milan-and-5-betting-options-for.html
https://clients1.google.no/url?sa=t&url=https://hhttps://sportsbetting010.blogspot.com/2022/07/ac-milan-and-5-betting-options-for.html
https://clients1.google.mw/url?sa=t&url=https://hhttps://sportsbetting010.blogspot.com/2022/07/ac-milan-and-5-betting-options-for.html
https://clients1.google.ms/url?sa=t&url=https://hhttps://sportsbetting010.blogspot.com/2022/07/ac-milan-and-5-betting-options-for.html
https://clients1.google.mn/url?sa=t&url=https://hhttps://sportsbetting010.blogspot.com/2022/07/ac-milan-and-5-betting-options-for.html
https://clients1.google.md/url?sa=t&url=https://hhttps://sportsbetting010.blogspot.com/2022/07/ac-milan-and-5-betting-options-for.html
https://clients1.google.lv/url?sa=t&url=https://hhttps://sportsbetting010.blogspot.com/2022/07/ac-milan-and-5-betting-options-for.html
https://clients1.google.lu/url?sa=t&url=https://hhttps://sportsbetting010.blogspot.com/2022/07/ac-milan-and-5-betting-options-for.html
https://clients1.google.lt/url?sa=t&url=https://hhttps://sportsbetting010.blogspot.com/2022/07/ac-milan-and-5-betting-options-for.html
https://clients1.google.lk/url?sa=t&url=https://hhttps://sportsbetting010.blogspot.com/2022/07/ac-milan-and-5-betting-options-for.html
https://clients1.google.kz/url?sa=t&url=https://hhttps://sportsbetting010.blogspot.com/2022/07/ac-milan-and-5-betting-options-for.html
https://clients1.google.kg/url?sa=t&url=https://hhttps://sportsbetting010.blogspot.com/2022/07/ac-milan-and-5-betting-options-for.html
https://clients1.google.jo/url?sa=t&url=https://hhttps://sportsbetting010.blogspot.com/2022/07/ac-milan-and-5-betting-options-for.html
https://clients1.google.is/url?sa=t&url=https://hhttps://sportsbetting010.blogspot.com/2022/07/ac-milan-and-5-betting-options-for.html
https://clients1.google.ie/url?sa=t&url=https://hhttps://sportsbetting010.blogspot.com/2022/07/ac-milan-and-5-betting-options-for.html
https://clients1.google.ie/url?q=https://hhttps://sportsbetting010.blogspot.com/2022/07/ac-milan-and-5-betting-options-for.html
https://clients1.google.hu/url?sa=t&url=https://hhttps://sportsbetting010.blogspot.com/2022/07/ac-milan-and-5-betting-options-for.html
https://clients1.google.ht/url?sa=t&url=https://hhttps://sportsbetting010.blogspot.com/2022/07/ac-milan-and-5-betting-options-for.html
https://clients1.google.hr/url?sa=t&url=https://hhttps://sportsbetting010.blogspot.com/2022/07/ac-milan-and-5-betting-options-for.html
https://clients1.google.gr/url?sa=t&url=https://hhttps://sportsbetting010.blogspot.com/2022/07/ac-milan-and-5-betting-options-for.html
https://clients1.google.gm/url?sa=t&url=https://hhttps://sportsbetting010.blogspot.com/2022/07/ac-milan-and-5-betting-options-for.html
https://clients1.google.gl/url?sa=t&url=https://hhttps://sportsbetting010.blogspot.com/2022/07/ac-milan-and-5-betting-options-for.html
https://clients1.google.gg/url?sa=t&url=https://hhttps://sportsbetting010.blogspot.com/2022/07/ac-milan-and-5-betting-options-for.html
https://clients1.google.ge/url?sa=t&url=https://hhttps://sportsbetting010.blogspot.com/2022/07/ac-milan-and-5-betting-options-for.html
https://clients1.google.fm/url?sa=t&url=https://hhttps://sportsbetting010.blogspot.com/2022/07/ac-milan-and-5-betting-options-for.html
https://clients1.google.fi/url?sa=t&url=https://hhttps://sportsbetting010.blogspot.com/2022/07/ac-milan-and-5-betting-options-for.html
https://clients1.google.es/url?sa=t&url=https://hhttps://sportsbetting010.blogspot.com/2022/07/ac-milan-and-5-betting-options-for.html
https://clients1.google.es/url?q=https://hhttps://sportsbetting010.blogspot.com/2022/07/ac-milan-and-5-betting-options-for.html
https://clients1.google.ee/url?sa=t&url=https://hhttps://sportsbetting010.blogspot.com/2022/07/ac-milan-and-5-betting-options-for.html
https://clients1.google.dm/url?sa=t&url=https://hhttps://sportsbetting010.blogspot.com/2022/07/ac-milan-and-5-betting-options-for.html
https://clients1.google.dk/url?sa=t&url=https://hhttps://sportsbetting010.blogspot.com/2022/07/ac-milan-and-5-betting-options-for.html
https://clients1.google.dj/url?sa=t&url=https://hhttps://sportsbetting010.blogspot.com/2022/07/ac-milan-and-5-betting-options-for.html
https://clients1.google.de/url?sa=t&url=https://hhttps://sportsbetting010.blogspot.com/2022/07/ac-milan-and-5-betting-options-for.html
https://clients1.google.com.vn/url?sa=t&url=https://hhttps://sportsbetting010.blogspot.com/2022/07/ac-milan-and-5-betting-options-for.html
https://clients1.google.com.vc/url?sa=t&url=https://hhttps://sportsbetting010.blogspot.com/2022/07/ac-milan-and-5-betting-options-for.html
https://clients1.google.com.uy/url?sa=t&url=https://hhttps://sportsbetting010.blogspot.com/2022/07/ac-milan-and-5-betting-options-for.html
https://clients1.google.com.ua/url?sa=t&url=https://hhttps://sportsbetting010.blogspot.com/2022/07/ac-milan-and-5-betting-options-for.html
https://clients1.google.com.tr/url?sa=t&url=https://hhttps://sportsbetting010.blogspot.com/2022/07/ac-milan-and-5-betting-options-for.html
https://clients1.google.com.tr/url?q=https://hhttps://sportsbetting010.blogspot.com/2022/07/ac-milan-and-5-betting-options-for.html
https://clients1.google.com.sg/url?sa=t&url=https://hhttps://sportsbetting010.blogspot.com/2022/07/ac-milan-and-5-betting-options-for.html
https://clients1.google.com.sa/url?sa=t&url=https://hhttps://sportsbetting010.blogspot.com/2022/07/ac-milan-and-5-betting-options-for.html
https://clients1.google.com.qa/url?sa=t&url=https://hhttps://sportsbetting010.blogspot.com/2022/07/ac-milan-and-5-betting-options-for.html
https://clients1.google.com.py/url?sa=t&url=https://hhttps://sportsbetting010.blogspot.com/2022/07/ac-milan-and-5-betting-options-for.html
https://clients1.google.com.pr/url?sa=t&url=https://hhttps://sportsbetting010.blogspot.com/2022/07/ac-milan-and-5-betting-options-for.html
https://clients1.google.com.pk/url?sa=t&url=https://hhttps://sportsbetting010.blogspot.com/2022/07/ac-milan-and-5-betting-options-for.html
https://clients1.google.com.ph/url?sa=t&url=https://hhttps://sportsbetting010.blogspot.com/2022/07/ac-milan-and-5-betting-options-for.html
https://clients1.google.com.pa/url?sa=t&url=https://hhttps://sportsbetting010.blogspot.com/2022/07/ac-milan-and-5-betting-options-for.html
https://clients1.google.com.np/url?sa=t&url=https://hhttps://sportsbetting010.blogspot.com/2022/07/ac-milan-and-5-betting-options-for.html
https://clients1.google.com.ng/url?sa=t&url=https://hhttps://sportsbetting010.blogspot.com/2022/07/ac-milan-and-5-betting-options-for.html
https://clients1.google.com.my/url?sa=t&url=https://hhttps://sportsbetting010.blogspot.com/2022/07/ac-milan-and-5-betting-options-for.html
https://clients1.google.com.mt/url?sa=t&url=https://hhttps://sportsbetting010.blogspot.com/2022/07/ac-milan-and-5-betting-options-for.html
https://clients1.google.com.ly/url?sa=t&url=https://hhttps://sportsbetting010.blogspot.com/2022/07/ac-milan-and-5-betting-options-for.html
https://clients1.google.com.lb/url?sa=t&url=https://hhttps://sportsbetting010.blogspot.com/2022/07/ac-milan-and-5-betting-options-for.html
https://clients1.google.com.kw/url?sa=t&url=https://hhttps://sportsbetting010.blogspot.com/2022/07/ac-milan-and-5-betting-options-for.html
https://clients1.google.com.jm/url?sa=t&url=https://hhttps://sportsbetting010.blogspot.com/2022/07/ac-milan-and-5-betting-options-for.html
https://clients1.google.com.hk/url?sa=t&url=https://hhttps://sportsbetting010.blogspot.com/2022/07/ac-milan-and-5-betting-options-for.html
https://clients1.google.com.gt/url?sa=t&url=https://hhttps://sportsbetting010.blogspot.com/2022/07/ac-milan-and-5-betting-options-for.html
https://clients1.google.com.gi/url?sa=t&url=https://hhttps://sportsbetting010.blogspot.com/2022/07/ac-milan-and-5-betting-options-for.html
https://clients1.google.com.fj/url?sa=t&url=https://hhttps://sportsbetting010.blogspot.com/2022/07/ac-milan-and-5-betting-options-for.html
https://clients1.google.com.et/url?sa=t&url=https://hhttps://sportsbetting010.blogspot.com/2022/07/ac-milan-and-5-betting-options-for.html
https://clients1.google.com.eg/url?sa=t&url=https://hhttps://sportsbetting010.blogspot.com/2022/07/ac-milan-and-5-betting-options-for.html
https://clients1.google.com.ec/url?sa=t&url=https://hhttps://sportsbetting010.blogspot.com/2022/07/ac-milan-and-5-betting-options-for.html
https://clients1.google.com.do/url?sa=t&url=https://hhttps://sportsbetting010.blogspot.com/2022/07/ac-milan-and-5-betting-options-for.html
https://clients1.google.com.co/url?sa=t&url=https://hhttps://sportsbetting010.blogspot.com/2022/07/ac-milan-and-5-betting-options-for.html
https://clients1.google.com.co/url?q=https://hhttps://sportsbetting010.blogspot.com/2022/07/ac-milan-and-5-betting-options-for.html
https://clients1.google.com.bz/url?sa=t&url=https://hhttps://sportsbetting010.blogspot.com/2022/07/ac-milan-and-5-betting-options-for.html
https://clients1.google.com.bh/url?sa=t&url=https://hhttps://sportsbetting010.blogspot.com/2022/07/ac-milan-and-5-betting-options-for.html
https://clients1.google.com.bd/url?sa=t&url=https://hhttps://sportsbetting010.blogspot.com/2022/07/ac-milan-and-5-betting-options-for.html
https://clients1.google.com.ar/url?sa=t&url=https://hhttps://sportsbetting010.blogspot.com/2022/07/ac-milan-and-5-betting-options-for.html
https://clients1.google.com.ag/url?sa=t&url=https://hhttps://sportsbetting010.blogspot.com/2022/07/ac-milan-and-5-betting-options-for.html
https://clients1.google.co.zm/url?sa=t&url=https://hhttps://sportsbetting010.blogspot.com/2022/07/ac-milan-and-5-betting-options-for.html
https://clients1.google.co.za/url?sa=t&url=https://hhttps://sportsbetting010.blogspot.com/2022/07/ac-milan-and-5-betting-options-for.html
https://clients1.google.co.ve/url?sa=t&url=https://hhttps://sportsbetting010.blogspot.com/2022/07/ac-milan-and-5-betting-options-for.html
https://clients1.google.co.uz/url?sa=t&url=https://hhttps://sportsbetting010.blogspot.com/2022/07/ac-milan-and-5-betting-options-for.html
https://clients1.google.co.ug/url?sa=t&url=https://hhttps://sportsbetting010.blogspot.com/2022/07/ac-milan-and-5-betting-options-for.html
https://clients1.google.co.th/url?sa=t&url=https://hhttps://sportsbetting010.blogspot.com/2022/07/ac-milan-and-5-betting-options-for.html
https://clients1.google.co.nz/url?sa=t&url=https://hhttps://sportsbetting010.blogspot.com/2022/07/ac-milan-and-5-betting-options-for.html
https://clients1.google.co.kr/url?sa=t&url=https://hhttps://sportsbetting010.blogspot.com/2022/07/ac-milan-and-5-betting-options-for.html
https://clients1.google.co.ke/url?sa=t&url=https://hhttps://sportsbetting010.blogspot.com/2022/07/ac-milan-and-5-betting-options-for.html
https://clients1.google.co.il/url?sa=t&url=https://hhttps://sportsbetting010.blogspot.com/2022/07/ac-milan-and-5-betting-options-for.html
https://clients1.google.co.id/url?sa=t&url=https://hhttps://sportsbetting010.blogspot.com/2022/07/ac-milan-and-5-betting-options-for.html
https://clients1.google.co.cr/url?sa=t&url=https://hhttps://sportsbetting010.blogspot.com/2022/07/ac-milan-and-5-betting-options-for.html
https://clients1.google.co.ck/url?sa=t&url=https://hhttps://sportsbetting010.blogspot.com/2022/07/ac-milan-and-5-betting-options-for.html
https://clients1.google.co.bw/url?sa=t&url=https://hhttps://sportsbetting010.blogspot.com/2022/07/ac-milan-and-5-betting-options-for.html
https://clients1.google.cm/url?sa=t&url=https://hhttps://sportsbetting010.blogspot.com/2022/07/ac-milan-and-5-betting-options-for.html
https://clients1.google.cl/url?sa=t&url=https://hhttps://sportsbetting010.blogspot.com/2022/07/ac-milan-and-5-betting-options-for.html
https://clients1.google.cl/url?q=https://hhttps://sportsbetting010.blogspot.com/2022/07/ac-milan-and-5-betting-options-for.html
https://clients1.google.ci/url?sa=t&url=https://hhttps://sportsbetting010.blogspot.com/2022/07/ac-milan-and-5-betting-options-for.html
https://clients1.google.ch/url?q=https://hhttps://sportsbetting010.blogspot.com/2022/07/ac-milan-and-5-betting-options-for.html
https://clients1.google.cg/url?sa=t&url=https://hhttps://sportsbetting010.blogspot.com/2022/07/ac-milan-and-5-betting-options-for.html
https://clients1.google.cd/url?sa=t&url=https://hhttps://sportsbetting010.blogspot.com/2022/07/ac-milan-and-5-betting-options-for.html
https://clients1.google.by/url?sa=t&url=https://hhttps://sportsbetting010.blogspot.com/2022/07/ac-milan-and-5-betting-options-for.html
https://clients1.google.bs/url?sa=t&url=https://hhttps://sportsbetting010.blogspot.com/2022/07/ac-milan-and-5-betting-options-for.html
https://clients1.google.bi/url?sa=t&url=https://hhttps://sportsbetting010.blogspot.com/2022/07/ac-milan-and-5-betting-options-for.html
https://clients1.google.bg/url?sa=t&url=https://hhttps://sportsbetting010.blogspot.com/2022/07/ac-milan-and-5-betting-options-for.html
https://clients1.google.be/url?sa=t&url=https://hhttps://sportsbetting010.blogspot.com/2022/07/ac-milan-and-5-betting-options-for.html
https://clients1.google.ba/url?sa=t&url=https://hhttps://sportsbetting010.blogspot.com/2022/07/ac-milan-and-5-betting-options-for.html
https://clients1.google.az/url?sa=t&url=https://hhttps://sportsbetting010.blogspot.com/2022/07/ac-milan-and-5-betting-options-for.html
https://clients1.google.at/url?sa=t&url=https://hhttps://sportsbetting010.blogspot.com/2022/07/ac-milan-and-5-betting-options-for.html
https://clients1.google.am/url?sa=t&url=https://hhttps://sportsbetting010.blogspot.com/2022/07/ac-milan-and-5-betting-options-for.html
https://clients1.google.ae/url?sa=t&url=https://hhttps://sportsbetting010.blogspot.com/2022/07/ac-milan-and-5-betting-options-for.html
http://toolbarqueries.google.sk/url?sa=t&url=https://hhttps://sportsbetting010.blogspot.com/2022/07/ac-milan-and-5-betting-options-for.html
http://toolbarqueries.google.si/url?sa=t&url=https://hhttps://sportsbetting010.blogspot.com/2022/07/ac-milan-and-5-betting-options-for.html
http://toolbarqueries.google.se/url?sa=t&url=https://hhttps://sportsbetting010.blogspot.com/2022/07/ac-milan-and-5-betting-options-for.html
http://toolbarqueries.google.ru/url?sa=t&url=https://hhttps://sportsbetting010.blogspot.com/2022/07/ac-milan-and-5-betting-options-for.html
http://toolbarqueries.google.rs/url?sa=t&url=https://hhttps://sportsbetting010.blogspot.com/2022/07/ac-milan-and-5-betting-options-for.html
http://toolbarqueries.google.ro/url?sa=t&url=https://hhttps://sportsbetting010.blogspot.com/2022/07/ac-milan-and-5-betting-options-for.html
http://toolbarqueries.google.pl/url?sa=t&url=https://hhttps://sportsbetting010.blogspot.com/2022/07/ac-milan-and-5-betting-options-for.html
http://toolbarqueries.google.no/url?sa=t&url=https://hhttps://sportsbetting010.blogspot.com/2022/07/ac-milan-and-5-betting-options-for.html
http://toolbarqueries.google.nl/url?sa=t&url=https://hhttps://sportsbetting010.blogspot.com/2022/07/ac-milan-and-5-betting-options-for.html
http://toolbarqueries.google.lv/url?sa=t&url=https://hhttps://sportsbetting010.blogspot.com/2022/07/ac-milan-and-5-betting-options-for.html
http://toolbarqueries.google.lu/url?sa=t&url=https://hhttps://sportsbetting010.blogspot.com/2022/07/ac-milan-and-5-betting-options-for.html
http://toolbarqueries.google.lt/url?sa=t&url=https://hhttps://sportsbetting010.blogspot.com/2022/07/ac-milan-and-5-betting-options-for.html
http://toolbarqueries.google.lk/url?sa=t&url=https://hhttps://sportsbetting010.blogspot.com/2022/07/ac-milan-and-5-betting-options-for.html
http://toolbarqueries.google.it/url?sa=t&url=https://hhttps://sportsbetting010.blogspot.com/2022/07/ac-milan-and-5-betting-options-for.html
http://toolbarqueries.google.is/url?sa=t&url=https://hhttps://sportsbetting010.blogspot.com/2022/07/ac-milan-and-5-betting-options-for.html
http://toolbarqueries.google.ie/url?sa=t&url=https://hhttps://sportsbetting010.blogspot.com/2022/07/ac-milan-and-5-betting-options-for.html
http://toolbarqueries.google.hu/url?sa=t&url=https://hhttps://sportsbetting010.blogspot.com/2022/07/ac-milan-and-5-betting-options-for.html
http://toolbarqueries.google.hr/url?sa=t&url=https://hhttps://sportsbetting010.blogspot.com/2022/07/ac-milan-and-5-betting-options-for.html
http://toolbarqueries.google.gr/url?sa=t&url=https://hhttps://sportsbetting010.blogspot.com/2022/07/ac-milan-and-5-betting-options-for.html
http://toolbarqueries.google.fr/url?sa=t&url=https://hhttps://sportsbetting010.blogspot.com/2022/07/ac-milan-and-5-betting-options-for.html
http://toolbarqueries.google.fi/url?sa=t&url=https://hhttps://sportsbetting010.blogspot.com/2022/07/ac-milan-and-5-betting-options-for.html
http://toolbarqueries.google.es/url?sa=t&url=https://hhttps://sportsbetting010.blogspot.com/2022/07/ac-milan-and-5-betting-options-for.html
http://toolbarqueries.google.ee/url?sa=t&url=https://hhttps://sportsbetting010.blogspot.com/2022/07/ac-milan-and-5-betting-options-for.html
http://toolbarqueries.google.dk/url?sa=t&url=https://hhttps://sportsbetting010.blogspot.com/2022/07/ac-milan-and-5-betting-options-for.html
http://toolbarqueries.google.de/url?sa=t&url=https://hhttps://sportsbetting010.blogspot.com/2022/07/ac-milan-and-5-betting-options-for.html
http://toolbarqueries.google.cz/url?sa=t&url=https://hhttps://sportsbetting010.blogspot.com/2022/07/ac-milan-and-5-betting-options-for.html
http://toolbarqueries.google.com.vn/url?sa=t&url=https://hhttps://sportsbetting010.blogspot.com/2022/07/ac-milan-and-5-betting-options-for.html
http://toolbarqueries.google.com.uy/url?sa=t&url=https://hhttps://sportsbetting010.blogspot.com/2022/07/ac-milan-and-5-betting-options-for.html
http://toolbarqueries.google.com.tw/url?sa=t&url=https://hhttps://sportsbetting010.blogspot.com/2022/07/ac-milan-and-5-betting-options-for.html
http://toolbarqueries.google.com.tr/url?sa=t&url=https://hhttps://sportsbetting010.blogspot.com/2022/07/ac-milan-and-5-betting-options-for.html
http://toolbarqueries.google.com.sa/url?sa=t&url=https://hhttps://sportsbetting010.blogspot.com/2022/07/ac-milan-and-5-betting-options-for.html
http://toolbarqueries.google.com.py/url?sa=t&url=https://hhttps://sportsbetting010.blogspot.com/2022/07/ac-milan-and-5-betting-options-for.html
http://toolbarqueries.google.com.pr/url?sa=t&url=https://hhttps://sportsbetting010.blogspot.com/2022/07/ac-milan-and-5-betting-options-for.html
http://toolbarqueries.google.com.pk/url?sa=t&url=https://hhttps://sportsbetting010.blogspot.com/2022/07/ac-milan-and-5-betting-options-for.html
http://toolbarqueries.google.com.pe/url?sa=t&url=https://hhttps://sportsbetting010.blogspot.com/2022/07/ac-milan-and-5-betting-options-for.html
http://toolbarqueries.google.com.my/url?sa=t&url=https://hhttps://sportsbetting010.blogspot.com/2022/07/ac-milan-and-5-betting-options-for.html
http://toolbarqueries.google.com.hk/url?sa=t&url=https://hhttps://sportsbetting010.blogspot.com/2022/07/ac-milan-and-5-betting-options-for.html
http://toolbarqueries.google.com.gt/url?sa=t&url=https://hhttps://sportsbetting010.blogspot.com/2022/07/ac-milan-and-5-betting-options-for.html
http://toolbarqueries.google.com.gh/url?sa=t&url=https://hhttps://sportsbetting010.blogspot.com/2022/07/ac-milan-and-5-betting-options-for.html
http://toolbarqueries.google.com.eg/url?sa=t&url=https://hhttps://sportsbetting010.blogspot.com/2022/07/ac-milan-and-5-betting-options-for.html
http://toolbarqueries.google.com.ec/url?sa=t&url=https://hhttps://sportsbetting010.blogspot.com/2022/07/ac-milan-and-5-betting-options-for.html
http://toolbarqueries.google.com.do/url?sa=t&url=https://hhttps://sportsbetting010.blogspot.com/2022/07/ac-milan-and-5-betting-options-for.html
http://toolbarqueries.google.com.cu/url?sa=t&url=https://hhttps://sportsbetting010.blogspot.com/2022/07/ac-milan-and-5-betting-options-for.html
http://toolbarqueries.google.com.br/url?sa=t&url=https://hhttps://sportsbetting010.blogspot.com/2022/07/ac-milan-and-5-betting-options-for.html
http://toolbarqueries.google.com.au/url?sa=t&url=https://hhttps://sportsbetting010.blogspot.com/2022/07/ac-milan-and-5-betting-options-for.html
http://toolbarqueries.google.com.ar/url?sa=t&url=https://hhttps://sportsbetting010.blogspot.com/2022/07/ac-milan-and-5-betting-options-for.html
http://toolbarqueries.google.co.za/url?sa=t&url=https://hhttps://sportsbetting010.blogspot.com/2022/07/ac-milan-and-5-betting-options-for.html
http://toolbarqueries.google.co.ve/url?sa=t&url=https://hhttps://sportsbetting010.blogspot.com/2022/07/ac-milan-and-5-betting-options-for.html
http://toolbarqueries.google.co.uk/url?sa=t&url=https://hhttps://sportsbetting010.blogspot.com/2022/07/ac-milan-and-5-betting-options-for.html
http://toolbarqueries.google.co.ug/url?sa=t&url=https://hhttps://sportsbetting010.blogspot.com/2022/07/ac-milan-and-5-betting-options-for.html
http://toolbarqueries.google.co.th/url?sa=t&url=https://hhttps://sportsbetting010.blogspot.com/2022/07/ac-milan-and-5-betting-options-for.html
http://toolbarqueries.google.co.nz/url?sa=t&url=https://hhttps://sportsbetting010.blogspot.com/2022/07/ac-milan-and-5-betting-options-for.html
http://toolbarqueries.google.co.kr/url?sa=t&url=https://hhttps://sportsbetting010.blogspot.com/2022/07/ac-milan-and-5-betting-options-for.html
http://toolbarqueries.google.co.ke/url?sa=t&url=https://hhttps://sportsbetting010.blogspot.com/2022/07/ac-milan-and-5-betting-options-for.html
http://toolbarqueries.google.co.jp/url?sa=t&url=https://hhttps://sportsbetting010.blogspot.com/2022/07/ac-milan-and-5-betting-options-for.html
http://toolbarqueries.google.co.in/url?sa=t&url=https://hhttps://sportsbetting010.blogspot.com/2022/07/ac-milan-and-5-betting-options-for.html
http://toolbarqueries.google.co.il/url?sa=t&url=https://hhttps://sportsbetting010.blogspot.com/2022/07/ac-milan-and-5-betting-options-for.html
http://toolbarqueries.google.co.id/url?sa=t&url=https://hhttps://sportsbetting010.blogspot.com/2022/07/ac-milan-and-5-betting-options-for.html
http://toolbarqueries.google.co.cr/url?sa=t&url=https://hhttps://sportsbetting010.blogspot.com/2022/07/ac-milan-and-5-betting-options-for.html
http://toolbarqueries.google.co.bw/url?sa=t&url=https://hhttps://sportsbetting010.blogspot.com/2022/07/ac-milan-and-5-betting-options-for.html
http://toolbarqueries.google.cl/url?sa=t&url=https://hhttps://sportsbetting010.blogspot.com/2022/07/ac-milan-and-5-betting-options-for.html
http://toolbarqueries.google.ch/url?sa=t&url=https://hhttps://sportsbetting010.blogspot.com/2022/07/ac-milan-and-5-betting-options-for.htmlhttps://www.sachili.com/blogs/blog/spice-up-your-thanksgiving-meal?comment=128434634928#comments
http://toolbarqueries.google.ca/url?sa=t&url=https://hhttps://sportsbetting010.blogspot.com/2022/07/ac-milan-and-5-betting-options-for.html
http://toolbarqueries.google.bg/url?sa=t&url=https://hhttps://sportsbetting010.blogspot.com/2022/07/ac-milan-and-5-betting-options-for.html
http://toolbarqueries.google.at/url?sa=t&url=https://hhttps://sportsbetting010.blogspot.com/2022/07/ac-milan-and-5-betting-options-for.html
http://toolbarqueries.google.ae/url?sa=t&url=https://hhttps://sportsbetting010.blogspot.com/2022/07/ac-milan-and-5-betting-options-for.html
https://im.tonghopdeal.net/pic.php?q=https://www.ce-top10.com/
http://ads.cars.cz/adclick.php?bannerid=333&zoneid=237&source=&dest=https://www.ce-top10.com/
https://spb-medcom.ru/redirect.php?https://www.ce-top10.com/
https://www.info-realty.ru/bitrix/rk.php?goto=https://www.ce-top10.com/
http://www.sermemole.com/public/serbook/redirect.php?url=https://www.ce-top10.com/
https://www.usjournal.com/go.php?campusID=190&url=https://www.ce-top10.com/
https://www.winnipegfreepress.com/s?action=doLogout&rurl=https://www.ce-top10.com/
https://www.kyoto-good.jp/ad.php?url=https://www.ce-top10.com/
https://analytics.bluekai.com/site/16231?phint=event=click&phint=campaign=BRAND-TAB&phint=platform=search&done=https://www.ce-top10.com/
https://temptationsaga.com/buy.php?url=https://www.ce-top10.com/
https://socialmart.ru/redirect.php?url=https://www.ce-top10.com/
https://www.cheerunion.org/tracker/index.html?t=ad&pool_id=2&ad_id=5&url=https://www.ce-top10.com/
http://www.shippingchina.com/pagead.php?id=RW4uU2hpcC5tYWluLjE=&tourl=https://www.ce-top10.com/
https://kakaku-navi.net/items/detail.php?url=https://www.ce-top10.com/
http://www.paladiny.ru/go.php?url=https://www.ce-top10.com/
http://tido.al/vazhdo.php?url=https://www.ce-top10.com/
http://smile.wjp.am/link-free/link3.cgi?mode=cnt&no=8&hpurl=https://www.ce-top10.com/
https://oxleys.app/friends.php?q=https://www.ce-top10.com/
https://splash.hume.vic.gov.au/analytics/outbound?url=https://www.ce-top10.com/
http://my.51edu.cc/link.php?url=https://www.ce-top10.com/
https://www.hradycz.cz/redir.php?b=445&t=https://www.ce-top10.com/
https://heaven.porn/te3/out.php?u=https://www.ce-top10.com/
http://park3.wakwak.com/~yadoryuo/cgi-bin/click3/click3.cgi?cnt=chalet-main&url=https://www.ce-top10.com/
https://www.moneydj.com/ads/adredir.aspx?bannerid=39863&url=https://www.ce-top10.com/
https://uk.kindofbook.com/redirect.php/?red=https://www.ce-top10.com/
http://m.17ll.com/apply/tourl/?url=https://www.ce-top10.com/
https://track.effiliation.com/servlet/effi.redir?id_compteur=13215059&url=https://www.ce-top10.com/
http://ms1.caps.ntct.edu.tw/school/netlink/hits.php?id=107&url=https://www.ce-top10.com/
https://meguro.keizai.biz/banner.php?type=image_banner&position=right&id=13&uri=https://www.ce-top10.com/
https://www.lionscup.dk/?side_unique=4fb6493f-b9cf-11e0-8802-a9051d81306c&s_id=30&s_d_id=64&go=https://www.ce-top10.com/
http://kreepost.com/go/?https://www.ce-top10.com/
https://www.matchesfashion.com/us/affiliate?url=https://www.ce-top10.com/
https://www.cheerunion.org/tracker/index.html?t=ad&pool_id=2&ad_id=5&url=https://www.ce-top10.com/
http://www.shippingchina.com/pagead.php?id=RW4uU2hpcC5tYWluLjE=&tourl=https://www.ce-top10.com/
https://meguro.keizai.biz/banner.php?type=image_banner&position=right&id=13&uri=https://www.ce-top10.com/
https://www.lionscup.dk/?side_unique=4fb6493f-b9cf-11e0-8802-a9051d81306c&s_id=30&s_d_id=64&go=https://www.ce-top10.com/
http://kreepost.com/go/?https://www.ce-top10.com/
https://www.matchesfashion.com/us/affiliate?url=https://www.ce-top10.com/
https://im.tonghopdeal.net/pic.php?q=https://www.ce-top10.com/
http://ads.cars.cz/adclick.php?bannerid=333&zoneid=237&source=&dest=https://www.ce-top10.com/
https://spb-medcom.ru/redirect.php?https://www.ce-top10.com/
https://www.info-realty.ru/bitrix/rk.php?goto=https://www.ce-top10.com/
http://www.sermemole.com/public/serbook/redirect.php?url=https://www.ce-top10.com/
https://www.hradycz.cz/redir.php?b=445&t=https://www.ce-top10.com/
https://heaven.porn/te3/out.php?u=https://www.ce-top10.com/
http://park3.wakwak.com/~yadoryuo/cgi-bin/click3/click3.cgi?cnt=chalet-main&url=https://www.ce-top10.com/
https://www.moneydj.com/ads/adredir.aspx?bannerid=39863&url=https://www.ce-top10.com/
https://uk.kindofbook.com/redirect.php/?red=https://www.ce-top10.com/
https://kakaku-navi.net/items/detail.php?url=https://www.ce-top10.com/
http://www.paladiny.ru/go.php?url=https://www.ce-top10.com/
http://tido.al/vazhdo.php?url=https://www.ce-top10.com/
http://smile.wjp.am/link-free/link3.cgi?mode=cnt&no=8&hpurl=https://www.ce-top10.com/
https://oxleys.app/friends.php?q=https://www.ce-top10.com/
https://splash.hume.vic.gov.au/analytics/outbound?url=https://www.ce-top10.com/
http://my.51edu.cc/link.php?url=https://www.ce-top10.com/
http://m.17ll.com/apply/tourl/?url=https://www.ce-top10.com/
https://track.effiliation.com/servlet/effi.redir?id_compteur=13215059&url=https://www.ce-top10.com/
http://ms1.caps.ntct.edu.tw/school/netlink/hits.php?id=107&url=https://www.ce-top10.com/
https://www.usjournal.com/go.php?campusID=190&url=https://www.ce-top10.com/
https://www.winnipegfreepress.com/s?action=doLogout&rurl=https://www.ce-top10.com/
https://www.kyoto-good.jp/ad.php?url=https://www.ce-top10.com/
https://analytics.bluekai.com/site/16231?phint=event=click&phint=campaign=BRAND-TAB&phint=platform=search&done=https://www.ce-top10.com/
https://temptationsaga.com/buy.php?url=https://www.ce-top10.com/
https://socialmart.ru/redirect.php?url=https://www.ce-top10.com/
https://kakaku-navi.net/items/detail.php?url=https://www.ce-top10.com/
http://www.paladiny.ru/go.php?url=https://www.ce-top10.com/
http://tido.al/vazhdo.php?url=https://www.ce-top10.com/
http://smile.wjp.am/link-free/link3.cgi?mode=cnt&no=8&hpurl=https://www.ce-top10.com/
https://oxleys.app/friends.php?q=https://www.ce-top10.com/
https://splash.hume.vic.gov.au/analytics/outbound?url=https://www.ce-top10.com/
http://my.51edu.cc/link.php?url=https://www.ce-top10.com/
https://www.usjournal.com/go.php?campusID=190&url=https://www.ce-top10.com/
https://www.winnipegfreepress.com/s?action=doLogout&rurl=https://www.ce-top10.com/
https://www.kyoto-good.jp/ad.php?url=https://www.ce-top10.com/
https://analytics.bluekai.com/site/16231?phint=event=click&phint=campaign=BRAND-TAB&phint=platform=search&done=https://www.ce-top10.com/
https://temptationsaga.com/buy.php?url=https://www.ce-top10.com/
https://socialmart.ru/redirect.php?url=https://www.ce-top10.com/
https://www.cheerunion.org/tracker/index.html?t=ad&pool_id=2&ad_id=5&url=https://www.ce-top10.com/
http://www.shippingchina.com/pagead.php?id=RW4uU2hpcC5tYWluLjE=&tourl=https://www.ce-top10.com/
https://meguro.keizai.biz/banner.php?type=image_banner&position=right&id=13&uri=https://www.ce-top10.com/
https://www.lionscup.dk/?side_unique=4fb6493f-b9cf-11e0-8802-a9051d81306c&s_id=30&s_d_id=64&go=https://www.ce-top10.com/
http://kreepost.com/go/?https://www.ce-top10.com/
https://www.matchesfashion.com/us/affiliate?url=https://www.ce-top10.com/
https://im.tonghopdeal.net/pic.php?q=https://www.ce-top10.com/
http://ads.cars.cz/adclick.php?bannerid=333&zoneid=237&source=&dest=https://www.ce-top10.com/
https://spb-medcom.ru/redirect.php?https://www.ce-top10.com/
https://www.info-realty.ru/bitrix/rk.php?goto=https://www.ce-top10.com/
http://www.sermemole.com/public/serbook/redirect.php?url=https://www.ce-top10.com/
https://www.hradycz.cz/redir.php?b=445&t=https://www.ce-top10.com/
https://heaven.porn/te3/out.php?u=https://www.ce-top10.com/
http://park3.wakwak.com/~yadoryuo/cgi-bin/click3/click3.cgi?cnt=chalet-main&url=https://www.ce-top10.com/
https://www.moneydj.com/ads/adredir.aspx?bannerid=39863&url=https://www.ce-top10.com/
https://uk.kindofbook.com/redirect.php/?red=https://www.ce-top10.com/
http://m.17ll.com/apply/tourl/?url=https://www.ce-top10.com/
https://track.effiliation.com/servlet/effi.redir?id_compteur=13215059&url=https://www.ce-top10.com/
http://ms1.caps.ntct.edu.tw/school/netlink/hits.php?id=107&url=https://www.ce-top10.com/
https://www.usjournal.com/go.php?campusID=190&url=https://www.ce-top10.com/
https://www.winnipegfreepress.com/s?action=doLogout&rurl=https://www.ce-top10.com/
https://www.kyoto-good.jp/ad.php?url=https://www.ce-top10.com/
https://analytics.bluekai.com/site/16231?phint=event=click&phint=campaign=BRAND-TAB&phint=platform=search&done=https://www.ce-top10.com/
https://temptationsaga.com/buy.php?url=https://www.ce-top10.com/
https://socialmart.ru/redirect.php?url=https://www.ce-top10.com/
https://www.cheerunion.org/tracker/index.html?t=ad&pool_id=2&ad_id=5&url=https://www.ce-top10.com/
http://www.shippingchina.com/pagead.php?id=RW4uU2hpcC5tYWluLjE=&tourl=https://www.ce-top10.com/
https://meguro.keizai.biz/banner.php?type=image_banner&position=right&id=13&uri=https://www.ce-top10.com/
https://www.lionscup.dk/?side_unique=4fb6493f-b9cf-11e0-8802-a9051d81306c&s_id=30&s_d_id=64&go=https://www.ce-top10.com/
http://kreepost.com/go/?https://www.ce-top10.com/
https://www.matchesfashion.com/us/affiliate?url=https://www.ce-top10.com/
https://im.tonghopdeal.net/pic.php?q=https://www.ce-top10.com/
http://ads.cars.cz/adclick.php?bannerid=333&zoneid=237&source=&dest=https://www.ce-top10.com/
https://spb-medcom.ru/redirect.php?https://www.ce-top10.com/
https://www.info-realty.ru/bitrix/rk.php?goto=https://www.ce-top10.com/
http://www.sermemole.com/public/serbook/redirect.php?url=https://www.ce-top10.com/
https://www.hradycz.cz/redir.php?b=445&t=https://www.ce-top10.com/
https://heaven.porn/te3/out.php?u=https://www.ce-top10.com/
http://park3.wakwak.com/~yadoryuo/cgi-bin/click3/click3.cgi?cnt=chalet-main&url=https://www.ce-top10.com/
https://www.moneydj.com/ads/adredir.aspx?bannerid=39863&url=https://www.ce-top10.com/
https://uk.kindofbook.com/redirect.php/?red=https://www.ce-top10.com/
https://kakaku-navi.net/items/detail.php?url=https://www.ce-top10.com/
http://www.paladiny.ru/go.php?url=https://www.ce-top10.com/
http://tido.al/vazhdo.php?url=https://www.ce-top10.com/
http://smile.wjp.am/link-free/link3.cgi?mode=cnt&no=8&hpurl=https://www.ce-top10.com/
https://oxleys.app/friends.php?q=https://www.ce-top10.com/
https://splash.hume.vic.gov.au/analytics/outbound?url=https://www.ce-top10.com/
http://my.51edu.cc/link.php?url=https://www.ce-top10.com/
http://m.17ll.com/apply/tourl/?url=https://www.ce-top10.com/
https://track.effiliation.com/servlet/effi.redir?id_compteur=13215059&url=https://www.ce-top10.com/
http://ms1.caps.ntct.edu.tw/school/netlink/hits.php?id=107&url=https://www.ce-top10.com/
https://www.usjournal.com/go.php?campusID=190&url=https://www.ce-top10.com/
https://www.winnipegfreepress.com/s?action=doLogout&rurl=https://www.ce-top10.com/
https://www.kyoto-good.jp/ad.php?url=https://www.ce-top10.com/
https://analytics.bluekai.com/site/16231?phint=event=click&phint=campaign=BRAND-TAB&phint=platform=search&done=https://www.ce-top10.com/
https://temptationsaga.com/buy.php?url=https://www.ce-top10.com/
https://socialmart.ru/redirect.php?url=https://www.ce-top10.com/
http://rostovklad.ru/go.php?https://www.ce-top10.com/
https://rostovmama.ru/redirect?url=https://www.ce-top10.com/
https://www.rprofi.ru/bitrix/rk.php?goto=https://www.ce-top10.com/
https://adengine.old.rt.ru/go.jsp?to=https://www.ce-top10.com/
http://www.rucem.ru/doska/redirect/?go=https://www.ce-top10.com/
http://www.runiwar.ru/go?https://www.ce-top10.com/
https://rusq.ru/go.php?https://www.ce-top10.com/
http://2010.russianinternetweek.ru/bitrix/rk.php?goto=https://www.ce-top10.com/
https://www.russianrobotics.ru/bitrix/rk.php?goto=https://www.ce-top10.com/
http://rybackij-prival.ru/go?https://www.ce-top10.com/
http://www.ryterna.ru/bitrix/redirect.php?goto=https://www.ce-top10.com/
http://rzngmu.ru/go?https://www.ce-top10.com/
https://s-online.ru/bitrix/redirect.php?goto=https://www.ce-top10.com/
http://samaraenergo.ru/bitrix/rk.php?goto=https://www.ce-top10.com/
https://www.samovar-forum.ru/go?https://www.ce-top10.com/
http://san-house.ru/bitrix/rk.php?goto=https://www.ce-top10.com/
https://sbereg.ru/links.php?go=https://www.ce-top10.com/
https://sellsee.ru/pp.php?i=https://www.ce-top10.com/
http://www.semtex.ru/go.php?a=https://www.ce-top10.com/
http://sennheiserstore.ru/bitrix/rk.php?goto=https://www.ce-top10.com/
https://seoandme.ru/bitrix/redirect.php?goto=https://www.ce-top10.com/
http://visits.seogaa.ru/redirect/?g=https://www.ce-top10.com/
https://www.serie-a.ru/bitrix/redirect.php?goto=https://www.ce-top10.com/
https://www.sgvavia.ru/go?https://www.ce-top10.com/
http://shckp.ru/ext_link?url=https://www.ce-top10.com/
https://sherif-karter.ru/bitrix/redirect.php?goto=https://www.ce-top10.com/
https://shinglas.ru/bitrix/redirect.php?goto=https://www.ce-top10.com/
https://shtilniisad.ru/bitrix/redirect.php?goto=https://www.ce-top10.com/
https://www.shtrih-m.ru/bitrix/redirect.php?goto=https://www.ce-top10.com/
https://sibran.ru/bitrix/redirect.php?goto=https://www.ce-top10.com/
https://www.sibsiu.ru/bitrix/rk.php?goto=https://www.ce-top10.com/
http://simvol-veri.ru/xp/?goto=https://www.ce-top10.com/
https://www.sinetic.ru/bitrix/redirect.php?goto=https://www.ce-top10.com/
http://sintez-oka.ru/bitrix/redirect.php?goto=https://www.ce-top10.com/
https://skamata.ru/bitrix/redirect.php?goto=https://www.ce-top10.com/
https://www.skamata.ru/bitrix/redirect.php?event1=cafesreda&event2=&event3=&goto=https://www.ce-top10.com/
https://skibaza.ru/bitrix/rk.php?goto=https://www.ce-top10.com/
http://www.skladcom.ru/(S(qdiwhk55jkcyok45u4ti0a55))/banners.aspx?url=https://www.ce-top10.com/
http://mias.skoda-avto.ru/bitrix/redirect.php?event1=news_out&event2=&goto=https://www.ce-top10.com/
https://smartservices.ru/bitrix/rk.php?goto=https://www.ce-top10.com/
http://smartsourcing.ru/link?https://www.ce-top10.com/
https://smolkassa.ru/?b=1&r=https://www.ce-top10.com/
http://portalnp.snauka.ru/bitrix/redirect.php?goto=https://www.ce-top10.com/
https://socport.ru/redirect?url=https://www.ce-top10.com/
http://www.sofion.ru/banner.php?r1=41&r2=2234&goto=https://www.ce-top10.com/
http://solo-center.ru/links.php?go=https://www.ce-top10.com/
https://sovaisova.ru/bitrix/redirect.php?event1=2009_mainpage&event2=go_www&event3=&goto=https://www.ce-top10.com/
https://www.spacioclub.ru/forum_script/url/?go=https://www.ce-top10.com/
https://spartak.ru/bitrix/redirect.php?goto=https://www.ce-top10.com/
http://school364.spb.ru/bitrix/rk.php?goto=https://www.ce-top10.com/
https://spb90.ru/bitrix/redirect.php?goto=https://www.ce-top10.com/
http://spbstroy.ru/bitrix/redirect.php?goto=https://www.ce-top10.com/
http://speakrus.ru/links.php?go=https://www.ce-top10.com/
http://staldver.ru/go.php?go=https://www.ce-top10.com/
http://www.stalker-modi.ru/go?https://www.ce-top10.com/
https://www.star174.ru/redir.php?url=https://www.ce-top10.com/
https://staten.ru/bitrix/rk.php?goto=https://www.ce-top10.com/
https://stav-geo.ru/go?https://www.ce-top10.com/
http://stopcran.ru/go?https://www.ce-top10.com/
https://store-pro.ru/go?https://www.ce-top10.com/
https://strelmag.ru/bitrix/rk.php?goto=https://www.ce-top10.com/
https://stroim100.ru/redirect?url=https://www.ce-top10.com/
https://stroymet-shop.ru/bitrix/rk.php?goto=https://www.ce-top10.com/
https://stroysar.ru/links.php?go=https://www.ce-top10.com/
http://stroysoyuz.ru/bitrix/rk.php?goto=https://www.ce-top10.com/
http://studioad.ru/go?https://www.ce-top10.com/
http://supcourt.ru/bitrix/redirect.php?goto=https://www.ce-top10.com/
http://www.survivalbook.ru/forum/go.php?https://www.ce-top10.com/
https://sutd.ru/links.php?go=https://www.ce-top10.com/
http://www.sv-mama.ru/shared/go.php?url=https://www.ce-top10.com/
http://www.eventnn.ru/catalog/actions/?a=redirect&link=https://www.ce-top10.com/
http://www.evrika41.ru/redirect?url=https://www.ce-top10.com/
http://expomodel.ru/bitrix/redirect.php?goto=https://www.ce-top10.com/
https://www.extrimdrive.ru/bitrix/rk.php?goto=https://www.ce-top10.com/
https://facto.ru/bitrix/rk.php?goto=https://www.ce-top10.com/
http://fallout3.ru/utils/ref.php?url=https://www.ce-top10.com/
http://fbsearch.ru/away.php?url=https://www.ce-top10.com/
https://fc-zenit.ru/bitrix/redirect.php?goto=https://www.ce-top10.com/
https://www.finanalis.ru/out.php?linkout=https://www.ce-top10.com/
https://flyd.ru/away.php?to=https://www.ce-top10.com/
http://forum-region.ru/forum/away.php?s=https://www.ce-top10.com/
http://forumdate.ru/redirect-to/?redirect=https://www.ce-top10.com/
https://fr-gtr.ru/go?https://www.ce-top10.com/
https://freediving.ru/bitrix/redirect.php?goto=https://www.ce-top10.com/
http://www.furnitura4bizhu.ru/links/links1251.php?id=https://www.ce-top10.com/
http://new.futuris-print.ru/bitrix/redirect.php?event1=&event2=&event3=&goto=https://www.ce-top10.com/
https://gasdefence.ru/goto.php?url=https://www.ce-top10.com/
http://gazteplostroy.ru/bitrix/redirect.php?event1=&event2=&event3=&goto=https://www.ce-top10.com/
http://gbi-12.ru/links.php?go=https://www.ce-top10.com/
https://www.gblnet.ru/blocked.php?url=https://www.ce-top10.com/
https://gcup.ru/go?https://www.ce-top10.com/
http://www.gearguide.ru/phpbb/go.php?https://www.ce-top10.com/
https://gektor-nsk.ru/bitrix/redirect.php?goto=https://www.ce-top10.com/
https://getfaster.ru/bitrix/rk.php?goto=https://www.ce-top10.com/
http://gfaq.ru/go?https://www.ce-top10.com/
http://ggeek.ru/bitrix/redirect.php?goto=https://www.ce-top10.com/
http://azt.ggeek.ru/azt-zbt.php?p=ggeek&backurl=https://www.ce-top10.com/
http://www.gigatran.ru/go?url=https://www.ce-top10.com/
https://gituha.ru/root/redirect.php?https://www.ce-top10.com/
https://glavkniga.ru/away.php?to=https://www.ce-top10.com/
https://glazev.ru/redirect?url=https://www.ce-top10.com/
https://globalmedia51.ru/bitrix/redirect.php?goto=https://www.ce-top10.com/
http://www.go2golf.ru/link/redirect?link=https://www.ce-top10.com/
https://godsvoice.ru/redirect?url=https://www.ce-top10.com/
https://golden-resort.ru/out.php?out=https://www.ce-top10.com/
https://goldfish.ru/bitrix/rk.php?goto=https://www.ce-top10.com/
https://www.russianrobotics.ru/bitrix/rk.php?goto=https://www.ce-top10.com/
http://rybackij-prival.ru/go?https://www.ce-top10.com/
http://www.ryterna.ru/bitrix/redirect.php?goto=https://www.ce-top10.com/
http://rzngmu.ru/go?https://www.ce-top10.com/
https://s-online.ru/bitrix/redirect.php?goto=https://www.ce-top10.com/
https://salapin.ru/redirect.php?num_lnk=33036&nm_url=https://www.ce-top10.com/
http://samaraenergo.ru/bitrix/rk.php?goto=https://www.ce-top10.com/
https://www.samovar-forum.ru/go?https://www.ce-top10.com/
http://san-house.ru/bitrix/rk.php?goto=https://www.ce-top10.com/
https://sbereg.ru/links.php?go=https://www.ce-top10.com/
http://sbtg.ru/ap/redirect.aspx?l=https://www.ce-top10.com/
https://sellsee.ru/pp.php?i=https://www.ce-top10.com/
http://www.semtex.ru/go.php?a=https://www.ce-top10.com/
http://sennheiserstore.ru/bitrix/rk.php?goto=https://www.ce-top10.com/
https://seoandme.ru/bitrix/redirect.php?goto=https://www.ce-top10.com/
http://visits.seogaa.ru/redirect/?g=https://www.ce-top10.com/
https://www.serie-a.ru/bitrix/redirect.php?goto=https://www.ce-top10.com/
http://sevensport.ru/go.php?to=https://www.ce-top10.com/
https://www.sgvavia.ru/go?https://www.ce-top10.com/
http://shckp.ru/ext_link?url=https://www.ce-top10.com/
https://sherif-karter.ru/bitrix/redirect.php?goto=https://www.ce-top10.com/
https://shinglas.ru/bitrix/redirect.php?goto=https://www.ce-top10.com/
https://shtilniisad.ru/bitrix/redirect.php?goto=https://www.ce-top10.com/
https://www.shtrih-m.ru/bitrix/redirect.php?goto=https://www.ce-top10.com/
https://www.sibpsa.ru/bitrix/redirect.php?goto=https://www.ce-top10.com/
https://sibran.ru/bitrix/redirect.php?goto=https://www.ce-top10.com/
https://www.sibsiu.ru/bitrix/rk.php?goto=https://www.ce-top10.com/
http://simvol-veri.ru/xp/?goto=https://www.ce-top10.com/
https://www.sinetic.ru/bitrix/redirect.php?goto=https://www.ce-top10.com/
http://sintez-oka.ru/bitrix/redirect.php?goto=https://www.ce-top10.com/
https://lk.sistemagorod.ru/lk/away?to=https://www.ce-top10.com/
https://lk.sistemagorod.ru/lk/away?to=https://www.ce-top10.com/
https://skamata.ru/bitrix/redirect.php?goto=https://www.ce-top10.com/
https://www.skamata.ru/bitrix/redirect.php?event1=cafesreda&event2=&event3=&goto=https://www.ce-top10.com/
https://skibaza.ru/bitrix/rk.php?goto=https://www.ce-top10.com/
http://www.skladcom.ru/(S(qdiwhk55jkcyok45u4ti0a55))/banners.aspx?url=https://www.ce-top10.com/
http://mias.skoda-avto.ru/bitrix/redirect.php?event1=news_out&event2=&goto=https://www.ce-top10.com/
http://slotex.ru/bitrix/redirect.php?goto=https://www.ce-top10.com/
https://smartservices.ru/bitrix/rk.php?goto=https://www.ce-top10.com/
http://smartsourcing.ru/link?https://www.ce-top10.com/
https://smolkassa.ru/?b=1&r=https://www.ce-top10.com/
http://portalnp.snauka.ru/bitrix/redirect.php?goto=https://www.ce-top10.com/
https://www.sobyanin.ru/metrics/r/?muid=b10710a6-9c4e-469f-8dce-4a37ef6b646b&category=4bd2ab6d-286b-4cec-84c4-89728dedb630&url=https://www.ce-top10.com/
https://socport.ru/redirect?url=https://www.ce-top10.com/
http://www.sofion.ru/banner.php?r1=41&r2=2234&goto=https://www.ce-top10.com/
http://solo-center.ru/links.php?go=https://www.ce-top10.com/
https://sovaisova.ru/bitrix/redirect.php?event1=2009_mainpage&event2=go_www&event3=&goto=https://www.ce-top10.com/
https://www.spacioclub.ru/forum_script/url/?go=https://www.ce-top10.com/
https://spartak.ru/bitrix/redirect.php?goto=https://www.ce-top10.com/
http://school364.spb.ru/bitrix/rk.php?goto=https://www.ce-top10.com/
https://spb90.ru/bitrix/redirect.php?goto=https://www.ce-top10.com/
http://spbstroy.ru/bitrix/redirect.php?goto=https://www.ce-top10.com/
http://speakrus.ru/links.php?go=https://www.ce-top10.com/
http://staldver.ru/go.php?go=https://www.ce-top10.com/
http://www.stalker-modi.ru/go?https://www.ce-top10.com/
https://www.star174.ru/redir.php?url=https://www.ce-top10.com/
https://staten.ru/bitrix/rk.php?goto=https://www.ce-top10.com/
https://stav-geo.ru/go?https://www.ce-top10.com/
http://stopcran.ru/go?https://www.ce-top10.com/
https://store-pro.ru/go?https://www.ce-top10.com/
https://strelmag.ru/bitrix/rk.php?goto=https://www.ce-top10.com/
https://stroim100.ru/redirect?url=https://www.ce-top10.com/
https://stroymet-shop.ru/bitrix/rk.php?goto=https://www.ce-top10.com/
https://stroysar.ru/links.php?go=https://www.ce-top10.com/
http://stroysoyuz.ru/bitrix/rk.php?goto=https://www.ce-top10.com/
http://studioad.ru/go?https://www.ce-top10.com/
http://supcourt.ru/bitrix/redirect.php?goto=https://www.ce-top10.com/
http://www.survivalbook.ru/forum/go.php?https://www.ce-top10.com/
https://sutd.ru/links.php?go=https://www.ce-top10.com/
http://www.sv-mama.ru/shared/go.php?url=https://www.ce-top10.com/
http://www.svadba66.ru/openx/www/delivery/ck.php?ct=1&oaparams=2bannerid=258zoneid=92cb=0c393e46d5oadest=https://www.ce-top10.com/
http://svob-gazeta.ru/redirect?url=https://www.ce-top10.com/
http://sway-dance.ru/go?https://www.ce-top10.com/
https://emaratyah.ae/new-redirect.php?w=https://www.ce-top10.com/
http://mbrf.ae/knowledgeaward/language/ar/?redirecturl=https://www.ce-top10.com/
http://rafco.ae/container.asp?url=https://www.ce-top10.com/
http://for-css.ucoz.ae/go?https://www.ce-top10.com/
https://clients1.google.com.af/url?q=https://www.ce-top10.com/
https://cse.google.com.af/url?q=https://www.ce-top10.com/
https://images.google.com.af/url?q=https://www.ce-top10.com/
http://toolbarqueries.google.com.af/url?sa=t&url=https://www.ce-top10.com/
https://www.google.com.af/url?q=https://www.ce-top10.com/
https://www.snek.ai/redirect?url=https://www.ce-top10.com/
http://www.torrent.ai/lt/redirect.php?url=https://www.ce-top10.com/
http://avto.al/az/home/redirect?carId=1639612&url=https://www.ce-top10.com/
https://clients1.google.al/url?q=https://www.ce-top10.com/
https://cse.google.al/url?q=https://www.ce-top10.com/
https://images.google.al/url?q=https://www.ce-top10.com/
https://images.google.al/url?q=https://www.ce-top10.com/
http://toolbarqueries.google.al/url?q=https://www.ce-top10.com/
https://www.google.al/url?q=https://www.ce-top10.com/
http://tido.al/vazhdo.php?url=https://www.ce-top10.com/
http://smile.wjp.am/link-free/link3.cgi?mode=cnt&no=8&hpurl=https://www.ce-top10.com/
https://oxleys.app/friends.php?q=https://www.ce-top10.com/
http://www.ain.com.ar/openpop.php?url=https://www.ce-top10.com/
http://www.ain.com.ar/openpop.php?url=https://www.ce-top10.com/
jbDWRkmT
ZntYasBhlJHxFjS